
Check the version description below (bottom right) for more info and add a ❤️ to receive future updates.
Do you like what I do? Consider leaving me a tip
Hi, I'm shikasensei, also known as u/Boring_Ad_914 on Reddit. With the hype around Magnific AI, I found myself drawn to achieving similar results. Initially, I was inspired by LDWorks' work; however, due to the limitations of their initial workflow, I decided to create my own, thus Ultra Upscale was born.
Currently, my focus has shifted more to tools like Clarity Upscaler and ultimately Magnific AI. However, moving the Automatic1111 workflow to ComfyUI has not been successful because the Tiled Diffusion nodes work differently. If anyone finds a way to achieve this, please let me know and I'll be happy to update the workflow.
In relation to the previous point, I recommend using Clarity Upscaler combined with tools like Upscayl, as this achieves much better results. However, I have updated the workflow because many people use it, and because I myself use ComfyUI in my day-to-day work and find it tedious to launch Automatic1111 just to upscale an image.
Please consider the following:
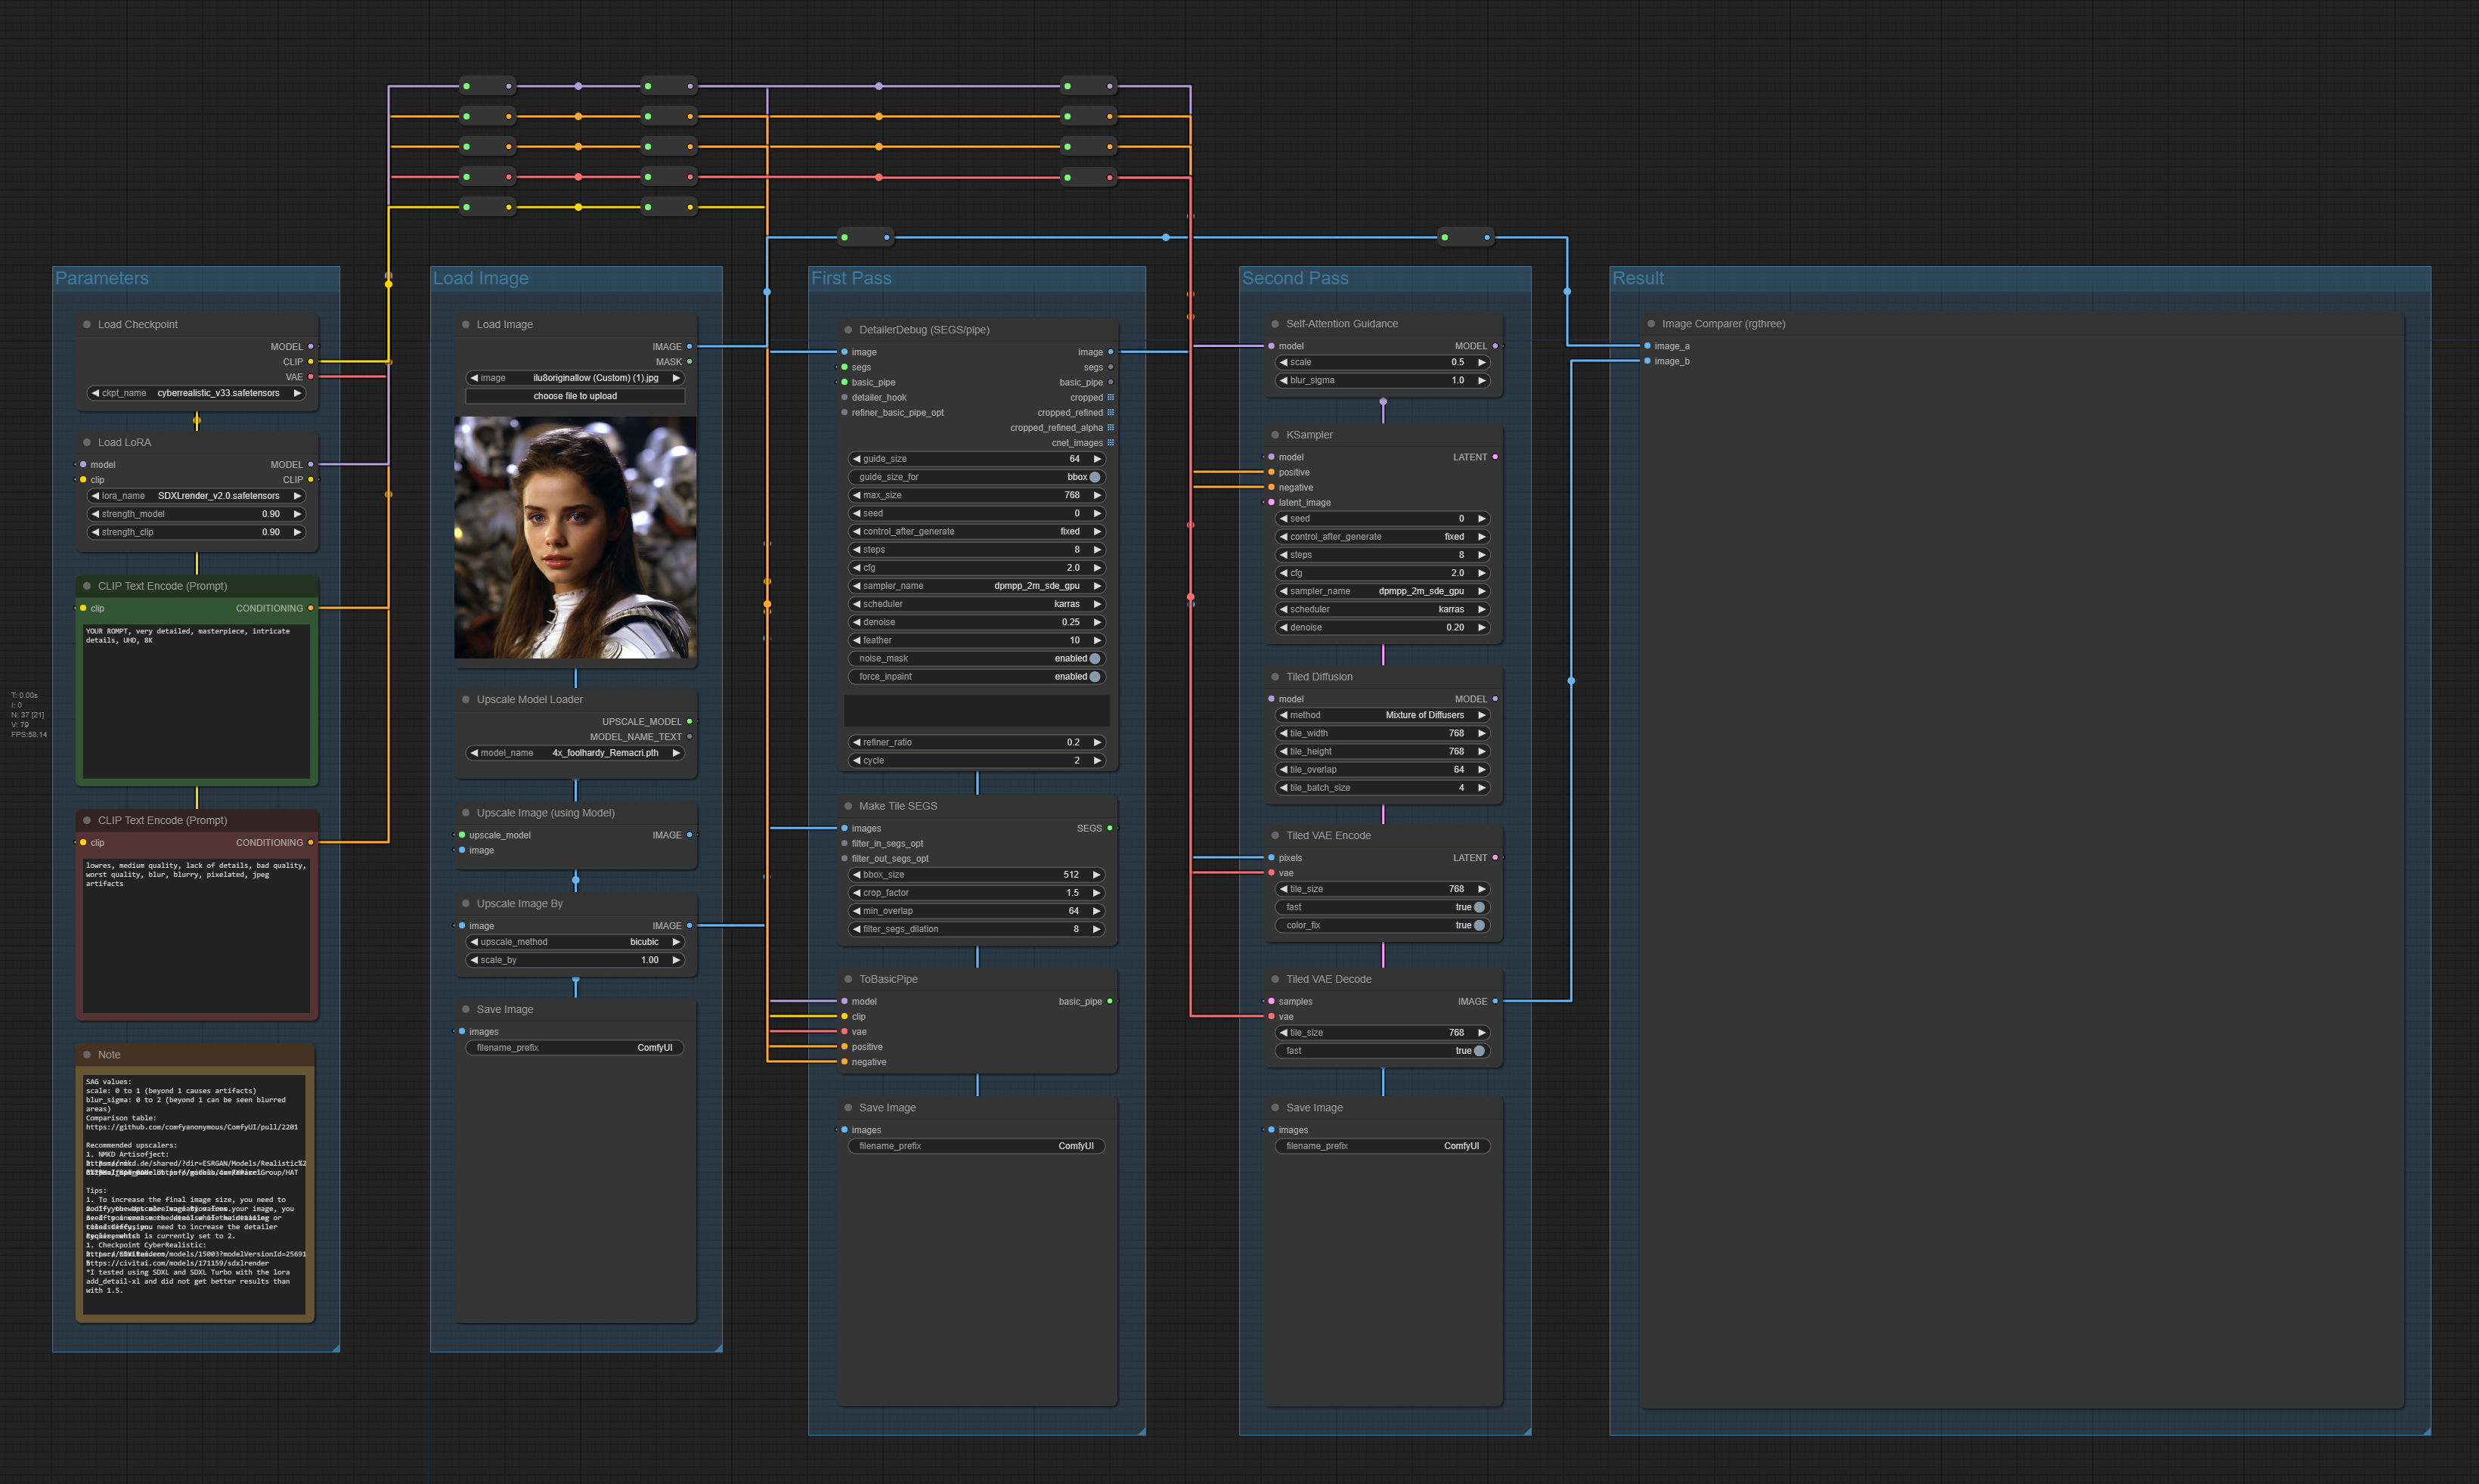
The workflow currently scales an image from 768x768 to 6144x6144. This doesn't mean it's limited to square images; rather, the workflow increases your image size by 8 times. Therefore, for larger images, it will take longer. One option would be to resize the image to 768 or 1024.
Before commenting on any issues with the workflow, ensure all necessary nodes are installed, update ComfyUI, and all nodes.
IMPORTANT: To install the missing nodes, you will have to install ComfyUI Manager. Once installed, you will have to click on "Install missing nodes" and install each node that appears.
Additional resources:
I hope you find this workflow helpful. Please let me know if you have any questions or suggestions.
Links to examples:
Description
Tile seams have been corrected, now they are less visible thanks to the replacement of Ultimate SD Upscale with Tiled Diffusion.
This version corresponds to a 4x increase in size compared to the original image.
FAQ
Comments (30)
v2 is many times better than v2.1.
why?
@fablegenius I don't know. I compared both default settings.
Try the new version, there are no more problems with tile seams, and I reimplemented Ultimate SD Upscale since it is more efficient.
@Most7029 awesome will try it. i plan to make tutorial hopefully for this
So, I've seen two comments, now, from people saying the v2.0 was better than v2.1. I was following your post on Reddit where another poster suggested using Tile Diffusion instead of Ultra SD Upscaler. Which do YOU think is better?
Let me explain something and I hope this clears up any confusion for others. Detailer works through segments (SEGS), which in a normal use of Detailer, you would mask out areas and basically do inpaint.
Through the Make Tile to SEGS node, what is done is to divide the image into tiles, but it does not apply a dedicated method for this, it only divides the image into tiles and processes them.
Now, both the Ultimate SD Upscale and Tiled Diffusion nodes are used to reprocess the image in the hopes of removing any potential tile seams.
So I think they are saying that v2 is better than v2.1, because Ultimate SD Upscale adds more contrast to the image and because it seems to be more efficient in terms of performance than Tiled Diffusion, however, it has the downside that the seams are more visible. Therefore, if you do not need an image larger than 4K, I would recommend using v2.1, otherwise use v2.
I hope this resolves your doubts.
@Most7029 Wait, did you write that last line correctly?
"Therefore, if you do not need an image larger than 4K, I would recommend using v2.1, otherwise use v2."
If v2.1 does a better job of hiding seams, wouldn't we want to use THAT for images larger than 4k?
@97Buckeye It does better at lower resolutions, try setting the "Upscale Image By" value to 2 and you'll see what I mean, it will output a 6k image in which each of the tiles is noticeable. If you can get it to work, leave your configuration parameters in the comments and I'll try it!
In the first pass group you have a node hidden behind the detailer debug segs pipe, it keeps giving me errors of not found. I can't see it in the image and can't figure it out to replace it. Any info on that one?
Certainly it was hidden, it has been corrected, however, you should not replace it, it is the node Make Tile to SEGS, which is in charge of dividing the image into tiles.
I decide to look at an automatic1111 workflow for something similar, and I think I got better results with it + LDSR + ControlNet Tile + MultiDiffusion + Tiled VAE.
The auto1111 workflow messed up the colors so I had to fix it saturation in Affinity, but overall I like the results better than the ComfyUI results
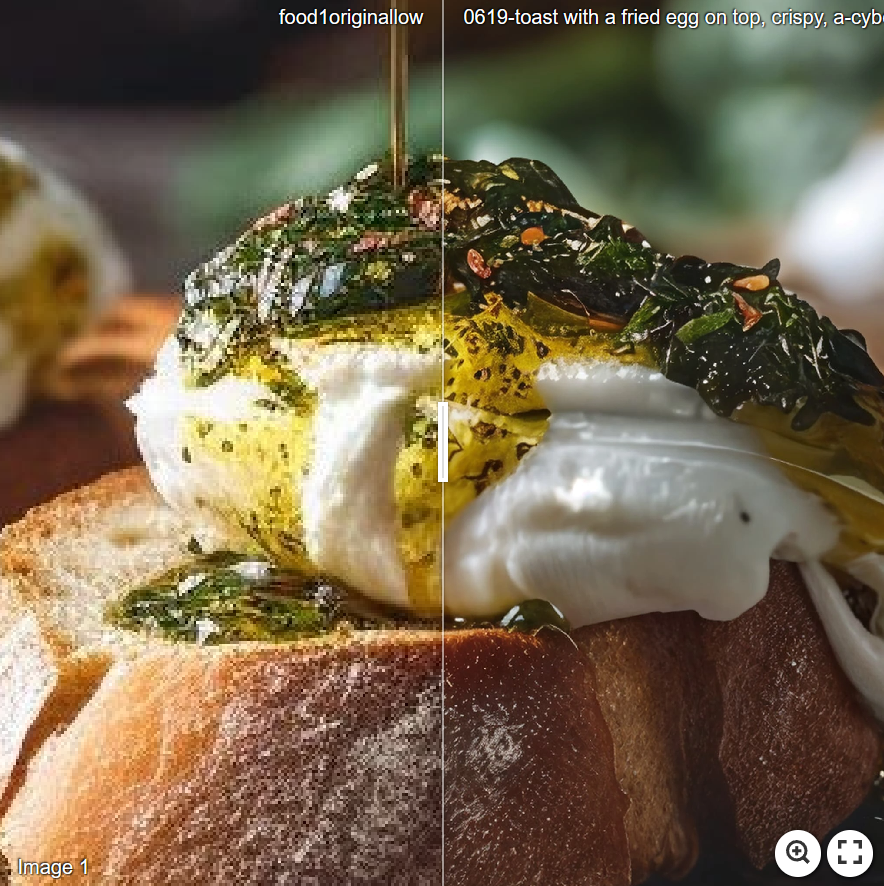
I've tested that workflow, not in automatic but in ComfyUI and LDSR is too slow. Here's the same image you used with my workflow, it was executed in 232.29 seconds. Image 2 - Imgsli
The automatic version definitely looks more natural.
Do you have some more details? sound interesting. I was using UltimateSDUpscale + Controlnet tile + 0.25-0.35 Denoise strength with mixed results. Tested your method and it really gave me some magnific.ai like results! Especially Multi Diffusion.
@arcgx71140 I think the auto11 results are more pleasing, but I have a strong "vision" of what I want the final to be, because it was from a photo, not a generated image. I tried posting https://civitai.com/images/5424250 so that the parameters were visible, but in case they're not:
a highland cow with long fur, licking its nose, the fur is frizzy from the rain, fine strands of hair, fine hair
Steps: 30, Sampler: DPM++ 2M Karras, CFG scale: 2, Seed: 1910381572, Face restoration: CodeFormer, Size: 2600x1704, Model hash: 41b6846108, Model: cyberrealistic_v41BackToBasics, Denoising strength: 0.2, Clip skip: 2, RNG: NV, Tiled Diffusion upscaler: LDSR, Tiled Diffusion scale factor: 4, Tiled Diffusion: {"Method": "Mixture of Diffusers", "Tile tile width": 112, "Tile tile height": 96, "Tile Overlap": 48, "Tile batch size": 2, "Upscaler": "LDSR", "Upscale factor": 4, "Keep input size": true}, ControlNet 0: "Module: tile_resample, Model: control_v11f1e_sd15_tile [a371b31b], Weight: 1, Resize Mode: Crop and Resize, Low Vram: False, Threshold A: 1, Guidance Start: 0, Guidance End: 1, Pixel Perfect: False, Control Mode: Balanced, Save Detected Map: True", Version: v1.7.0
I get a crash at the part below, any thoughts on how I can resolve it? Using 4x 2.1 version.
I have a 4090 and 32gb ram.
[Tiled VAE]: input_size: torch.Size([1, 3, 13568, 20480]), tile_size: 768, padding: 32 [Tiled VAE]: split to 18x27 = 486 tiles. Optimal tile size 768x768, original tile size 768x768 [Tiled VAE]: Fast mode enabled, estimating group norm parameters on 768 x 508 image [Tiled VAE]: Executing Encoder Task Queue: 18%|██████ | 7827/44226 [03:10<18:57, 32.01it/s]
I suggest you try the new version, although adjusting the values to use SDXL and LoRA Detail Tweaker XL. Most likely using 1.5, given the amount of tiles to generate, the seams will be visible.
@Most7029 Ok thank you for the update!
where to get the "Make tile SEGS" node 🥲
oh just had to update the impact-pack nodes!
Great workflow, thanks a lot for sharing!
Some questions came up on playing with the v2.1:
1) When does the second pass come in? The output latent of the ksampler is not connected to anything...?
2) How can I change the number of tiles beeing generated? I experimented with the numbers in the "Make tile SEGS" node but there still seem to be a very big overlap between the tiles and therefor I think there are too many generations...
One sidenote: I changed to a turbo model (RealGoodFastPass https://civitai.com/models/216980?modelVersionId=244536) and reduced the steps to 4 which works great!
The weird "1x Bicubic self-upscale" node in this does literally nothing at best and degrades image quality at worst, I struggle to imagine what the intended purpose of this was lol
when you only want to to upscale 2x you can set this to 0.5, or when you want to upscale 3x you set this to 0.75
When loading the graph, the following node types were not found:
TiledDiffusion
VAEEncodeTiled_TiledDiffusion
VAEDecodeTiled_TiledDiffusion
Nodes that have failed to load will show as red on the graph.
how do I fix this? Update missing node doesn't seem to work
@hoodady Update Comfy as well not just the custom nodes
super improved workflow for enhanced images and nice choice of nodes for same. had fun exploring it
I'm glad you liked it, I released a new version, again you can upscale up to 12k and there are no more problems with tile seams.
This workflow for some reason causes my Linux system with a RX 6800 via ROCm to consistently and reproducibility reset completely and output a MCE error that usually reads something like this
[ 0.707393] mce: [Hardware Error]: Machine check events logged [ 0.707395] mce: [Hardware Error]: CPU 10: Machine Check: 0 Bank 5: bea0000000000108 [ 0.707464] mce: [Hardware Error]: TSC 0 ADDR 1ffffbb03343c MISC d012000100000000 SYND 4d000000 IPID 500b000000000 [ 0.707540] mce: [Hardware Error]: PROCESSOR 2:870f10 TIME 1583508288 SOCKET 0 APIC 5 microcode 8701013
I have had this a few times but never been able to get it consistently like with this workflow oddly, does anyone else have this issue with similar setup? I don't think it's hardware related in reality despite what it says, it only happens with AI things. My hardware is otherwise perfectly fine with no major artifacts etc.