Please do not use for harming anyone, also to create deep fakes from famous people without their consent. Not intended for making profit. I don’t take responsibility of your actions for using this guide.
------------------------------------------------------------------------------------------
This guide only follows educational purposes.
If you enjoy the work I do and would like to show your support, you can donate a tip by purchasing a coffee or tea. Your contribution is greatly appreciated and helps to keep my work going. Thank you for your generosity!
https://ko-fi.com/gswan
https://www.buymeacoffee.com/gswan
------------------------------------------------------------------------------------------
This guide aims to provide general information.
DISCLAIMER: Please be aware that the following guide is still advanced and technical. It might not cover all possible cases or errors, which can lead to frustration and wasted time. It's vital to proceed with caution and have a good understanding of the subject matter before attempting the guide.
0. Introduction
This guide will provide steps to install AUTOMATIC1111's Webui several ways.
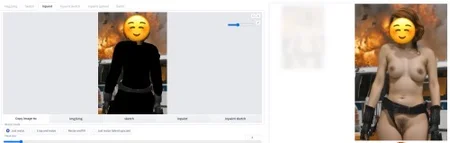
After the guide, you should be able to go from the left image, to the right,

Recommended Requirements:
Windows 10/11, 32 GB of RAM and a Nvidia graphics card with at least 4-6 GB VRAM (not tested by me, but reported to work), but the more the better.
Windows 11 (64 bit): Home or Pro version 21H2 or higher.
Windows 10 (64-bit): Home or Pro 21H1 (build 19043) or higher.
For AMD GPU cards check out https://github.com/AUTOMATIC1111/stable-diffusion-webui/wiki/Install-and-Run-on-AMD-GPUs
Non-GPU (not tested, proceed at own risk auseChamp: )
It does work without a Nvidia graphics card (GPU), but when using just the CPU it will take 10 to 25 minutes PER IMAGE, whereas with a GPU it will take 10 - 30 seconds per image. (images with a resolution of < 1024px, for larger pictures, it takes longer)
I've chosen to use docker, since this will make it far easier to install the webui and minimal fiddling in the command prompt.
1. Installation
Spoiler: (Windows) Install it natively, the lazy version (not tested)
Spoiler: (Windows) Install the native way (bit technical, not tested)
Spoiler: (Linux) Install the native way for the Linux-heads
Spoiler: (Windows) Install via Docker
Spoiler: (Mac) Install it natively (not tested)
Check the file for downloading.
1. Installation
Spoiler: (Windows) Install it natively, the lazy version (not tested)
1. Stable Diffusion Portable
Download Stable Diffusion Portable
Unzip the stable-diffusion-portable-main folder anywhere you want (Root directory preferred)
Example: D:\stable-diffusion-portable-mainRun webui-user-first-run.cmd and wait for a couple seconds (installs specific components, etc)
It will automatically launch the webui, but since you don't have any models, it's not very useful. Follow the guide further.
To relaunch the webui in the project root, run webui-user.bat
Spoiler: (Windows) Install the native way (bit technical, not tested)
1. Installing AUTOMATIC1111 Webui
This is the same guide as on the AUTOMATIC1111 git repo.
1.2. Automatic Installation
Install Python 3.10.6, checking "Add Python to PATH"
Install git.
Download the stable-diffusion-webui repository, for example by running (in CMD or Powershell)
Code:
git clone https://github.com/AUTOMATIC1111/stable-diffusion-webui.gitOr you can download by going to https://github.com/AUTOMATIC1111/stable-diffusion-webui , clicking "Code" and then "Download ZIP"
Run webui-user.bat from Windows Explorer as normal, non-administrator user.
Spoiler: (Linux) Install the native way for the Linux-heads
1. Automatic Installation on Linux
1.1. Install the dependencies
Code:
# Debian-based:
sudo apt install wget git python3 python3-venv

# Red Hat-based:
sudo dnf install wget git python3

# Arch-based:
sudo pacman -S wget git python3
1.2. Install A1111
To install in /home/$(whoami)/stable-diffusion-webui/, run:
Code:
bash <(wget -qO- https://raw.githubusercontent.com/AUTOMATIC1111/stable-diffusion-webui/master/webui.sh)
Run webui.sh
Spoiler: (Windows) Install via Docker
1. Installing Docker Desktop
1.1. Requirements
Windows 11 (64 bit): Home or Pro version 21H2 or higher.
Windows 10 (64-bit): Home or Pro 21H1 (build 19043) or higher.
Docker Desktop requires one of the following,
Enable Hyper-V (Windows Pro) [EASY]

Enable Hyper-V (Windows Home) - not tested [MEDIUM?]
Guide is available at
https://www.itechtics.com/enable-hyper-v-windows-10-home/
Install WSL 2 [ADVANCED] - Better performance
This requires several steps, available at https://learn.microsoft.com/en-us/windows/wsl/install
1.2. Hyper-V File Sharing
When using Hyper-V, you need to enable File Sharing in Docker Desktop > Settings > Resources > File Sharing.
The File sharing tab is only available in Hyper-V mode because the files are automatically shared in WSL 2 mode and Windows container mode.
1.3. Installation
Go to https://docs.docker.com/desktop/install/windows-install/ , then download and run the installer.
1.4. Installing Docker Container of the Webui
Go to https://github.com/AbdBarho/stable-diffusion-webui-docker/releases , download the latest source code release (ZIP) under Assets.
Unzip it somewhere.
1.5. Open Command Prompt (CMD) or Powershell
Go to the directory where you unzipped the archive, and run
Code:
docker compose --profile download up --build
this will download 12GB of pretrained models. Wait until it is finished, then
Code:
docker compose --profile auto up --build
More details are available on the project's wiki: https://github.com/AbdBarho/stable-diffusion-webui-docker/wiki/Setup
https://github.com/AbdBarho/stable-diffusion-webui-docker/wiki/Setup
Spoiler: (Mac) Install it natively (not tested)
Source: https://github.com/AUTOMATIC1111/stable-diffusion-webui/wiki/Installation-on-Apple-Silicon
If Homebrew is not installed, follow the instructions at https://brew.sh to install it. Keep the terminal window open and follow the instructions under "Next steps" to add Homebrew to your PATH.
Open a new terminal window and run brew install cmake protobuf rust [email protected] git wget
Clone the web UI repository by running git clone https://github.com/AUTOMATIC1111/stable-diffusion-webui
Place Stable Diffusion models/checkpoints you want to use into stable-diffusion-webui/models/Stable-diffusion. If you don't have any, see Downloading Stable Diffusion Models below.
cd stable-diffusion-webui and then ./webui.sh to run the web UI. A Python virtual environment will be created and activated using venv and any remaining missing dependencies will be automatically downloaded and installed.
To relaunch the web UI process later, run ./webui.sh again. Note that it doesn't auto update the web UI; to update, run git pull before running ./webui.sh.
2. The WEBUI!
Wait until you see
Code:
 Running on local URL:  http://0.0.0.0:7860
To create a public link, set `share=True` in `launch()`.
Then go to http://localhost:7860/ in any browser.
You should see something similar to this:

The 'hardest' part should be done.
3. Inpainting model for nudes
Download one of the following for 'Nudifying',
Realistic Vision InPainting
Go to https://civarchive.com/models/4201/realistic-vision-v13 (account required) and under Versions, select the inpainting model (v13), then at the right, download "Pruned Model SafeTensor" and "Config".
Save them to the "data/StableDiffusion" folder in the Webui docker project you unzipped earlier. The model file should be called realisticVisionV13_v13-inpainting.safetensors and the config file should be named realisticVisionV13_v13-inpainting.yamlUber Realistic Porn Merge
Go to https://civarchive.com/models/2661/uber-realistic-porn-merge-urpm (account required) and under Versions, click on 'URPMv1.2-inpainting', then at the right, download "Pruned Model SafeTensor" and "Config".
Save them to the "data/StableDiffusion" folder in the Webui docker project you unzipped earlier. The model file should be called uberRealisticPornMerge_urpmv12-inpainting.safetensors and the config file should be named uberRealisticPornMerge_urpmv12-inpainting.yaml
4. Embeddings / Lora
4.1. Embeddings
Add the following files in the 'data/embeddings'
Check My textual Inversions, under same names.
Allow you to add 'breasts', 'small_tits' and 'Style-Unshaved' in your prompt, and provide better quality breasts / vaginas. The first one is more generalized, the latter is well.. yes.
Check the Discord link in the 'Additional Tips', ppl post additional embeddings on there.
4.2. Lora
I have not tested all of these, so not sure if they work in combination with inpainting.
Add any of the following in 'data/Lora'. (CivitAI account required for NSFW)
To include Lora models click on the following icon at the right side, under the "Generate" button.
This will show an extra panel at the left, including a "Lora" tab. Clicking on any of the Lora's you have will add them to the prompt. You can move it to the front or back of the prompt to give it more 'focus', and you can also increase/decrease the number at the end "<..:1)" to give it more (e.g. 1.5) or less (e.g. 0.5) focus.
5. Loading Model
In the webui, at the top left, "Stable Diffusion checkpoint", hit the 'Refresh' icon.
Now you should see the uberRealisticPornMerge_urpmv12 model in the list, select it.
6. Model Parameters
Go to the 'img2img' tab, and then the 'Inpaint' tab.
In the first textarea (positive prompt), enter
RAW photo of a nude woman, naked
In the second textarea (negative prompt), enter
((clothing), (monochrome:1.3), (deformed, distorted, disfigured:1.3), (hair), jeans, tattoo, wet, water, clothing, shadow, 3d render, cartoon, ((blurry)), duplicate, ((duplicate body parts)), (disfigured), (poorly drawn), ((missing limbs)), logo, signature, text, words, low res, boring, artifacts, bad art, gross, ugly, poor quality, low quality, poorly drawn, bad anatomy, wrong anatomy
If not otherwise mentioned, leave default,
Masked content: fill (will just fill in the area without taking in to consideration the original masked 'content', but play around with others too)
Inpaint area: Only masked
Sampling method: DPM++ SDE Karras (one of the better methods that takes care of using similar skin colors for masked area, etc)
Sampling steps: start with 20, then increase to 50 for better quality/results when needed. But the higher, the longer it takes. I have mostly good results with 20, but it all depends on the complexity of the source image and the masked area.
CFG Scale: 7 - 12 (mostly 7)
Denoise Strength: 0.75 (default, the lower you set this, the more it will look like the original masked area)
These are just recommendations / what works for me, experiment / test out yourself to see what works for you.
Tips:
EXPERIMENT: don't take this guide word-by-word.. try stuff
Masked contentoptions:
Fill: will fill in based on the prompt without looking at the masked area
Original: will use the masked area to make a guess to what the masked content should include. This can be useful in some cases to keep body shape, but will more easily take over the clothes
Latent Noise: will generate new noise based on the masked content
Latent Nothing: will generate no initial noise
Denoising strength: the lower the closer to the original image, the higher the more "freedom" you give to the generator
Use a higher batch count to generate more images in one setting
Change masked padding, pixels this will include fewer/more pixels (e.g. at the edges), so the model will learn how to "fix" inconsistencies at the edges.
7. Images
Stable Diffusion models work best with images with a certain resolution, so it's best to crop your images to the smallest possible area.
You can use any photo manipulation software, or use https://www.birme.net/
Open your preferred image in the left area.
8. Masking
Now it's time to mask / paint over all the areas you want to 'regenerate', so start painting over all clothing. You can change the size of the brush at the right of the image.
I've experienced that painting a little bit outside the 'lines / borders' is the best for the model, else you will get visible remnants / distortions at the edges of the mask in the generated image.
Tips / Issues:
Mask more, go outside of the edges of the clothes. If you only mask clothes, the generator doesn't know about any skin colors, so it's best you include parts of the unclothed body (e.g.. neck, belly, etc).
And sometimes: you forgot to mask some (tiny) area of the clothes.. this is esp. difficult to find with clothes that are dark. But look at the "in progress" images that are generated during the process.. you should normally see where it is.
9. Inpainting, finally!
Hit generate. Inspect image, and if needed, retry.
10. Optimizations
When the model is generating weird or unwanted things, add them to the 'Negative Prompt'. I've already added some, like hair, water, etc. In some cases you need to add 'fingers', since Stable Diffusion is quite bad at generating fingers.
Sometimes it's needed to add extra words to the (positive) prompt, i.e. sitting, standing, ..
11. Caveats
I'll try to answer any questions regarding this guide you may have, but I'm no expert.
If you hit an error, or have a problem, add a comment. And don't forget to add a screenshot to the ouput of the docker container. It should provide detailed errors.
Whenever you see 'OOM (Out of Memory)' in the docker container output, it most of the time means that you do not have enough (graphics) VRAM to run it.
I don't have a lot of data, so if it works for you with less than 6 GB (graphics) VRAM, let us know in the comments.
This guide is written in a short time, so it probably needs some updates.
12. Additional Tips
You should be able to use 'Docker Desktop' to start and stop the container from now on. When not in use, it's best to stop the container, since it keeps a 'hold' on a lot of RAM and (graphics) VRAM.
If you see double body parts below each other, your image is too large. The Stable Diffusion model was initially trained on images with a resolution of 512x512, so in specific cases (large images) it needs to "split" the images up, and that causes the duplication in the result.
Also check that the width & height in the model parameters are close / equal to that of the source image, or leave it at the default: 512x512.
If you get error "height and width must be > 0", change the width and height in model parameters to 512 and try again.
Keep an eye on your RAM usage, depending on the amount, it's possible you will run out of RAM, and Windows will probably get very sluggish since it needs to swap constantly.
More parameter tweaks can be found in this guide (external): https://mrdeepfakes.com/forums/thre...f-inpainting-tutorial-sorta.11618/#post-54511
Now that you have this installed, also check out the 'text to image' and prompting guide by dkdoc at https://simpcity.su/threads/overall-basic-guide-to-using-stable-diffusion-webui.137162/
This guide is just a quick & dirty way to get you started, try to change settings, experiment!
To further level up your skillset, join the 'SD: Modelers' Discord at https://discord.gg/sdmodelers, this Discord has links to interesting embeddings and models in the 'Resources' channels
13. Extra
13.1. Upscaling
When you have generated an image, and you find it's too small, you can use the 'Send to extras' button below the result. For Upscaler 1, select "R-ESRGAN x4" and for Upscaler 2, select "Nearest". Depending on the original image, use a Resize value of either 4 (times 4), or 2.
It's not perfect for very small images, but works decently enough for images with width between 512x and 1024x.
13.2. Docker Desktop
To check the status of the running containers, open Docker Desktop you should see something like this,
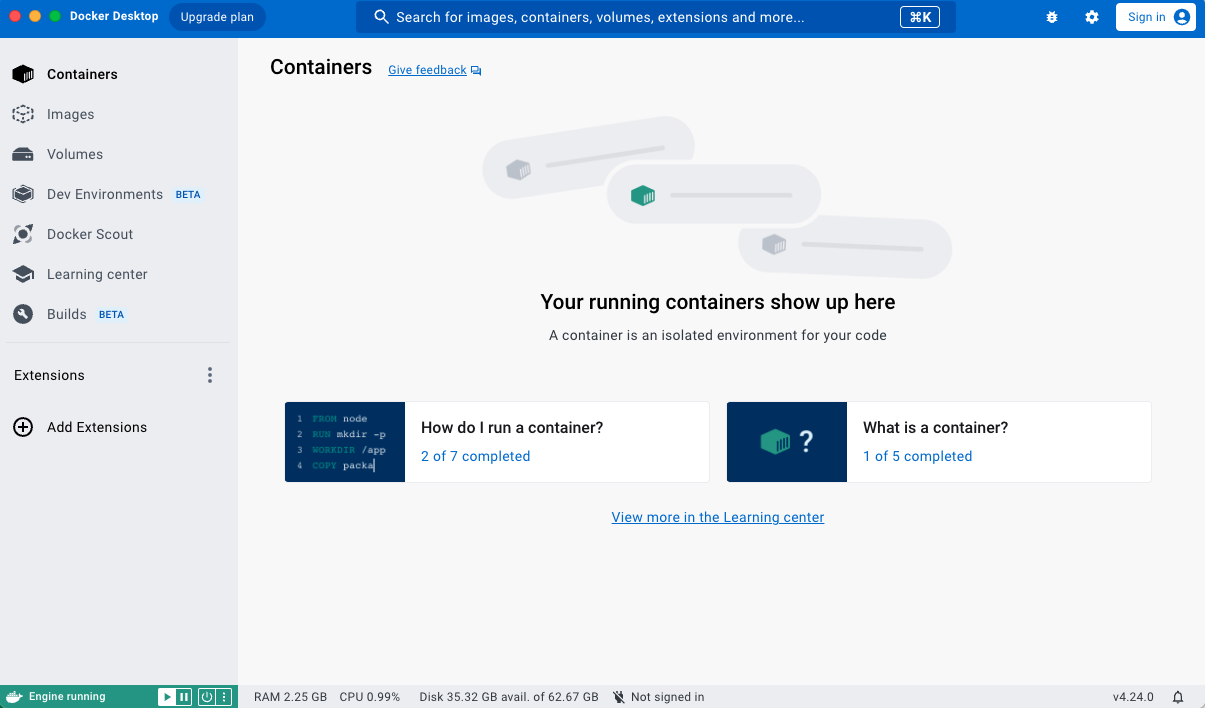
Here you can click on 'Containers' in the menu and see all containers installed, at the right of each container you have start/stop icons. This allows you to manage the containers.
13.3. Docker Internal
Sometimes (e.g. when training) you need to access files inside of the docker container.
Use the following commands to copy the files to the 'outside' /data folder.
Code:
docker exec -it <container> /bin/sh
# and then for example (for embeddings):
cd /stable-diffusion-webui/textual_inversion/
# list files / folders
ls
# then copy it to /data/train/ so you can access it via Windows explorer (or similar)
cp -r * /data/train/
14. Bugs
14.1. Cannot add middleware after an application has started
Around 2023-02-10 the developers of AUTOMATIC1111 introduced a bug. When you run build/start the docker container, you get the following error:
Code:
RuntimeError: Cannot add middleware after an application has startedTo fix this, open the file services/AUTOMATIC1111/Dockerfile (in the project folder) with a text editor. Go to line number 75 and after it add:
Code:
pip install fastapi==0.90.1 --upgradeThe result looks like this:
Code:
RUN --mount=type=cache,target=/root/.cache/pip <<EOF
cd stable-diffusion-webui
git fetch
git reset --hard ${SHA}
pip install -r requirements_versions.txt
pip install fastapi==0.90.1 --upgrade
EOF
Then rerun the docker container, and then follow from #4.
Code:
docker compose --profile auto up --build14.2. Clicking 'generate' loads additional model / Checkpoint b3f1532ba0 not found; loading fallback
Seem to have mixed results, it seems to load an Stable Diffusion 1.5 inpainting model that I have in the 'StableDiffusion' folder.
Not sure what the reasoning is behind this change.
To be safe, remove ALL files from the data/StableDiffusion directory and only leave the uberRealisticPornMerge_urpmv12-inpainting.* files.
And then click on the refresh icon at the top.
This also speeds up the generate process, since it doesn't need to load the extra model.[/TOC]
14.3. Inpainting doesn't work, weird results / output
Be sure to check that the webui has access to the 'Canvas' element, and that this is not blocked by your browser (e.g. Firefox) or by some extension (e.g. for privacy / anti-fingerprinting reasons).
Also, when using AMD graphics card, you can't use the standard install, you have to use a special install just for AMD cards: https://github.com/AUTOMATIC1111/stable-diffusion-webui/wiki/Install-and-Run-on-AMD-GPUs
Legal and risk management.
Using this model for commercial purposes or any illegal activities is strictly prohibited.
The model has been designed using explicit material. To ensure compliance with local laws and regulations, it's important to use this model appropriately.
I firmly oppose the implementation of this model for producing any kind of inappropriate content. It is important to follow local laws and regulations when utilizing this model. Additionally, users must not infringe on the rights of others in regards to their reputation, privacy, or image.
According to my perspective, utilizing this model for making content that is meant for mature audiences is not suitable. The user of this model must ensure that they follow the laws and regulations that are applicable in their local area. Additionally, they should be careful not to violate the rights of others, including their rights to privacy, honor, or publicity.
Description
This is a general guide, Hopefully Helpful.
The textual inversion are inside the .zip file.