本打标器旨在借助最先进的大语言模型对数据集进行精准标注,以实现训练质量的最大化。
本打标器有以下几个特点:
可以使用ollama借助强大的开源模型(Llama3.2 90B, Qwen2VL 70B等)来实现近似gpt4o的标注质量;
上下文少样本学习功能。可以通过提供少量示例来最大化提升模型输出质量;
可以使用gpt4o, gemini 1.5pro, claude3.5 sonnet等市面上最强大的模型,只要你有一个兼容openai的api;
可以使用免费的gemini 1.5 flash模型,每天有高达1500次的免费标注次数,只需去gemini官网经过几步简单的申请就可以,具体教程在该页面的最下方。
错误标签筛查功能;
标签频率可视化功能;
图像预压缩功能;
下面有详细的更新日志和使用说明。如需阅读使用说明,下拉找到"Tagger_ALL-IN-One-V1.0使用说明"即可。
This tagger aims to accurately tag datasets using the best LLMs to maximize training quality.
The tagger has the following key features:
It can utilize Ollama to leverage powerful open-source models (such as Llama3.2 90B, Qwen2VL 70B, etc.) to achieve annotation quality comparable to GPT-4o.
In-context few-shot learning: Maximize output quality by providing the model with a small number of examples.
It supports the use of the most powerful models available, including GPT-4o, Gemini 1.5 Pro, and Claude 3.5 Sonnet, as long as you have an OpenAI-compatible API.
It can use the free Gemini 1.5 Flash model, which offers up to 1,500 free annotations per day. This can be accessed through a simple application process on the Gemini website. Detailed instructions are provided at the bottom of this page.
It includes a label error screening function.
It offers an Label frequency visualization function.
It has an image pre-compression capability.
Detailed update logs and user guide are provided below. To read the user guide, scroll down to find "User Guide of Tagger_ALL-IN-One-V1.0"
——————————————————————————————————
如何使用Ollama
How to use Ollama
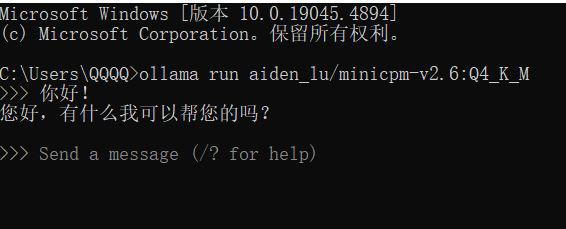
该打标器和ollama完全兼容。首先你需要下载ollama然后安装,这个就不细说了,安装完成后,打开命令提示符,输入start ollama开启ollama服务,然后通过命令—ollama run '模型名' 加载模型,这里我推荐填写aiden_lu/minicpm-v2.6:Q4_K_M,这是一个非常具有性价比的多模态LLM,仅仅8GB的显卡就可以使用,搭配Incontext-learning也能有非常不错的性能。如果你的电脑上没有这个模型,那么运行该命令后,会先从ollama library下载该模型,下载完成并成功载入后,会显示类似下图的提示:
This tagger is fully compatible with Ollama.
First, you need to download and install Ollama, Once installed, open the command prompt and enter "start ollama" to launch the Ollama service. Then, use the command "ollama run model_name". I recommend using "aiden_lu/minicpm-v2.6:Q4_K_M", which is a highly cost-effective multimodal LLM that can run on just 8GB of VRAM and performs quite well while working with in-context learning. If you don't have this model on your computer, running that command will first download it from the Ollama library. Once downloaded and successfully loaded, you'll see this:
之后,开启Tagger_All-in-One, 然后在两个openai页面(注意,必须是openai页面,gemini页面是不行的)的API URL输入框中输入http://127.0.0.1:11434/v1/chat/completions,然后在model输入框中输入aiden_lu/minicpm-v2.6:Q4_K_M,之后在api key输入框中输入类似'12345', 'abcde'之类的任意字符串,之后就可以选择图片文件夹或单张图片进行打标了,非常简单。
ollama下载地址:Download Ollama on Windows
***每次开机后都需要在命令提示符中输入"ollama run 模型名"来加载ollama模型,并且当你超过5分钟没有使用ollama时,模型就会自动从你的显存中卸载,此时你需要重新运行命令来加载模型
Next, open Tagger_All-in-One. In both OpenAI pages (note: it must be the OpenAI pages, not the Gemini pages), enter "http://127.0.0.1:11434/v1/chat/completions" in the API URL input field. Then, enter "aiden_lu/minicpm-v2.6:Q4_K_M" in the model input field. For the API key, you can enter any random string like '12345' or 'abcde'. After that, you can select an image folder or a single image for tagging. It's very straightforward.
Ollama download page: Download Ollama on Windows
***After each system startup, you need to enter "ollama run model_name" in the command prompt to load the Ollama model. Additionally, if you don't use Ollama for more than 5 minutes, the model will automatically unload from your GPU memory. In this case, you'll need to run the command again to reload the model.
——————————————————————————————————
如果你在使用阿里百炼大模型服务,那么你需要填写https://dashscope.aliyuncs.com/compatible-mode/v1/chat/completions到两个openai页面的api url输入框中,模型可以选择qwen-vl-max或qwen-vl-plus
如果你使用的是智谱大模型平台的服务,那么你需要填写https://open.bigmodel.cn/api/paas/v4/chat/completions,到两个openai页面的api url输入框中,模型可以选择glm-4v或glm-4v-plus
——————————————————————————————————
Update_Tagger_ALL-IN-One-V1.2.1_2024_10_13
V1.2.1相对V1.2的升级如下:
The upgrades in V1.2.1 compared to V1.2 are as follows:
1.修复了某些情况下,由编码不匹配引起的某些错误;
1. Fixed certain errors caused by encoding mismatches in some scenarios.
2.调整了页面逻辑,消除了某些潜在的bug
2. Adjusted the pages logic to eliminate some potential bugs.
3.由于目前webui完全兼容了gui的功能,并且稳定性已经达到了不错的水平,所以V1.2.1删除了gui,以维持简洁性;
3. Because the WebUI now fully supports the GUI functionality and has achieved a satisfactory level of stability, V1.2.1 has removed the GUI to maintain simplicity.
4.在Dataset Post-Process(数据集后处理)页面新增标签可视化组件。用户可以在输入框中输入已打好标签的数据集地址,点击start后,标签可视化组件即会筛选出前20个出现频率最高的tags,然后以直方图和词云图的方式可视化呈现。在数据集的规模非常庞大时,该功能可以很好地帮助用户建立起对标签频率的直观感受。(自然语言标注不建议使用此功能)
4. Added a tag visualization component to the Dataset Post-Process page. Users can input the address of your labeled dataset in the input folder. After clicking "Start," the tag visualization component will filter out the top 20 most frequently occurring tags and present them visually as histograms and word clouds. This feature is particularly helpful for users to gain an intuitive understanding of tags frequencies when dealing with large-scale datasets. (This function is not recommended for natural language captions)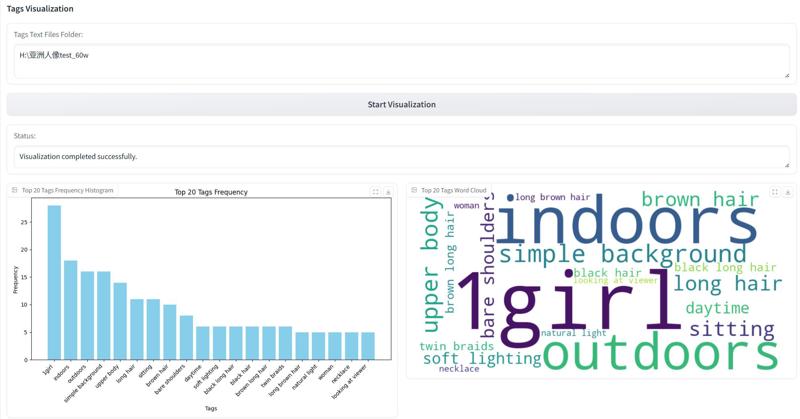
当初设想的功能基本已经实现了,以后应该也不会有什么大更新了,充其量大概就是发现了某些bug然后推送修复版本。感谢大家的支持!(虽然统共也没多少人用哈哈)
Well, pretty much all the features I originally had in mind have been implemented now, so I don't think there'll be any big updates coming up in the future. At most, I might push out some bug fixes versions if I stumble across any issues. Thanks to everyone for your support during this time!
——————————————————————————————————
Update_Tagger_ALL-IN-One-V1.2-preview_2024_10_08
V1.2相对V1.1.1主要升级了以下几点:
Version 1.2 includes the following major upgrades compared to V1.1.1:
1.为批处理打标组件添加了"stop"按钮,允许用户随时终止批处理打标任务。之后如果想继续打标,点击"stop"按钮旁的"Batch process images"按钮即可继续任务。(脚本会检测数据集中哪些图片已经被打标了,然后在任务开始时会跳过这些图片,所以不用担心会重复为这些图片打标)
1. "Stop" Button for Batch Processing components: "stop" buttons have been added to the batch processing components, allowing users to terminate batch tasks at any time. To resume the task, simply click the "Batch process images" button next to the "stop" button. (The script detects which images in the dataset have already been tagged and skips them at the start of the task, so there's no need to worry about duplicate tagging)
2.为单图打标组件添加了"Request Timeout"(请求超时终止)功能。用户可以自定义请求超时时间(以’秒‘为单位的整数),默认为30秒。当请求时间超过设定好的时间时,脚本会终止请求。
2. Request Timeout for Single Image tagging components: "Request Timeout" features have been added to the single image tagging components. Users can customize the request timeout period (in seconds, as an integer), with a default value of 30 seconds. The script will terminate the request if it exceeds the specified time.
3.新增"Dataset Pre-Process"(数据集预处理)页面,用户可以在这个页面对数据集中的图片进行压缩,把过大的图片压缩到合适的大小,以减少成本。具体如图所示:
3. Added a Dataset Pre-Process Page: it allows users to compress images in the dataset to a suitable size, reducing costs by shrinking oversized images. As shown in the figure (refer to the provided image) 用户可以在"Input Images Folder"输入框中输入数据集地址,然后在"Output Images Folders"输入框中输入任意一个空文件夹的地址,之后在"Images Pixels"输入框中输入范围在[400000,1000000]间的像素值,这个数值的意思就是你想将图片压缩到多少像素之内。之后点击"Start Preprocessing"即可开始压缩,压缩好的图片会被存储你填写的"Output Images Folders"中。
users can enter the dataset path in the "Input Images Folder" field and specify an empty folder path in the "Output Images Folders" field. Enter a pixel value between 400,000 and 1,000,000 in the "Images Pixels" field. This value represents the target pixel count you want to compress the images to. Then, Click "Start Preprocessing" to begin compression. The compressed images will be saved in the specified "Output Images Folders" directory.
4.新增"Dataset Post-Process"(数据集后处理)页面。由于网络问题、账户限速等原因,某些时候LLMs会给一些图片打上错误的标签,或者根本不为其打任何标签(尤其是数据集中包含NSFW图片时),所以对打好标签的数据集进行筛查是很重要的。具体如图所示:
4. Added a Dataset Post-Process Page: Due to network issues, account rate limits, or other factors, LLMs may sometimes give incorrect tags to some images or not tag them at all (especially when the dataset contains NSFW images). Therefore, it's crucial to review the labeled dataset. As shown in the figure (refer to the provided image)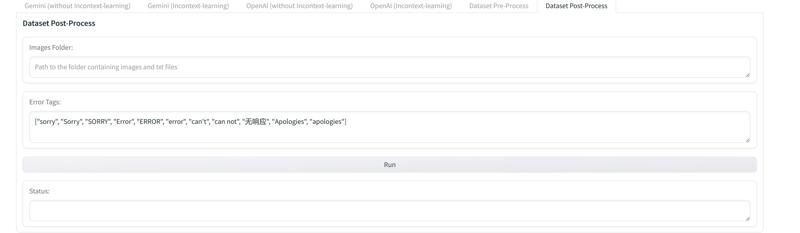
你需要在"Images Folder"中填写已经打完标签的数据集地址。然后点击"Run"即可开始对数据集中的标签进行筛查。脚本首先会筛查那些没有对应的同名txt标签文件的图片,然后在./Dataset Post-Process/Images_without_tagger_file中创建一个以"数据集名称"+"当前时间"命名的文件夹,然后将这些图片剪切到这里;之后脚本会筛查那些包含错误标签的txt文件(比如"Error", "Sorry"等等),然后在./Dataset Post-Process/Images_with_error_tags中创建一个以"数据集名称"+"当前时间"命名的文件夹,之后便会将这些包含错误标签的txt文件和与其同名的图片剪切到这里。你也可以自定义筛查哪些错误标签,只需要按照页面中给出的格式撰写即可。(我已经撰写了一套默认的错误标签集,已经可以非常有效地筛查错误标签了)
Enter the path of your labeled dataset in the "Images Folder" field. Click "Run" to begin the dataset label review process. The script first identifies images lacking corresponding .txt label files and creates a folder named "[Dataset Name]+[Current Time]" within "./Dataset Post-Process/Images_without_tagger_file," moving these images there. Next, it identifies .txt files containing error labels (e.g., "Error," "Sorry") and creates a folder named "[Dataset Name]+[Current Time]" within "./Dataset Post-Process/Images_with_error_tags," moving both these files and their corresponding image files there. You can customize the error labels to check by following the format provided on the page. (A default set of error labels is already included and is generally effective at identifying labeling errors.)
***建议在筛查前,先备份自己的数据集
***It is recommended to back up your dataset before the review
——————————————————————————————————
Update_Tagger_ALL-IN-One-V1.1.1-preview_2024_10_05
修复了webui中的一些bug。
Fixed some bugs in the web UI.
——————————————————————————————————
Update_Tagger_ALL-IN-One-V1.1-preview_2024_10_05
V1.1-preview升级了以下几点:
The V1.1-preview has been upgraded with the following features:
1.我猜大部分人都比较习惯使用webui,所以这次更新添加了一个webui界面,相比之前的gui在交互上更加友好一些。在启动webui后,它会自动在浏览器上启动,如果没有自动弹出web界面,则可以手动在浏览器输入命令提示符中显示的URL,类似下图这样的:
1. I guess most people are more accustomed to using web UI, so this update adds a web UI interface, which is more user-friendly compared to the previous GUI. When you start the web UI, it will automatically open in your browser. If the web interface does not open automatically, you can manually enter the URL displayed in the command prompt into your browser, similar to the example below:
2.当你下载好V1.1的zip压缩文件后,将其解压到任意位置,之后点击文件夹内的start_webui.bat或start_gui.bat即可启动打标器。它会自动创建一个虚拟环境并安装相关依赖,以防污染系统环境;
2. After downloading the V1.1 zip file, extract it to any location, and then click on start_webui.bat or start_gui.bat in the folder to launch the tagger. It will automatically create a virtual environment and install the necessary dependencies to avoid contaminating the system environment.
3.在WebUI中,新增了单图打标组件,你现在可以选择任意图片上传到webui中进行对它打标,不过单图打标组件打出来的tags不会被保存,只会显示在"输出"栏中,所以如果你需要将其存储下来的话,必须手动保存;
3. In the Web UI, a new single-image tagging component has been added. You can now upload any single image to the web UI for tagging. However, the tags generated by the single-image tagging component will not be saved; they will only be displayed in the "Output" section. If you need to save them, you must do so manually.
4.WebUI目前只是预览版,我做了简短的测试,但可能还会有一些bug,如果你在使用webui的过程中遇到了某些bug,可以关闭控制台然后重新启动,如果还是有问题,则可以先使用GUI(点击start_gui.bat以启动GUI)
4. The Web UI is currently in testing stage. I have done brief testing, but there might still be some bugs. If you encounter any bugs while using the web UI, you can close the console and restart it. If the problem persists, you can use the GUI instead (click start_gui.bat to launch the GUI).
5.如果你在使用任何魔法道具,请先关闭魔法道具,等webui开启后再打开你的魔法道具。否则可能会阻塞webui启动。
如果你还未安装python,请先安装python(Download Python | Python.org)
If you haven't installed Python yet, please install it first(Download Python | Python.org)
——————————————————————————————————
Update_2024_10_02
1.新增"Enable time interval"选项,现在可选择是否开启图片传送时间间隔,默认为"不开启"。(注意,类似openrouter之类的服务商会根据你的账户余额对你的请求频率进行限制,并且某些服务商还有自动化脚本检测机制。如果脚本在未开启"time interval"的情况下,突然开始频繁接收错误数据,那可能就是触发了类似机制)
***2.如果你使用的是免费的gemini api,那么就一定要打开"time interval",因为一旦请求速率超过15次/1分钟,就会开始报错。如果你使用的是付费的gemini api,那就没有这个限制了,完全可以关闭"time interval"
3.建议将“gemini-1.5-flash-latest”替换为“gemini-1.5-flash-002”,根据我的测试,这个最新的gemini flash模型在视觉能力上已经超越了gpt4v,并且接近甚至达到gpt4o的水平。
1.Added an "Enable time interval" option. Users can now choose whether to enable a time interval between image transmissions. The default setting is "no". (Note: Some service providers, such as OpenRouter, may limit request frequency based on your account balance, and some may have mechanisms for detecting automated scripts. If the script suddenly starts receiving frequent errors without the "time interval" enabled, it might be triggering such a mechanism.)
***2.If you're using the free Gemini API, you must enable the "time interval". Exceeding a request rate of 15 calls per minute will result in errors. If you're using a paid Gemini API, this limit doesn't apply, and you can safely disable the "time interval".
3.It is recommended that everyone switches from "gemini-1.5-flash-latest" to "gemini-1.5-flash-002". Based on my tests, this new Gemini Flash model shows significant improvement in vision capabilities, with its actual performance even surpassing gpt4v and approaching the level of gpt4o.
__________________________________________________________________________________
Update_2024_09_30
我更新了一个非常好用的Instruction,它可以让模型稳定生成详细的danbooru格式标签。这个Instruction来源于LEOSAM制作的打标器:
jiayev/GPT4V-Image-Captioner (github.com)
感谢作者为此付出的努力
I've updated a great instruction that enables the model to consistently generate detailed tags in danbooru format. This instruction is derived from the tagger created by LEOSAM:
jiayev/GPT4V-Image-Captioner (github.com)
Many thanks to the author for his hard work
_______________________________________________________________________________
User Guide of Tagger_ALL-IN-One-V1.0:
1. Tagger_All-in-One is an image tagger, similar to the renowned wd14 tagger. It can automatically annotate your dataset using the most powerful LLMs currently available (GPT4o, Claude3.5, Gemini 1.5 pro). This not only significantly reduces manual labor (especially when dealing with hundreds, thousands, or even tens of thousands of training images) but also potentially surpasses human annotation quality through optimized instructions and in-context learning techniques.
2. The usage is straightforward. If Python is not installed on your computer, please download and install Python first (Welcome to Python.org). Python 3.10 or above is recommended. (After installation, open the command prompt and enter 'python --version' to check if Python is successfully installed). Then, download Tagger_All-in-One and extract it to some place. In the navigation bar, type 'cmd' to bring up the command prompt, then enter 'python gui.py' to launch the script. The first launch may take longer as it installs certain dependencies.
3. The GUI contains four pages: "Gemini (without In-context Learning)", "Gemini (In-context Learning)", "OpenAI (without In-context Learning)", and "OpenAI (In-context Learning)". The two Gemini pages can use the free Gemini API, which I'll explain how to obtain at the end. The two OpenAI pages can use OpenAI's API and OpenAI-Compatible API (such as deepbricks and openrouter).
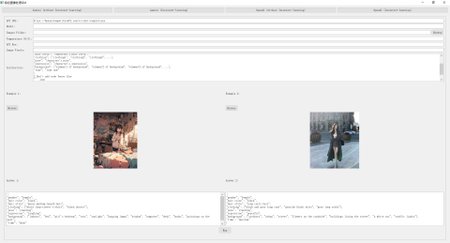
4. Now, I'll explain the parameters in OpenAI (without In-context Learning):
a. First, fill in your API URL in the "api url" field. For example, if you're using OpenAI, the URL would be https://api.openai.com. You should enter https://api.openai.com/v1/chat/completions in the api url field. For any OpenAI-Compatible API, you need to add v1/chat/completions at the end.
b. Then, click the "Browse" button to select your dataset.
c. In the "Temperature (0-2)" field, enter the temperature value. Lower values make the LLM's output more stable and adherent to your commands but also more rigid; higher values make the output less stable and less adherent but more creative. I usually set it to 1.0. (Based on my tests, a temperature of 0.85 works better for Gemini Flash 1.5)
d. In the "Model" field, you can input the model you want to use. Note that the model name must be the standard name recognizable by the service provider. For instance, if you're using OpenAI's API and want to use GPT4o for tagging, you must enter gpt-4o, not GPT4o, Gpt4o, or GPT4O, which the service provider might not recognize. Even for the same model, the standard name may differ across service providers. You can find the standard model names from your API service provider.
e. Enter the API Key you obtained from the model service provider in the "API key" field. (***It's advisable to change your API key frequently and revoke used API keys on the model service provider's website to prevent unauthorized use)
f. Since most current LLMs can accept images with a maximum of 1 million pixels, and the cost of using LLMs is closely related to the input image resolution, you must compress your images if their resolution is too high. I use LANCZOS for image compression. You can specify the desired pixel count for compression in the "Image Pixels" field, with a valid range of [400000, 1000000]. Values below 400000 or above 1000000 will cause an error. Generally, for GPT-4o and Claude3.5, providing images with 500,000 pixels is sufficient to ensure their image recognition capabilities. (I created a temp folder to temporarily store compressed images, the compression process does not affect your original dataset)
***If you don't fill in anything here, the script will directly upload the images from your dataset to the model. If the images in your dataset are too large (over 1 million pixels), it may not return any data or return incorrect data.
g. Then, you need to fill in the instruction. In simple terms, this step is to tell the LLMs how to describe your images. Generally, more complex and clearer instructions can lead to better results, but for many models, too complex instructions may be difficult to execute. This brings us to the in-context learning technique we mentioned at the beginning. Simply put, it's a technique to "brainwash" LLMs, forcing LLMs to output according to the answer template you've prepared. It can greatly enhance the model's ability to follow complex instructions but will also increase costs. If you highly value annotation quality and want the model to perform at its best, I strongly recommend using the two modules with "In-context Learning". For specific usage methods, you can refer to this article:
自动打标器的重大更新 || The major update of "Automated tagger with Openai-Compatible API" | Civitai
h. After filling in all the parameters, click "Run", and the script will start using the LLMs to automatically annotate the images in your dataset. For each processed image, the script creates a txt file with the same name in your dataset folder, and then stores the tags in that txt file
Tagger_ALL-IN-One-V1.0使用说明:
1. Tagger_All-in-One是一个图片标记器,类似大名鼎鼎的wd14,它可以借助目前市面上最强大的LLMs(GPT4o,Claude3.5,gemini 1.5 pro)对你的数据集进行自动化标注,不仅可以大幅节省人力(尤其是在数百张、数千张、甚至上万张训练图片的情况下),而且通过优化后的指令以及Incontext-learning(上下文学习)技术,它的标注水平甚至可能超越人类。
2.使用方法很简单,如果你的电脑上没有安装Python,那么请先下载并安装Python(Welcome to Python.org),建议Python3.10以上(安装完成后,打开命令提示符,输入’python --version’检查python是否安装成功)。之后下载Tagger_All-in-One并将其解压到某个位置,然后在导航栏中输入’cmd’唤出命令提示符,然后输入’python gui.py’就可以启动脚本了。首次启动可能会安装某些依赖,所以可能时间会长些。
3.GUI中包含4个页面,分别是”Gemini(without Incontext-learning)”, ”Gemini(Incontext-learning)”, ”Openai(without Incontext-learning)”以及”Gemini(Incontext-learning)”。两个gemini页面可以使用免费Gemini API,关于如何获得免费Gemini API,我会在最后写到。两个Openai页面则可以使用Openai的API,以及任何兼容Openai API格式的API(比如deepbricks, openrouter以及openai。或者TB上众多的模型贩子,它们提供的API基本兼容openai的API)。
4.现在我针对Openai(without Incontext-learning)中的参数做一下说明:
a.首先在api url这一栏填写你的api url,以openai举例,openai的url是这样的: https://api.openai.com,那么你就应该在api url栏中填写
https://api.openai.com/v1/chat/completions, 没错,针对任何openai-compatible api,都要在末尾添加v1/chat/completions。
b.之后,点击“浏览”键,选择你的数据集。
c.在“Temperature(0-2)”这一栏填写温度。这个值越低,LLMs的输出就越稳定且越遵循你的命令,但是回答也越死板;这个值越高,LLMs的输出就越不稳定且越不遵循你的命令,但是其回答也会越来越有创意。我一般将其设定为1.0。(根据我的测试,对于gemini flash 1.5来说,0.85的温度值更好)
d.在“模型”这一栏可以选择你想使用模型,这里需要注意,填写的模型名称必须是那种能被服务商识别的标准模型名称,比如说你使用的是openai的API,现在你想使用gpt4o对数据集打标,那么你就必须填写gpt-4o,而不是GPT4o、Gpt4o或者GPT4O这种不能被服务商识别的模型名。即使对于同一个模型来说,在每个服务商那里的标准名称可能都是不同的。标准的模型名可以去你购买API的服务商那里找到。
e.在"API key"这一栏填写你从模型服务商获取的API Key,只有第一次使用这个脚本时需要填写API Key。(***建议经常更换新的API key,废弃使用的API key应该去模型服务商官网将其注销,以保证API key不被窃用)
f.因为目前大部分LLMs可接收的图片的最大像素一般是100万,且使用LLMs的花费和输入的图片的分辨率息息相关,所以如果你的图片的分辨率太大,就必须对其进行压缩。我使用了LANCZOS对图片进行压缩,你可以在“图片像素”这一栏填写你想要将图片压缩到多少分辨率以内,可填写的范围是[400000,1000000],小于400000或大于1000000都会让程序报错。一般来说,对于GPT4o和Claude3.5,你只需要提供50万像素的图片就能保证它们的图像识别能力了。(我创建了一个temp文件夹,用来暂时储存被压缩的图片,图片压缩过程不会对数据集产生任何影响)
***如果你不在这里填写任何东西,那么脚本就会直接将你数据集中的图片上传到模型。如果你的数据集中的图片的像素太大(大于100万像素),那么有可能无法返回任何数据或返回错误数据。
g.最后你需要填写instruction。简单来说,这一步是为了告诉LLMs应该如何描述你的图片,一般来说,更复杂、更清晰的instruction可以带来更好的效果,但是对于很多模型来说,较复杂的instruction可能在执行上比较困难,所以这就引出了我们最开始提到的Incontext-learning(上下文学习)技术。简单来说,它就是一种给LLMs进行”洗脑”的技术,强制大模型按照你编写好的回答模板进行输出,它可以极大地增强模型对复杂指令的遵循能力,但是也会增加相关的花费。如果你非常重视标注质量,希望模型可以最大程度发挥它的水平,那么我非常推荐你使用那两个带”Incontext-learning”的模块。具体的使用方法可以参考这篇文章:
自动打标器的重大更新 || The major update of "Automated tagger with Openai-Compatible API" | Civitai
h.当你将全部参数填写完成后,点击“运行”,脚本就会开始利用你选择的模型对数据集里的图片进行自动标注。每标注好一张图片,这个脚本便会在你的数据集中创建一个和被处理图片同名的txt文件,然后将tags储存在这个txt文件中。
————————————————————————————————
关于Gemini免费API的介绍以及如何获取Gemini免费API:
Introduction to Gemini's free API and how to obtain it:
1.Google的Gemini模型现在一共有两个,分别是Gemini 1.5 flash和Gemini 1.5 pro,其中Gemini 1.5 pro的视觉能力大概有GPT4o和Claude3.5 Sonnet的90%的水平,属于T0行列;
Gemini 1.5 flash是Gemini 1.5 pro的青春版,视觉能力大概有gemini 1.5 pro 85%~90的水平,强于Claude3 haiku,属于T1行列,在描述图片时基本不会犯什么错。对于免费的API,谷歌那边的说明是这样的:如果你使用的是Gemini 1.5 flash,那么你每分钟最多被允许发送15次请求,一天最多被允许发送1500次请求。这对于给图片打标来说已经非常够用了。至于gemini 1.5 pro,如果你只有免费API,那么一分钟最多发送两次请求,这基本是没法用的,所以gemini 1.5 pro暂时不在我们的考虑范围内。
1.There are two Gemini models now: Gemini 1.5 flash and Gemini 1.5 pro. Gemini 1.5 pro's visual capabilities are about 90% of GPT4o and Claude3.5 Sonnet, and Gemini 1.5 flash is like a lite version of Gemini 1.5 pro, with visual capabilities about 85-90% of Gemini 1.5 pro. It's stronger than Claude3 haiku, and rarely makes mistakes when describing images. For the free API, Google states that with Gemini 1.5 flash, you're allowed up to 15 requests per minute and 1500 requests per day. This is more than enough for image tagging. As for Gemini 1.5 pro, the free API only allows two requests per minute, which is practically unusable, so we're not considering it for now.
2.你可以在这里获取Gemini API: https://ai.google.dev/aistudio, 进入页面后是这样的:
2.You can get the Gemini API here: https://ai.google.dev/aistudio. The page looks like this: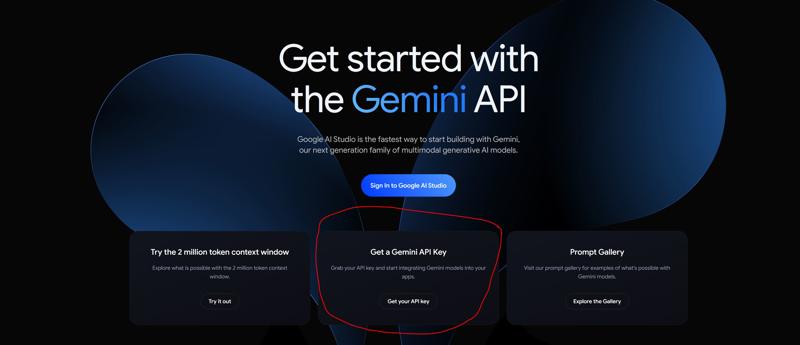
点击红圈内的Get your API key,然后跟着引导走就可以很轻松地获取免费API了。(注意:某些国家和地区可能无法使用Gemini API服务,具体情况可以在Google官网查询)
Click on "Get your API key" in the red circle, then follow the prompts to easily obtain your free API. (Note: Gemini API services may not be available in some countries and regions. Check Google's official website for specifics.)
Description
FAQ
Looks like we don't have an active mirror for this file right now.
CivArchive is a community-maintained index — we catalog mirrors that volunteers upload to HuggingFace, torrents, and other public hosts. Looks like no one has uploaded a copy of this file yet.
Some files do get recovered over time through contributions. If you're looking for this one, feel free to ask in Discord, or help preserve it if you have a copy.