
Original link:
v0.20: https://sololo.xyz/article/26-solotagger-v020-improved-caption-output-quality
v0.12: https://sololo.xyz/article/25-solotagger-v012-easier-prompt-editing
SoloTagger is an LLM-based image captioning tool.
v0.20
The prompt passing mechanism has been optimized, significantly improving caption output quality.
The default temperature has been changed from 0.1 to 0, reducing model hallucinations.
v0.12
Ever since I built this little tool, SoloTagger, it has become my main tool for dataset annotation. Recently all of my dataset labeling work has been done with it.
To create high quality LoRAs, high quality dataset annotations are essential. Generating captions with a large language model is similar to generating images with one. If you want good results, a well designed prompt is necessary.
Different datasets and different goals require different tagging styles, which means different prompts. Over the past few days I have been tweaking and optimizing the prompts used by SoloTagger. During this process I ran into an annoying issue. In the previous version all prompts were stored in a JSON file, and manually editing JSON files is something I really hate.
So SoloTagger v0.12 was born. 😄
For detailed instructions, please visit:
https://sololo.xyz/article/25-solotagger-v012-easier-prompt-editing
v0.1
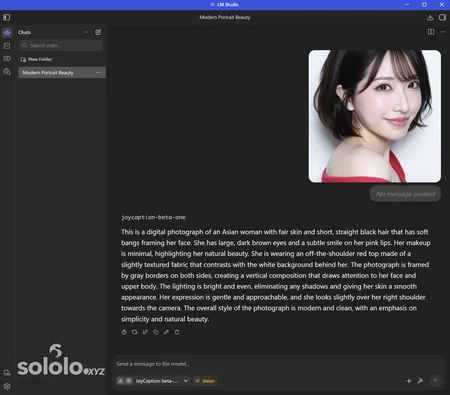
Local JoyCaption Beta One GGUF Setup on Windows via LM Studio

Over the past couple of days I’ve been testing some of the smaller Qwen3.5 models on my laptop, including the 2B, 4B, and 9B versions. I wanted to see whether these mini models could be useful for my workflow.
Initially, I planned to use them to tag datasets for LoRA training. After many attempts they technically worked, but the results were not very satisfying.
When it comes to image tagging, JoyCaption naturally comes to mind. So I casually made this simple little tool, let's call it: SoloTagger .
Running JoyCaption locally on a laptop isn’t super fast, but it’s still acceptable. For my tagging needs, the speed is good enough.
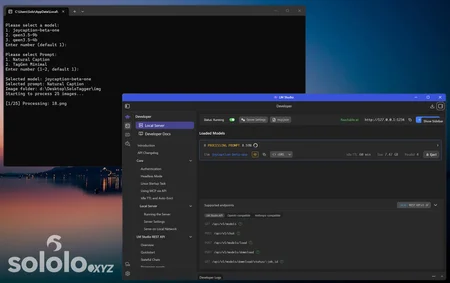
First, SoloTagger is just a simple Python script with two basic functions:
Send images and tagging instructions to JoyCaption.
Receive the output from JoyCaption and save it into a TXT file.
SoloTagger itself does not run the model. It relies on a third-party LLM runtime, such as LM Studio, Ollama, or other model runners. You can think of these tools as a “player” for large language models.
In this guide, I use LM Studio as the example because it has a graphical interface, works well on Windows, and is easy for regular users to get started with.
Also, I always try to keep things simple. So SoloTagger does not include unnecessary third-party libraries just for convenience. It has zero external dependencies. As long as you have Python installed, you can run it.
There are many ways and tools to tag images, and JoyCaption itself can be used in different ways. SoloTagger was just a quick idea I had and threw together as a small, simple tool.
If you want to run JoyCaption locally, you can use this method as a reference, or just download and use SoloTagger directly.
I know that releasing a tagging tool now is quite outdated, not to mention how simple this tool is. However, this post serves as a record of my own daily use and can also act as an introductory guide for beginners.
For detailed instructions, please visit:
Want more of my models? Visit my website: sololo.xyz
Latest releases first, HUNDREDS of models FREE to download.
♥ Support me on Ko-fi: https://ko-fi.com/solo_lee
♥ Telegram channel: https://t.me/sololeeai
♥ Model orders: https://sololo.xyz/commission
Thanks so much for your support! ♥

Description
Looks like we don't have an active mirror for this file right now.
CivArchive is a community-maintained index — we catalog mirrors that volunteers upload to HuggingFace, torrents, and other public hosts. Looks like no one has uploaded a copy of this file yet.
Some files do get recovered over time through contributions. If you're looking for this one, feel free to ask in Discord, or help preserve it if you have a copy.