


🌀 Teleport – Move Your Selfie Through Space, Time & Style
Teleport is a ComfyUI node that lets you move your selfie (or any character image) into different locations, eras, and cinematic styles — while preserving identity, pose, and composition.

Upload your photo.
Choose a destination.
Select a style or era.
Model Stack: Optimized for Flux.2 Klein 9B Distilled (Base) and Qwen3-VL-4B-Instruct (Vision Analysis).
· Z-Image Resolution Picker: This workflow requires the Z-Image Resolution Picker
Enrico's Nodes: This workflow requires the ComfyUI-enricos-nodes suite for advanced processing.
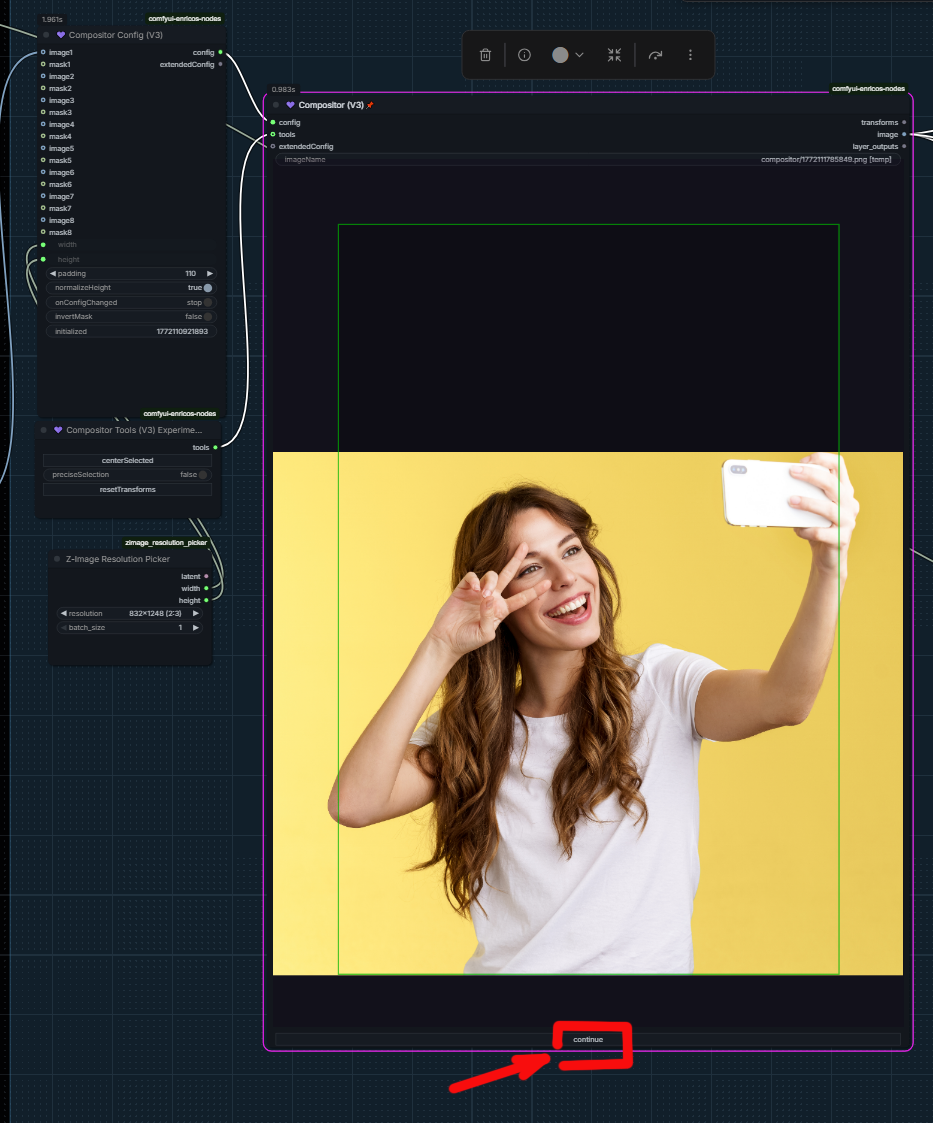
Precision Control: Powered by CompositorV3 for perfect subject placement.
🛠 How to Use (Interactive Step):
This workflow features an interactive pause to give you full artistic control over the composition:
Initial Run: Start the queue. The process will automatically analyze your image and prepare the cinematic prompt.
The Pause: The workflow will stop at the CompositorV3 node.
Manual Composition: * Adjust the position and scale of your subject on the canvas.
This is crucial for Outpainting — you decide exactly where the character stands in the new cinematic environment.
Resume: Click the "Continue" button at the bottom of the CompositorV3 node to finish the generation.
6. And your character will be seamlessly integrated into a new world.


From ancient temples to cyberpunk streets.
From film noir to VHS retro.
From realistic photography to stylized aesthetics.
✨ What It Does
Changes the background only
Keeps your character’s identity and facial structure
Preserves pose, framing and perspective
Allows lighting to naturally interact for realistic integration
Can change facial expression
Can apply lens distortion (fisheye strength)
Supports cinematic enhancement modes
This is not a simple background swap.
It builds a structured transformation instruction for Qwen → Flux to generate coherent, physically believable results.
🎛 Settings Explained
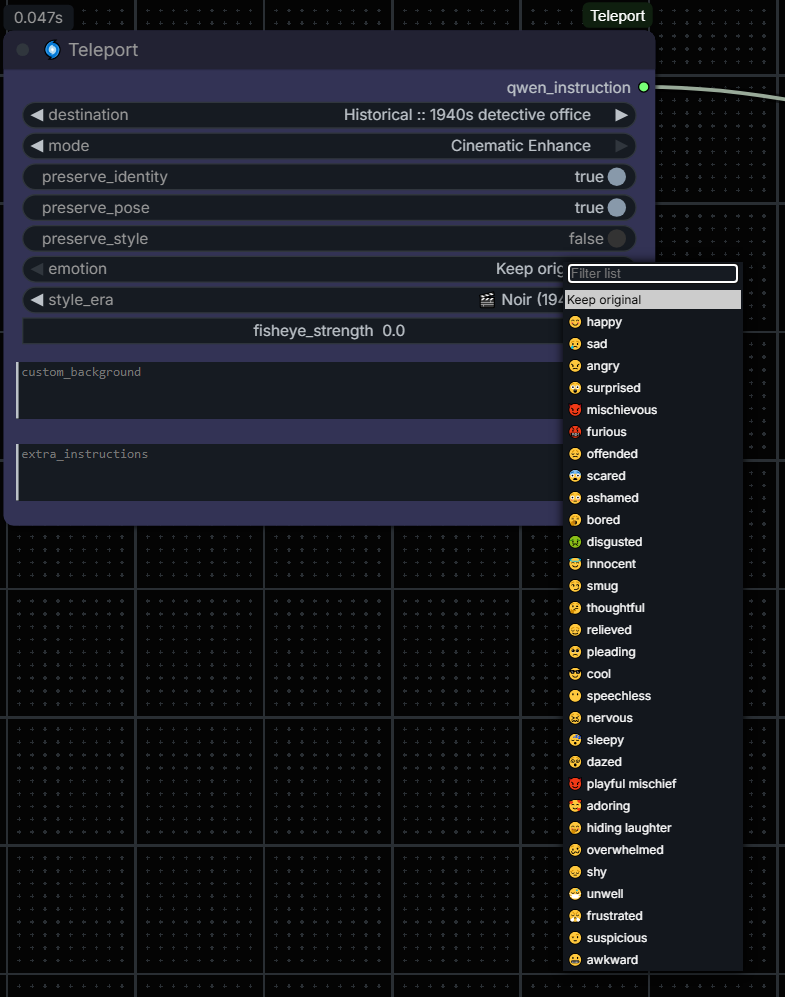
📍 Destination
Select a location from locations.json.
You can:
Expand the list by editing data/locations.json
Or override everything using Custom Background
Examples:
Ancient temple corridors
Abandoned amusement park
Cyberpunk alley
Desert western town
Retro 80s VHS interior
🧠 Mode (Very Important)
This setting controls how aggressively the environment is interpreted.
1️⃣ Replace Exactly
Strict background replacement
No major new elements added
Best for controlled results
Minimal artistic interpretation
Use this if you want predictable output.
2️⃣ Adapt Creatively
Uses the location as a base
Adds subtle atmospheric details
Slight creative expansion
Still respects original description
Balanced mode for most use cases.
3️⃣ Cinematic Enhance
Adds dramatic lighting
Atmospheric depth
Particles, haze, spatial contrast
Stronger cinematic feeling
Lighting can naturally interact with the character for seamless integration.
Best for:
Movie-poster style
Epic fantasy
High-drama scenes
🎭 Emotion
Replace the character’s facial expression while preserving identity.
Examples:
Happy
Sad
Furious
Mischievous
Thoughtful
Shy
Suspicious
Awkward
This only affects expression — not structure.
🎬 Style Era
Apply predefined visual aesthetics:
Film Noir (1940s)
Disco 70s
VHS 80s
Cyberpunk Future
Spaghetti Western
Polaroid Vintage
Anime Style
If no era is selected, default mode uses realistic full-frame digital photography.
📷 Fisheye Strength
Controls lens distortion:
0.0 → No distortion
0.3 → Subtle wide-angle
0.6 → Noticeable fisheye
1.0 → Extreme GoPro-style curvature
Only affects perspective — not pose.
🛠 Custom Background
Override the selected location completely.
Write your own environment description here.
Example:
"Narrow corridor with towering stone columns covered in ancient glyphs, golden dust in the air, dramatic top lighting"
➕ Extra Instructions
Add advanced tweaks:
Depth of field adjustments
Color grading preferences
Specific lighting behavior
Composition hints
💡 Use Cases
Teleport your selfie into historical eras
Create cinematic key visuals
Generate fantasy character scenes
Make retro VHS memories
Turn casual photos into movie stills
Test lens distortion effects
Emotion-swapping portraits
🔧 For Advanced Users
Add new locations inside data/locations.json
🚀 Summary
Teleport is a structured prompt-engineering node designed for:
Character preservation
Controlled environment replacement
Cinematic enhancement
Style-era transformations
Selfie-to-scene teleportation
Move through space.
Move through time.
Stay yourself.
Installation
Download the ZIP file from this page.
Unzip the downloaded file.
Move the ComfyUI-Teleport folder into your ComfyUI/custom_nodes/ directory.
Restart ComfyUI.
(No external dependencies or pip install required).
Description
FAQ
Comments (6)
how to connect it to the new qwen 3 node,the old node is not working
@djivanoff1977277 🛠 Troubleshooting & Installation Fixes
If you see Red Nodes , follow these steps in order:
1. Install Missing Nodes (The Standard Way)
If you just downloaded the workflow and see red boxes:
Open ComfyUI Manager.
Click "Install Missing Custom Nodes".
Install all required packages and Restart ComfyUI.
2. If Nodes Stay Red After Installation (Version Mismatch)
Sometimes, even after installation, nodes stay red because the developer updated their internal structure.
Delete the red nodes from the workspace.
Right-click on empty space -> Add Node -> Search for Qwen3-VL Model Loader and Qwen3-VL Run (or whichever ones were red) and add them manually from the menu.
Reconnect: Simply plug the qwen_instruction output from my Teleport Node into the prompt or text input of your newly added Qwen nodes.
@Krug_Lov I showed you a screenshot. You can't connect a teleporter to a new node.
@djivanoff1977277 Reconnect: Simply plug the qwen_instruction output from my Teleport Node into the prompt or text input of your newly added Qwen nodes. https://drive.google.com/file/d/1t6_0vVao9nGNcZiCPvV_4Kfn28kqQu24/view?usp=sharing
@Krug_Lov TNX