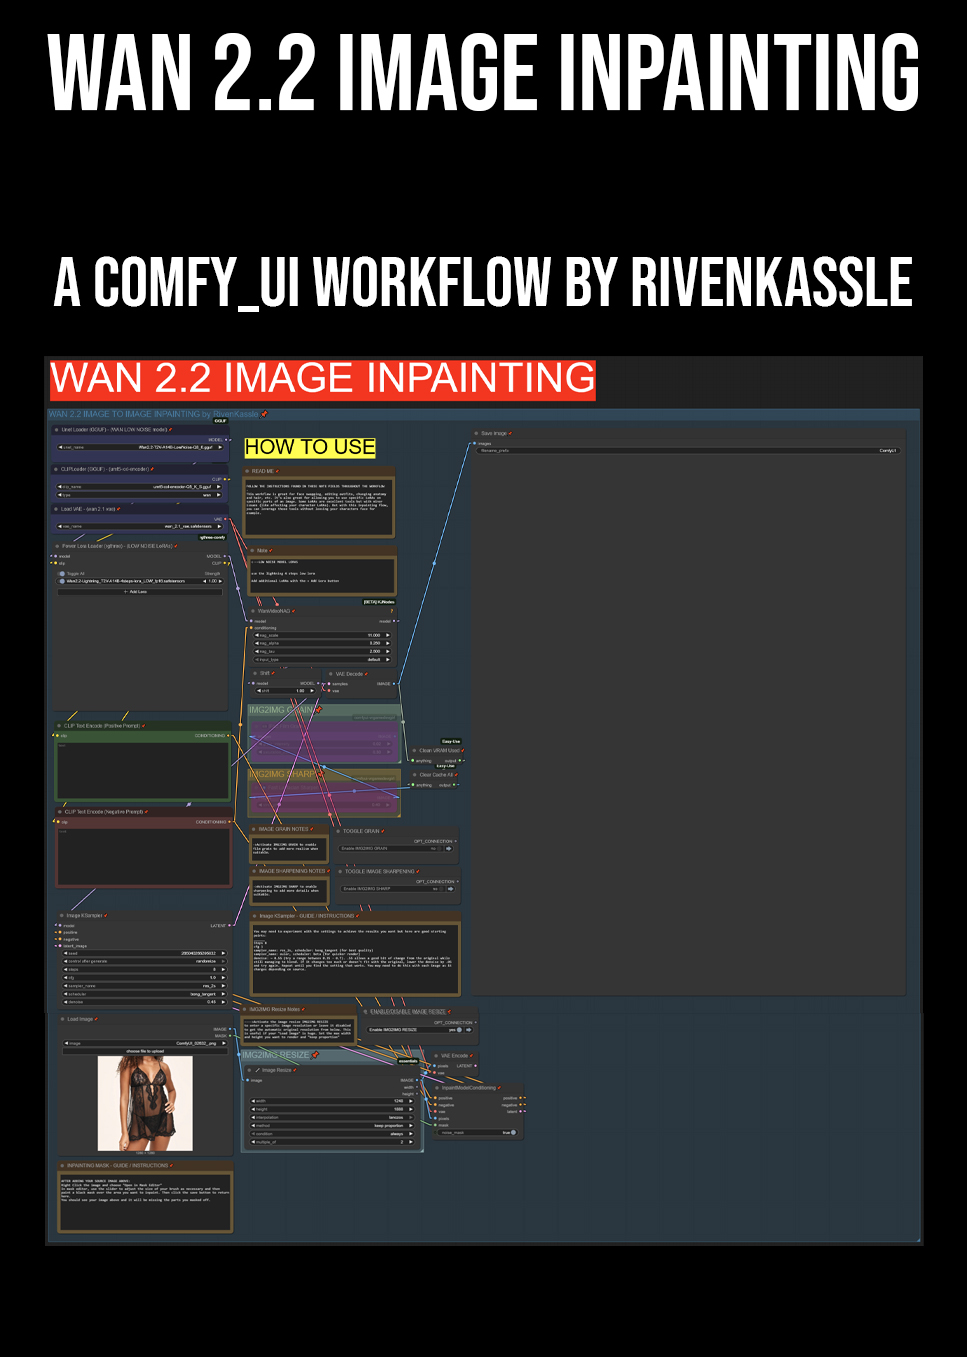


I created a workflow for inpainting with WAN 2.2. It would work for WAN 2.1 as well but WAN 2.2 is superior for image creation.
The workflow has easy to follow notes and instructions embedded so anyone should be able to use it.
_______
Sometimes with WAN 2.2 LoRAs, you need the perfect starting image to get the most use from them. Being able to inpaint in WAN and edit specific areas of the image makes it easy to get that Start Image you need for videos. InPainting also helps you use any LoRA you want to use and still retain your character likeness because you can inpaint their face/head/etc back onto the image.
______
How to use the workflow
Load your starting image that you want to inpaint on.
Load any LoRAs you want to use to influence your inpainting generations (character, anatomy, outfit, action)
Mask your starting image: right-click the image you loaded and choose "Open in MaskEditor". Adjust your brush size accordingly and paint over the portion of the image that you want to inpaint over. Click save when you're done.
Write a prompt for what you want to see in the masked area. Use typical image prompt language like "she is wearing a white off the shoulder crop top" - if you mask also covers parts of your image that you don't want to change, describe those too. For example: if you're changing her hair but her hair falls over her clothing that you want to keep, describe the hair you want AND the clothing you want to keep.
Set an appropriate denoising strength: this will vary and can take some trial and error. If it's a minor change, a strength of 0.4-0.6 is usually ideal. If it's a strong change, like changing black leggings into a miniskirt with bare thighs, you may need a stronger denoise up to 0.8. This could take several generations to get what you're looking for because a stronger denoise affects the image a lot more. Pay attention to where your mask is and edit it when needed. If a strong denoise is disconnecting a bicep from a shoulder because of a shirt change, you may need to mask the shoulder and bicep and let it all generate together. Practice and you'll get the hang of it.
Other notes and instructions are found throughout the workflow and include things like Image resize, sampler and scheduler, option noise grain and sharpening (helps match the look of certain images you may be inpainting).
I usually queue up 4 images back to back so I can choose the best amongst them.
What this workflow does and doesn't do
This workflow creates a mask at the latent layer allowing you to add noise to a specific area you mask for inpainting without touching the rest of your original image. Excellent for making coordinated changes
This workflow does not feed contextual reference images into the pipeline like you may be familiar with from Flux Kontext or Google's Nano Banana. If you want to put a certain character's outfit onto your image, you'll need a character LoRA that knows the outfit.
Description
FAQ
Comments (14)
Two questions:
1.) How do you prompt this? Like a video? Or like you prompt Qwen image edit, or SD? Example, you have some image of a woman, you want change her face to some specific Lora character, you mask the face, and promp... what? "CHange her face LoraCharacters?" or "LoraCharacter" or "woman with the face of "LoraCharacter"?
2.) When you say "can inpaint their face back in", this means using a character lora specifically to re-add the face right? Not that you can basically face-swap from the image (without lora)? Example of the latter would be making 2 characters in the SAME image swap faces, or duplicate one face onto another character (both in the same image).
Thanks a lot, it works pretty good for me so far!
Edit: last question, it cannot see what is under the mask right? Qwen Edit lets you say "make the cat blue" and it will turn the cat blue, but the cat will be (hopefully) the same cat. This will generate a completely new AI cat using the T2V model right?
Hey there! I'm glad it's working out for you so far!
1.) You just prompt for an image and exactly what you want. Example: If I upload an image of a woman with straight hair, I mask her hair. Then my prompt might say "dark curly hair with volume"
So you don't use terminology like Qwen Image Edit (change her hair to curly, etc). I haven't really needed any long difficult prompts.
2.) For this I mean something like: Load your image, load your character LoRA (I'll use "Hailey" as an example), mask the face, then prompt: Hailey, smiling, head tilted back slightly, open mouth
This works well too if you have an actual photo and you want to change the identity of the person. If you have a LoRA for the person, you can do it.
There are LoRAs that help with anatomy, outfits, etc that would usually mess with your character identity. For these, if you have an image of your character that isn't quite what you want it, load that image, choose an appropriate LoRA that would help you get what you need, then mask only those parts.
The extra question: The masked area becomes a latent with added noise - essentially your masking at the latent level rather than the image level. This works for WAN, which has aggressive denoising. I had tried another workflow to composite images. That was masking at the image level but it introduced denoising steps for both the original and the mask and then composited them together at the end. It wasn't optimal for what I was trying to do since it changed/touched every part of the image. I hope that wasn't too much extra info, but if I didn't explain something well enough, let me know and I'll regroup and try again :)
@RivenKassle That's what I thought, thanks. Was hoping I could use this to, for example, change the color of a cat, but keep the EXACT cat. But that will be impossible if it's off into latent space once masked (which of course it is, Idk why I asked).
How I handle it currently is to use Qwen it eventually can do a good enough job. Or I will put the image into Wan 2.2 I2V fp16 and tell it something like "Static Camera, the cat is frozen in time and does not move, meanwhile the cat slowly changes color to red". Then I can pull that frame from the video into photoshop or whatever..
@CAldonni try it out with .3 denoising strength and see how it goes. I haven't tried exactly this but it's worth a shot. I think Qwen Image Edit and/or Flux Kontext Max (currently only API accessible) would be the best at this. Or you can also try the Google Banana (give it 3 or four reference images of the same cat and tell it to make the same cat but a different color)
hey how do i inpaint from a reference pic or a character or a costume lora into the area? like jewelry logo, face and other
Hey! If I understand your question correctly: Since WAN isn't a "Kontext" type model (like Qwen Image Edit or Flux Kontext, Nano Banana), it doesn't have that kind of workflow where you can provide reference images and have elements of those references show up in your final image.
However, if you do have a LoRA that knows the character, costume, or logo - it's easy. You just load a starting image and the appropriate LoRAs, follow the instructions in the workflow to mask the specific part of the image you want to generate over, and then give it a prompt (like superman logo on her chest, etc).
@RivenKassle Lora is easy way to inpaint I know. maybe there are some way to adapt WF for QWEN / Kontext to provide reference image then auto stich? I feel it's real
Great work! Works sometimes best of the best! Thanks a lot!
Glad to hear it's working great for you! Enjoy!
unfortunately nothing changes for me.. i dont use any loras only the lighting one. Also tried to get denoise up and down lowest i went was 0.35
The lower the denoise, the smaller the change effect. If you're not seeing any change at all regardless of the denoising strength, then it's a mask issue. The workflow will only inpaint what has been masked. Make sure that you right click your loaded image, and "Open in Mask Editor". Then after painting a mask onto the parts you want to change, be sure to save it. You will return to the workflow at that point and you should see that masked portions are cut out from your loaded image.
@RivenKassle Copy, im gonna try it out im gonna raise the Denoise, and i did mask it open'd with right click masked and clicked Save im gonna Report back. Thank U
why is it not working for me? i did mask, and increased denoise too, nothing seems to work for me. the otput is always the original.
It's hard to say without seeing exactly what you're doing, but the most likely reason is missing a step or a slight deviation from the steps.