These files are Custom Nodes for ComfyUI
ComfyUI is a super powerful node-based, modular, interface for Stable Diffusion. I have a brief overview of what it is and does here. And full tutorial content coming soon on my Patreon.
In this model card I will be posting some of the custom Nodes I create. Let me know if you have any ideas, or if there's any feature you'd specifically like to see added as a Node!
Please consider joining my Patreon! Advanced SD tutorials, settings explanations, adult-art, from a female content creator (me!) patreon.com/theally
Description
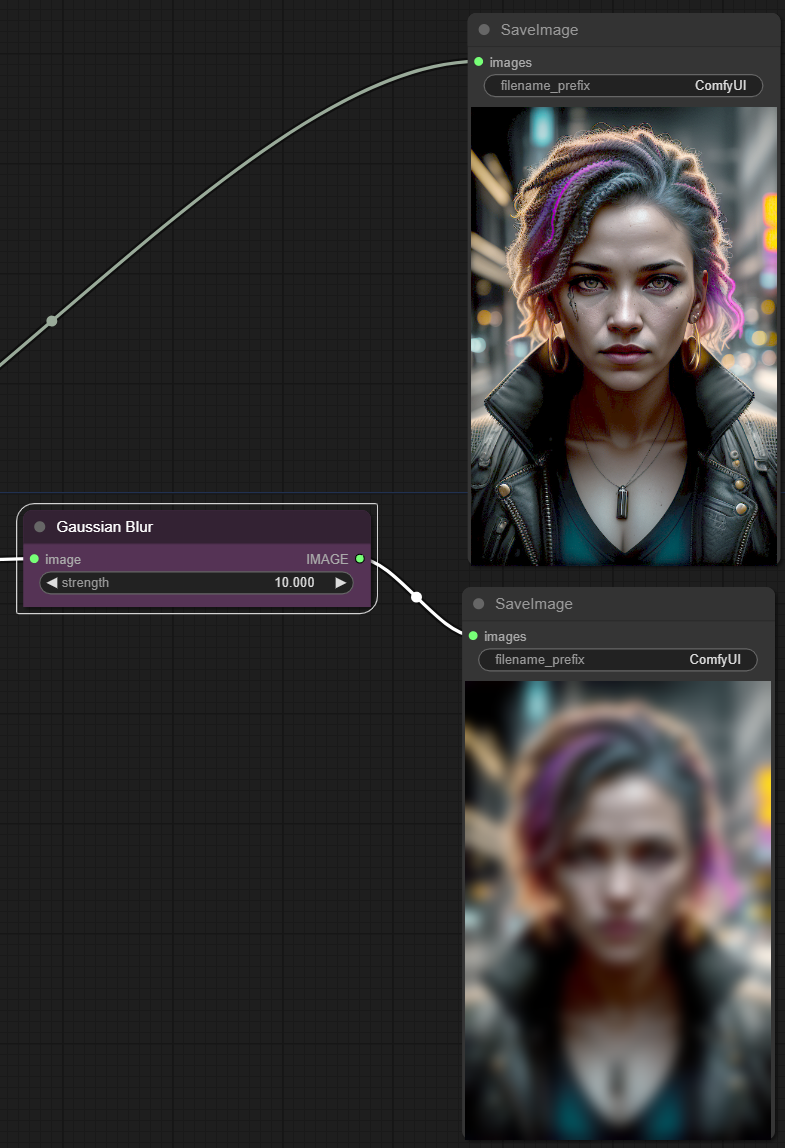
Drop in your ComfyUI_windows_portable\ComfyUI\custom_nodesfolder and select the Node from the Image Processing Node list. Simple Node to add gaussian blur.
FAQ
Comments (28)
Sorry, but I don't quite understand what is the usual WEBUI. Could someone briefly explain what nodes are better?
You can edit pictures a little in any convenient editor, right?
So this is ComfyUI - it's a node based workflow, which means you have a little more freedom when creating images; you can chain multiple nodes, or skip particular steps which you might not be able to skip in WebUI.
As for these image manipulation custom nodes, sure, you can edit your pictures in Photoshop or Gimp or similar, but if you can make adjustments to your image in the workflow - why not?
Do you know if node based generation come to Auto1111? And does Comfy support safetensors?
Lastly, in your humble opinion, is Comfy worth getting and using?
Comfy supports safetensor, it's definitely worth getting and trying out - but I wouldn't swap Auto1111 WebUI just yet - it doesn't have the support WebUI has. Some things are insanely complex in Comfy, and two clicks in WebUI.
I'm sure at some point someone will make a node-based, workflow style extension for WebUI, though.
SD-Controls for Brightness & Desaturation & Contrast - why has it taken so long? ;)
Thanksalot!
Is there a batch count? So I can make at lot of image without increasing the amount of ram use
In the main "window" there is an advanced option that lets you define a que.
As a Compositor, I'm looking forward to trying this out!
how come you only decrease contrast and not increase?
I need to re-visit this whole thing - it's on the list to do so before SD XL releases! Good call, I'll look into it.
Can you help with this error? Using SDXL 0.9
Error occurred when executing Pseudo HDR Style: Cannot handle this data type: (1, 1, 2460, 3), |u1
Having same problem with Sharpening. I get the error when running batches larger than 1. I'm also using Brightness / Contrast and it works fine.
Error occurred when executing Image Sharpening: Cannot handle this data type: (1, 1, 1200, 3), |u1 File "P:\ComfyUI_windows_portable\ComfyUI\execution.py", line 151, in recursive_execute output_data, output_ui = get_output_data(obj, input_data_all) File "P:\ComfyUI_windows_portable\ComfyUI\execution.py", line 81, in get_output_data return_values = map_node_over_list(obj, input_data_all, obj.FUNCTION, allow_interrupt=True) File "P:\ComfyUI_windows_portable\ComfyUI\execution.py", line 74, in map_node_over_list results.append(getattr(obj, func)(**slice_dict(input_data_all, i))) File "P:\ComfyUI_windows_portable\ComfyUI\custom_nodes\sharpness_ally.py", line 32, in apply_filter img = Image.fromarray(np.clip(i, 0, 255).astype(np.uint8)) File "P:\ComfyUI_windows_portable\python_embeded\lib\site-packages\PIL\Image.py", line 3073, in fromarray raise TypeError(msg) from e
@Hellborn I abandoned this long ago, but I think you can use the "rebatchlatents" node. Your batch can then be any size, this will rebatch to 1.
Please add detailed instructions on how to install your custom nodes, thank you.
I was confused at first, but it's very simple. You put each file in the base custom nodes directory and they load in just fine.
Thanks for this, just what i needed :)
I have edited the brightness/contrast a little to use "negative" values, also added a scaling factor for the negative contrast as it was too much, raise to lower the strength when doing negative contrast.
code below:
#Developed by Ally - https://www.patreon.com/theally #https://civitai.com/user/theally #This node provides a simple interface to adjust the brightness/contrast of the output image prior to saving import numpy as np class BrightnessContrast: """ """ def __init__(self): pass @classmethod def INPUT_TYPES(s): """ Input Types """ return { "required": { "image": ("IMAGE",), "mode": (["brightness", "contrast"],), "strength": ("FLOAT", {"default": 0.5, "min": -1.0, "max": 1.0, "step": 0.01}), "scaling": ("FLOAT", {"default": 0, "min": 0, "max": 1.0, "step": 0.1}), }, } RETURN_TYPES = ("IMAGE",) FUNCTION = "apply_filter" CATEGORY = "Image Processing" def apply_filter(self, image, mode, strength, scaling): if mode == "brightness": if strength >= 0: image = np.clip(image + strength, 0.0, 1.0) else: image = np.clip(image - abs(strength), 0.0, 1.0) elif mode == "contrast": if strength >= 0: image = np.clip(image * strength, 0.0, 1.0) else: # Reducing contrast by a negative factor (effectively increasing contrast) if scaling <= 0: image = np.clip(image / abs(strength), 0.0, 1.0) else: image = np.clip(image / (abs(strength) * scaling), 0.0, 1.0) else: print(f"Invalid filter option: {mode}. No changes applied.") return (image,) return (image,) NODE_CLASS_MAPPINGS = { "Brightness & Contrast": BrightnessContrast }How do I install this? I am clueless :(
Never mind, I figured it out. Put the files directly in the custom nodes folder. I made extra folders for each file. Then it doesn't work
@Tegenstrever yeah, the nodes themselves need to be made to operate out of a subdirectory. It might be a good suggestion to collect all these as "AllyNodes for image processing" so that there's one folder (and one download too). @theally
Would be possible to create a node-link like in nodered? Link Out, Link In so the connections can be more visually better organized instead of using reroute node.
Context cards from @rgthree's pack is what I think you are lookinh for, just found them tonight, they make things so clean
https://imgur.com/a/0HB9yEd
Does somebody know how to recycle seed when batch generate images in comfyUI, I found that the images batch generated all use one seed, can't find out specific seed for each image
If you drag the image back into the comfui window it will reuse all the settings from that generated image. That goes for images generated in Automatic1111 that embed metadata into the png file if I understand what your wanting to do this should do it.
@friarfrosst No, I've tried this method. No matter which one you drag back, they all use one seed. Can work in Automatic1111 but not fit comfyUI
Doesn't work. Error in console:
FileNotFoundError: [Errno 2] No such file or directory: 'C:\\ComfyUI Rebuild Rebuild\\ComfyUI_windows_portable_nvidia_cu118_or_cpu_old\\ComfyUI_windows_portable\\ComfyUI\\custom_nodes\\comfyuiCustomNodes_pseudoHDR\\__init__.py'
Cannot import C:\ComfyUI Rebuild Rebuild\ComfyUI_windows_portable_nvidia_cu118_or_cpu_old\ComfyUI_windows_portable\ComfyUI\custom_nodes\comfyuiCustomNodes_pseudoHDR module for custom nodes: [Errno 2] No such file or directory: 'C:\\ComfyUI Rebuild Rebuild\\ComfyUI_windows_portable_nvidia_cu118_or_cpu_old\\ComfyUI_windows_portable\\ComfyUI\\custom_nodes\\comfyuiCustomNodes_pseudoHDR\\__init__.py'
I have it in the correct place, just like all my other working custom nodes, Its in the folder that is created via "extract to comfyuiCustomNodes_pseudoHDR"
Please reply if I am missing something.
These are easy to use, i loved it