
Qwen Image Edit ComfyUI Workflow: Basic Description
This workflow demonstrates how to use ComfyUI for image editing with the Qwen model, focusing on style transformation and conditioning via text prompts. Below you'll find a structured overview of the process: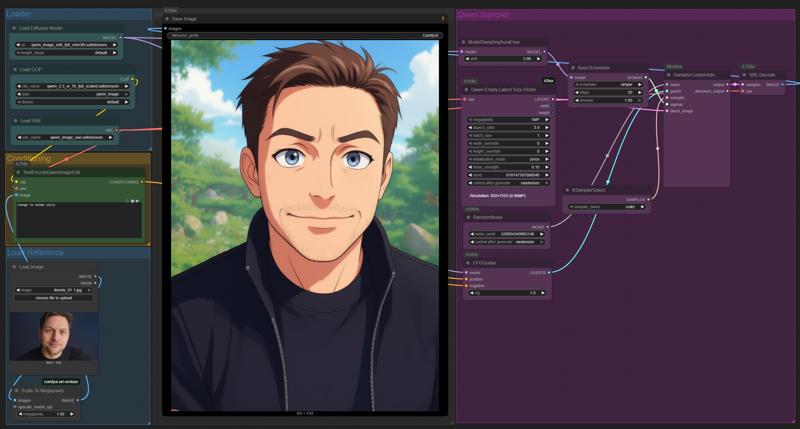
1. Loader Section
Load Diffusion Model: Select and load a Qwen image edit diffusion model from the available options. This model is responsible for generating and editing images based on provided instructions.
Load CLIP: Load the CLIP model, which is needed for image-text conditioning. It links your text prompt to specific visual features in the image.
Load VAE: Load the Variational Autoencoder (VAE) model to decode latent image representations back into viewable images.
2. Conditioning Section
Text Conditioning: Use the
TextEncodeQwenImageEditnode to input your prompt (e.g., "Change to anime style"). This allows the workflow to modify the image according to the textual description you provide.Image Reference: Load the original image to be edited. You can optionally provide a mask for targeted editing.
3. Preprocessing
Scale to Megapixels: Scale the reference image to a target megapixel size to ensure the output resolution matches your requirements.
4. Sampler Section
Latent Size Picker: Define the output size (resolution) and other sampling parameters such as strength and seed, which influence randomness and consistency.
Scheduler and Sampler Selection: Configure the scheduler and sampler. Common settings include:
Scheduler: Controls the number of steps and strength of denoising.
Sampler: Select a suitable algorithm (e.g., Euler) for the sampling process.
5. Generation Nodes
Random Noise: Initialize the process with random noise, consistent with the chosen seed.
CFG Guider: Guide the process toward the target image based on the CLIP conditioning and prompt.
6. Decoding & Output
Sampler & Decoder: The generated latent image is decoded by the VAE, transforming it into a final visual output.
Save/Export: Save the resulting image for further use or sharing.
This workflow enables flexible image editing by leveraging diffusion models conditioned on text prompts within an easy-to-follow, node-based interface. The modular structure allows customization at each step for a wide range of creative and technical applications.
Description
FAQ
Comments (16)
not work for me :(
Update Comfyui ;)
denrakeiw my version is 3.50
And update the nodes as well. Try out the implemented workflow which downloading the requirements. And sadly you have to have at least 8/16gigz vram. I'm also excited about the implementation of nunchaku version because of that.
Try remove the Wan upscale parts. You don't really want that at first.
In reality that upscale part more interesting than the main part.
Thanks for sharing ❤
hey i want to create a hotline miami style aesthetic, any pointers/tips? Your title pic definitely has that vibe. Ive relatively experienced, ive made a few very convincing animal mask people so far. But im not quite 100% in that zone
Use "Vaporwave" in the Prompt ;)
denrakeiw you legend! thanks.
Prompt execution failed
Prompt outputs failed validation: FluxEmptyLatentSizePicker: - Failed to convert an input value to a FLOAT value: noise_strength, zeros, could not convert string to float: 'zeros' - Failed to convert an input value to a INT value: batch_size, 3:4, invalid literal for int() with base 10: '3:4' - Value not in list: initialization_mode: '0' not in ['zeros', 'vae_sample', 'gaussian_noise', 'uniform_noise'] - Value not in list: resolution: '1MP' not in (list of length 24)
U can replace the "FluxEmptyLatentSizePicker" with "Empty SD3 Latent" Node
Hello I ve been trying it out since yesterday but I can t seem to make it work , all the results come out fully pixelated so I can t see anything. No idea whats causing it , i m using the fp8 model 20gb but i only have 12gb vram and 32ram I didn t think that would be an issue except for being slow but could that be whats causing it ? I checked a lot online but I can t find errors about this. Some help would be much appreciated , I tried both the normal and 4step workflow and get the same result except that for the 4step the result image is a little bit more visible under all the pixels
In my case, also 12 gb vram. I use the GGUF Q4_K_S model and the image is not pixelated, it is almost normal, but it is full of artifacts, like a JPG with terrible compression. I use the Basic workflow with 20 steps. I don't understand why this is happening, I don't think it should be like this.
I found a solution that fixes the terrible quality and artifacts in my case. Connect "Qwen-Image-Lightning-8steps-V1.1.1.safetensors" lora, set 10 steps and the quality increases many times over. Everything looks good.
@superuser111 oh great thanks for that , I will give it a try !
Yeah, the 8steps 1.1 lora with 10 steps is the best! And cfg 1.5! Negative prompt works a little bit too.