Introduction
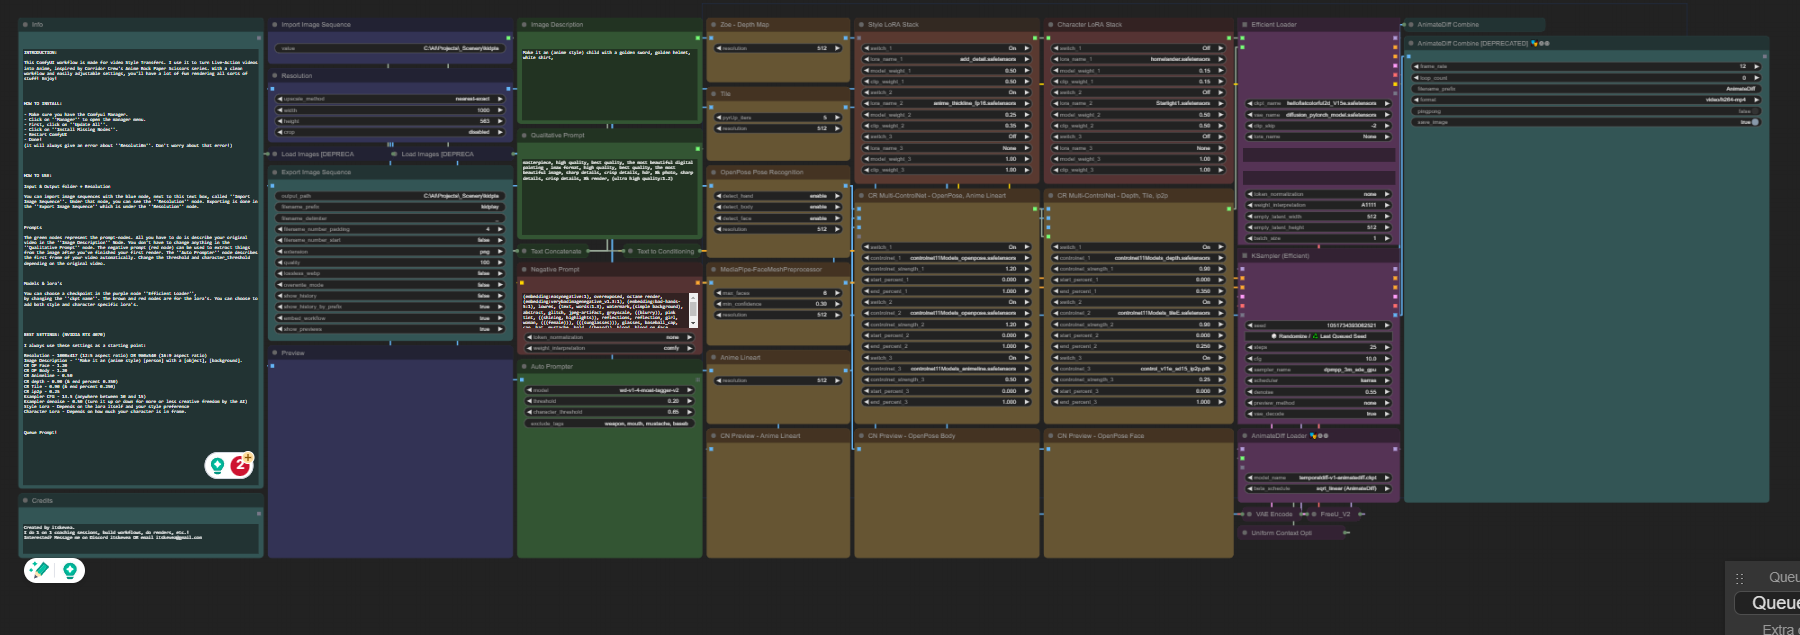
This ComfyUI workflow is designed for video style transfers, particularly to turn live-action videos into anime. It is a clean and easy-to-use workflow that allows you to render all sorts of stuff.
Tutorial Video:
Video's made with this workflow:
Installation
To install the workflow, you will need the ComfyUI Manager. Once you have the manager installed, open it and click on "Update All" and then "Install Missing Nodes".
Also add the following ControlNets:
Add them to \ComfyUI\models\controlnet
Restart ComfyUI and you are done!
Usage
Import/Export
To use the workflow, you will need to input an input and output folder, as well as the resolution of your video. You can import image sequences with the blue "Import Image Sequence" node. Make sure the import folder ONLY has your PNG-Sequence inside.
Resolution
The "Resolution" node can be used to set the resolution of your output video.
Prompting
The green "Prompt" nodes are used to describe your original video. You can also use the "Auto Prompter" node to describe the first frame of your video automatically.
The purple "Efficient Loader" node is used to choose a checkpoint. The brown and red nodes are used to choose lora's.
Settings
Here are the best settings for an NVIDIA RTX 4070:
Resolution: 1000x417 (12:5 aspect ratio) or 960x540 (16:9 aspect ratio)
Image Description: "Make it an (anime style) [person] with a [object], [background]."
CR OP Face: 1.20
CR OP Body: 1.20
CR Animeline: 0.50
CR depth: 0.90 (& end percent 0.350)
CR Tile: 0.90 (& end percent 0.250)
CR ip2p: 0.25
Ksampler CFG: 13.5 (anywhere between 10 and 15)
Ksampler denoise: 0.50 (turn it up or down for more or less creative freedom by the AI)
Style Lora: Depends on the lora itself and your style preference
Character Lora: Depends on how much your character is in frame
Conclusion & Tips
Once you have set up your workflow, you can start rendering by clicking on the "Queue Prompt!" button.
Shot Selection
The workflow is excellent at close-up shots. The further a character is from the camera, the less detailed it will be. The render sometimes even falls apart completely if the character isn't close enough.
Consistency
I found that the consistency really depends on the Denoise. The lower it is, the more it will follow the original footage. The higher it is, the more it will deviate from the original video. Try a render with a denoise of 0.20 and then 0.70 as a A/B test. You'll see the difference.
Enjoy!
Credits
Created by itskevea.
I do 1 on 1 coaching sessions, build workflows, do renders, etc.!
Interested? Message me on Discord itskevea OR email [email protected]
Description
First version!
FAQ
Comments (27)
Error FaceMeshPreprocessor
No module named ´mediapipe´
Have you updated your comfyui and installed missing nodes?
@itskevea Is up to date ComfyUI 1629, no missing nodes at start.
@rob73577931 try adding the node manually. the FaceMeshPreprocessor is for the openpose CR
@itskevea so far so good, next error Efficient Loader: ´Nonetype´ object has no attribute ´lower´
@rob73577931 Do you have all the right models installed? What GPU do you use? Try going to the Efficient loader and change the settings that are currently set to ''none''. Let me know if it works! Happy to help
@itskevea I figured it out, I was a long run and many errors. I disable all LORA_STACK, "anime_thickline_fp16 was the issue the file was missing without a error. Besides the "controlnet11Models" are not stored in the Manager (different name), you must download it manually from here. My Hardware is 4090/13900KS 64GB.
Thanks you for your kind support and the workflow.
@rob73577931 Great to hear that you got it to work! I will update the description with links to all models needed for this workflow in order to prevent the same errors.
1280*720 full body picture can't detect face,This is an error message in CMD:No faces detected in controlnet image for Mediapipe face annotator.
This could be because the face is far away or rotated in a way that the mediapipe can’t see it. The other controlnets should fill this information in though. Do the faces look bad?
@itskevea yes,the face look bad.
Hey thanks for sharing, I keep getting this error: Error occurred when executing CR Multi-ControlNet Stack: 'NoneType' object has no attribute 'lower' File "C:\Users\Loren\OneDrive\Desktop\ComfyUI_windows_portable\ComfyUI\execution.py", line 153, in recursive_execute output_data, output_ui = get_output_data(obj, input_data_all) ^^^^^^^^^^^^^^^^^^^^^^^^^^^^^^^^^^^^ File "C:\Users\Loren\OneDrive\Desktop\ComfyUI_windows_portable\ComfyUI\execution.py", line 83, in get_output_data return_values = map_node_over_list(obj, input_data_all, obj.FUNCTION, allow_interrupt=True) ^^^^^^^^^^^^^^^^^^^^^^^^^^^^^^^^^^^^^^^^^^^^^^^^^^^^^^^^^^^^^^^^^^^^^^^^^^^ File "C:\Users\Loren\OneDrive\Desktop\ComfyUI_windows_portable\ComfyUI\execution.py", line 76, in map_node_over_list results.append(getattr(obj, func)(**slice_dict(input_data_all, i))) ^^^^^^^^^^^^^^^^^^^^^^^^^^^^^^^^^^^^^^^^^^^^^^^^^^^ File "C:\Users\Loren\OneDrive\Desktop\ComfyUI_windows_portable\ComfyUI\custom_nodes\ComfyUI_Comfyroll_CustomNodes\nodes\controlnet.py", line 103, in controlnet_stacker controlnet_1 = comfy.controlnet.load_controlnet(controlnet_path) ^^^^^^^^^^^^^^^^^^^^^^^^^^^^^^^^^^^^^^^^^^^^^^^^^ File "C:\Users\Loren\OneDrive\Desktop\ComfyUI_windows_portable\ComfyUI\comfy\controlnet.py", line 289, in load_controlnet controlnet_data = comfy.utils.load_torch_file(ckpt_path, safe_load=True) ^^^^^^^^^^^^^^^^^^^^^^^^^^^^^^^^^^^^^^^^^^^^^^^^^^^^^^ File "C:\Users\Loren\OneDrive\Desktop\ComfyUI_windows_portable\ComfyUI\comfy\utils.py", line 12, in load_torch_file if ckpt.lower().endswith(".safetensors"): ^^^^^^^^^^
You might want to store your comfyui locally. Otherwise update everything or turn some control nets off to see if there is one that doesn't work. You might also want to check if the controllers are selected correctly
'NoneType' object has no attribute 'lower'
please can you have selected a checkpoint model from the drop down
https://civitai.com/articles/1745/comfyroll-workflow-templates-troubleshooting-guide
Hello I'm getting the error of LoadImagesFromDirectory not working
Conflicted Nodes: CustomControlNetWeights [ComfyUI-Advanced-ControlNet], CustomT2IAdapterWeights [ComfyUI-Advanced-ControlNet], LatentKeyframeTiming [ComfyUI-Advanced-ControlNet], LoadImagesFromDirectory [ComfyUI-Advanced-ControlNet], SoftControlNetWeights [ComfyUI-Advanced-ControlNet], SoftT2IAdapterWeights [ComfyUI-Advanced-ControlNet], TimestepKeyframe [ComfyUI-Advanced-ControlNet]
What can I do about this?
I've tried deleting and reinstalling and it's still not working
wow
Are you able to get special effects with this? Like him using his heat vision?
ERROR:root:Failed to validate prompt for output 18:
ERROR:root:* Text Concatenate 31:
ERROR:root: - Value not in list: clean_whitespace: '' not in ['true', 'false']
ERROR:root:Output will be ignored
ERROR:root:Failed to validate prompt for output 16:
ERROR:root:Output will be ignored
ERROR:root:Failed to validate prompt for output 29:
ERROR:root:* OpenposePreprocessor 3:
ERROR:root: - Value not in list: version: '512' not in ['v1', 'v1.1']
ERROR:root:Output will be ignored
ERROR:root:Failed to validate prompt for output 19:
ERROR:root:Output will be ignored
ERROR:root:Failed to validate prompt for output 21:
ERROR:root:Output will be ignored
Why am I getting this error?
how to fix this error File "F:\ComfyUI_windows_portable\python_embeded\Lib\site-packages\mediapipe\python\solution_base.py", line 248, in init self._graph = calculator_graph.CalculatorGraph( ^^^^^^^^^^^^^^^^^^^^^^^^^^^^^^^^^ RuntimeError: Failed to parse: node { calculator: "ImagePropertiesCalculator" input_stream: "IMAGE:image" output_stream: "SIZE:image_size" } node { calculator: "PreviousLoopbackCalculator" input_stream: "MAIN:image"
Can I ask how you arrange your SDXL and SD1.5 installs? You have a lot of models connected and I currently only have SDXL installed and I'm not sure how to add SD1.5 to it appropriately.
Do you combine both models? Do you keep them separate? (I'm a noob to SD btw)
The text boxes no longer load with this workflow after recent comfy update is there a fix for this?
same issue here
did u find any solution?
I also encountered the same problem. Have you solved it?
Same problem
i'm facing the same issue here, anyone manage to fix this?
Just use text multiline instead of text boxes.