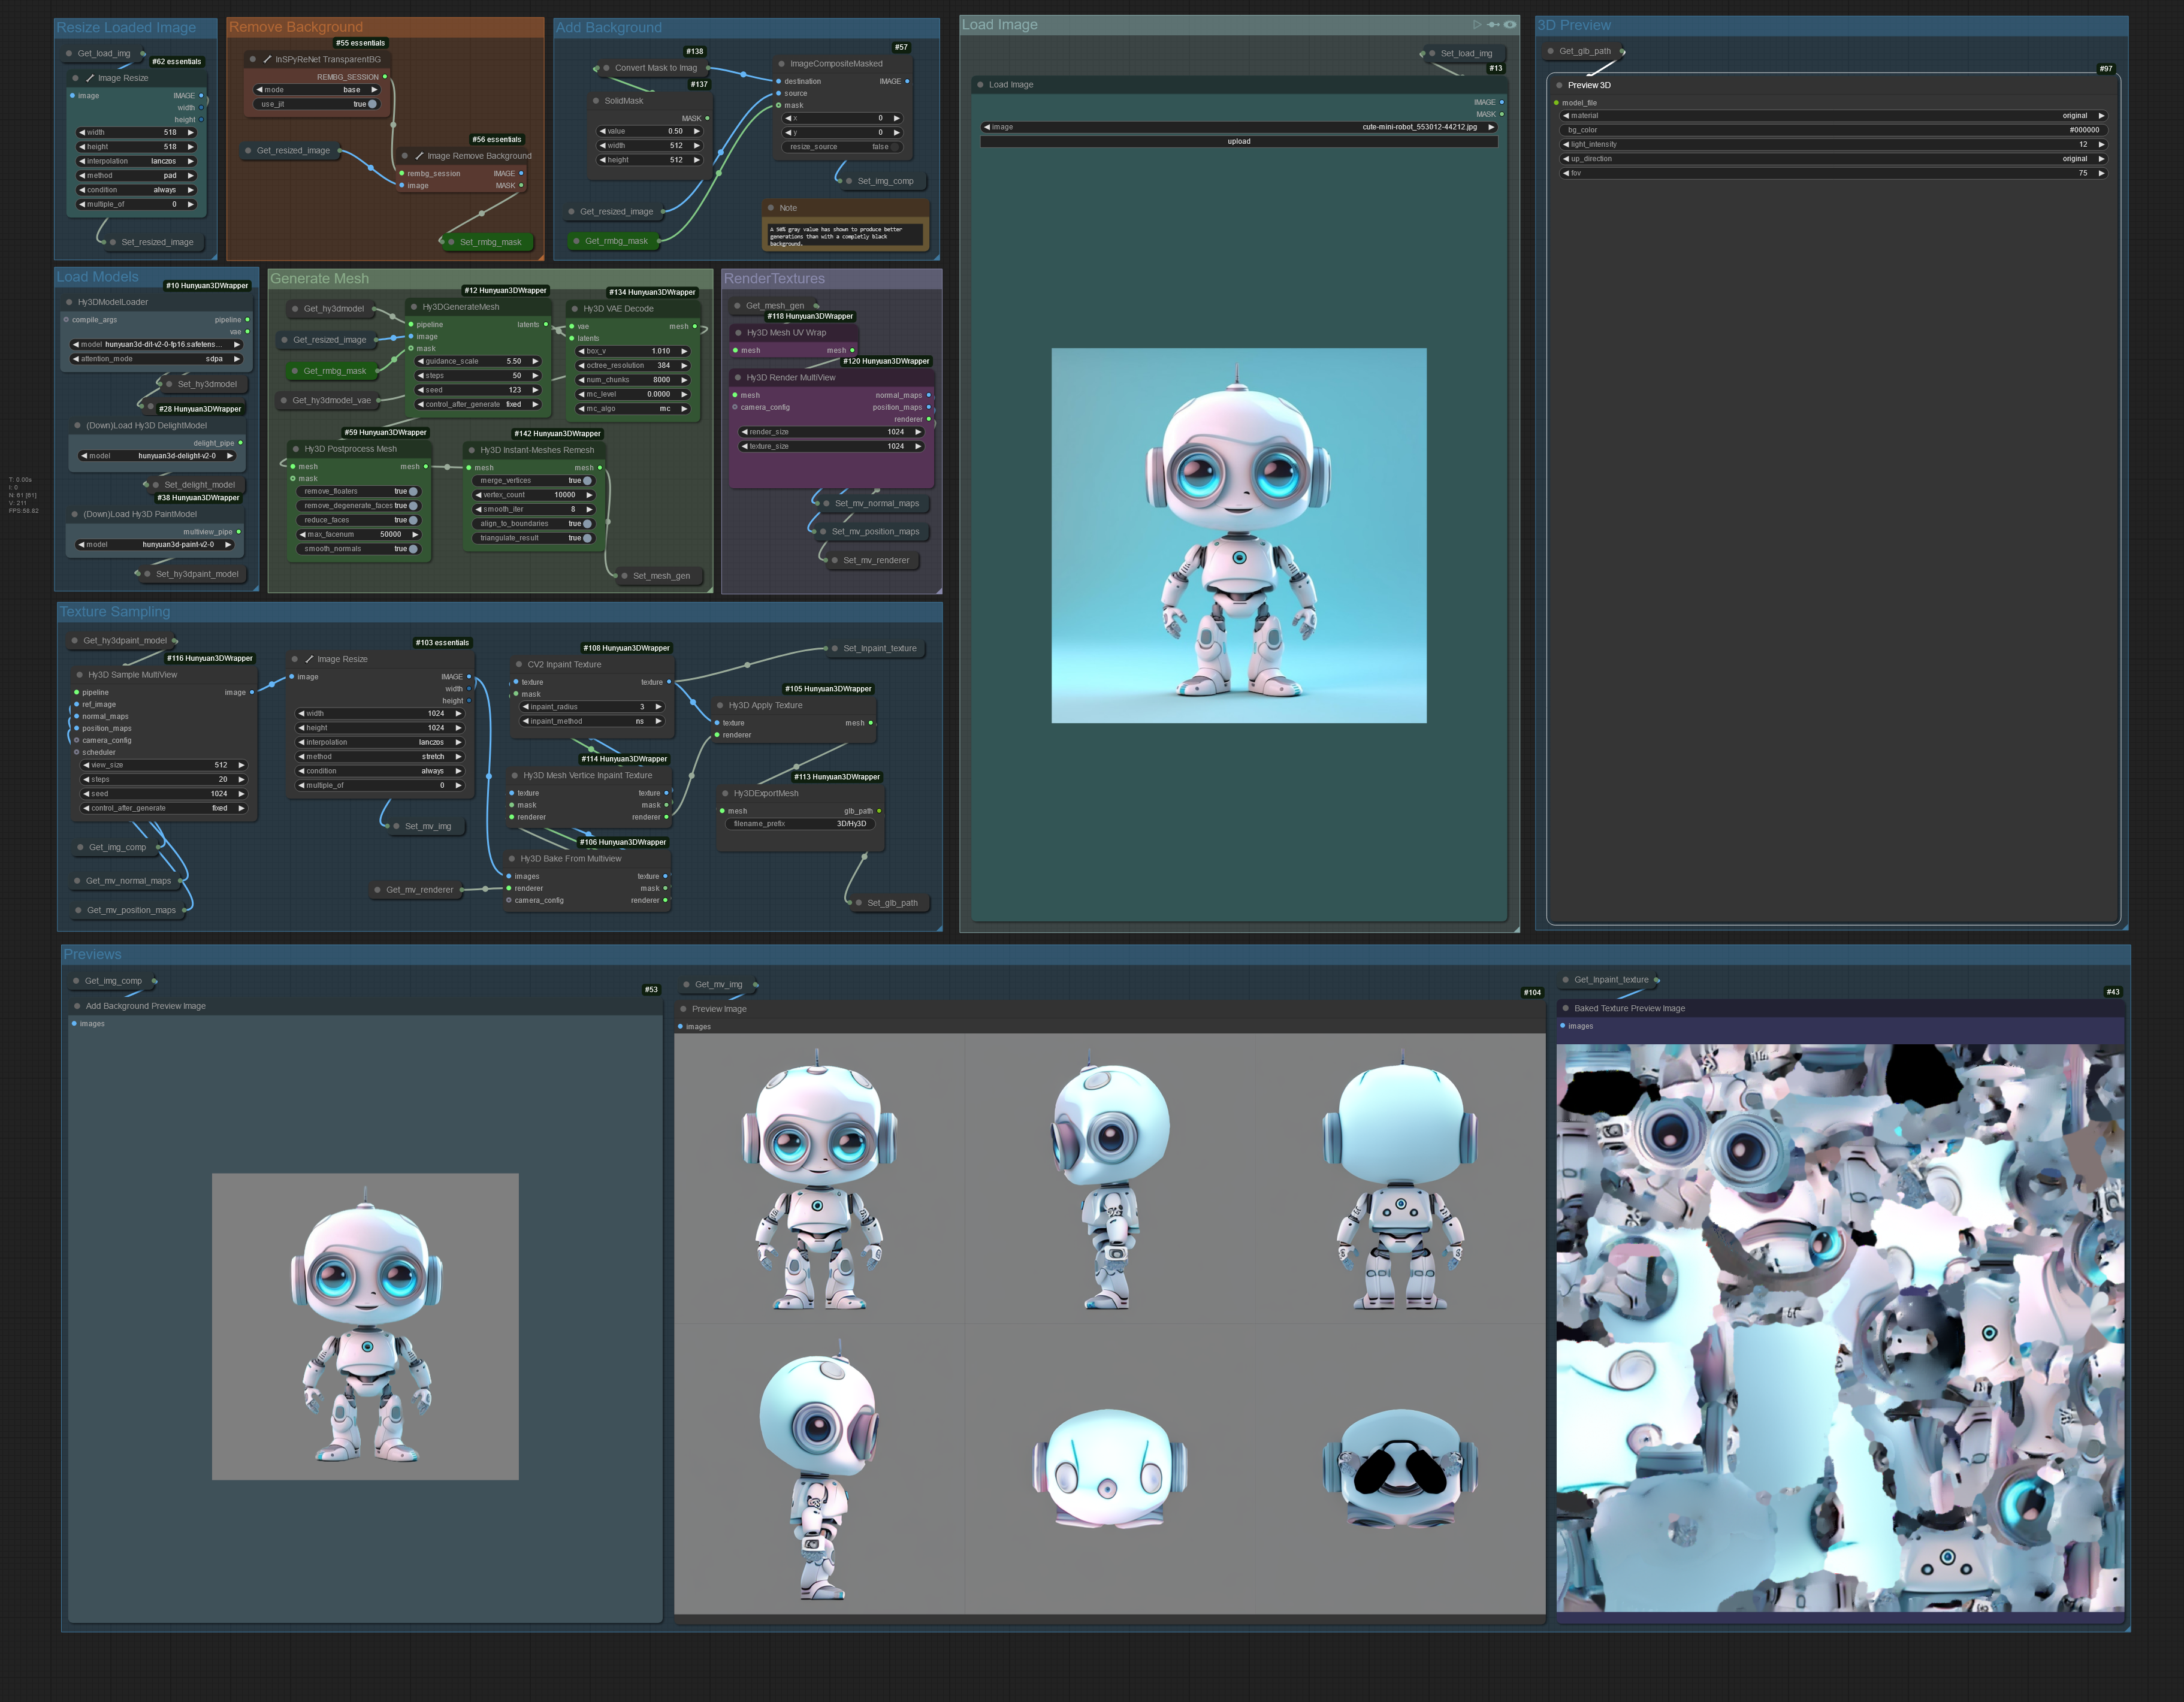
This is a simple and clean workflow for Hunyuan 3D 2.0 Wrapper in ComfyUI by Kijai
https://github.com/kijai/ComfyUI-Hunyuan3DWrapper
Version 2.2 Update
Removed delight (again!) it's just not good, if you want it use the 2.1 version or add it to the new workflow.
Added the new Hy3D Instant-Meshes Remesh node to the workflow
You need to install the dependency for it to work
For ComfyUI portable run
python.exe -m pip install pynanoinstantmeshes from within the python_embeded directory
For ComfyUI venv
activate the comfyui venv and then run
pip install pynanoinstantmeshes
make sure you are installing the module to the venv and not your local installation of python.
Version 2.1 Updated with latest changes from repo
Added the option to turn on Delight with a toggle node within the texture sampling group.
Version 2.0 update
Turned off delight by default and updated with new features from the sample workflow that kijai provided.
If you want to use delight change the get_img_comp to get_delight in the Hy3D Sample MultiView node in the Texture sampling group and unmute the Delight group.
Description
Removed delight since it's just not good
added the new Hy3D Instant-Meshes Remesh node to the workflow
need to install the dependency for it to work
for ComfyUI portable you can run
python.exe -m pip install pynanoinstantmeshes from within the python_embeded directory.
FAQ
Comments (48)
it would be wonderful to find a way to use the reference photo when possible as a front photo for the textures in order to have greater quality and an almost perfect final result
A multiview version of the model will be even more transformational... It will come for sure
Would love to give this a try, but I can't seem to install the missing custom nodes. I get this error in ComfyUI:
Missing Node Types
When loading the graph, the following node types were not found: SetNode, GetNode.
Can you let us know where to download these, or perhaps I'm missing something obvious. Thank you!
Those nodes are from the KJNodes pack https://github.com/kijai/ComfyUI-KJNodes
If you have the manager installed in ComfyUI you can open it and click on install missing nodes.
Installing & Using Hunyuan3D-2 in ComfyUI with a Virtual Environment
📌 Introduction
Hunyuan3D-2 is a 3D texture generation model that works within ComfyUI. To install and use it properly, you need to set up a virtual environment, download the model, install required components, and run ComfyUI inside the virtual environment.
This guide provides a step-by-step explanation of the process.
🔹 Step 1: Set Up a Virtual Environment
A virtual environment keeps all necessary tools and dependencies separate from the rest of your system. This ensures that ComfyUI and Hunyuan3D-2 work correctly without interfering with other software.
Steps to Create a Virtual Environment
Open Command Prompt (Windows) or Terminal (Linux/Mac).
Choose where to create the virtual environment. If you have an external drive (e.g., E:), create it there.
Run the command to create a virtual environment:
The virtual environment will be called paints_env.
Activate the virtual environment:
Windows: Navigate to the Scripts folder inside paints_env and activate it.Linux/Mac: Use source to activate it.
Once activated, all installations will only apply inside this environment.
🔹 Step 2: Install Required Libraries
After activating the virtual environment, install the necessary tools.
Libraries Needed
torch (PyTorch for AI models)
diffusers (for model execution)
accelerate (to optimize performance)
Other supporting tools (numpy, scipy, etc.)
Each of these helps ComfyUI handle 3D textures and image generation.
🔹 Step 3: Download the Hunyuan3D-2 Model
Go to Hugging Face and download the model file.
Rename the file to hunyuan3d-dit-v2-0.safetensors.
Move this file to the ComfyUI models folder inside:
bashCopyEdit
ComfyUI/models/diffusion_models/
This ensures that ComfyUI recognizes the model and allows you to load it in your workflow.
🔹 Step 4: Install the Hunyuan3D Wrapper
Hunyuan3D-2 requires a special wrapper to function inside ComfyUI.
Go to ComfyUI/custom_nodes/.
Download the Hunyuan3D Wrapper from GitHub.
Move it into the custom_nodes/ folder.
Check that there is a folder called ComfyUI-Hunyuan3DWrapper inside custom_nodes.
This wrapper allows ComfyUI to properly process 3D textures.
🔹 Step 5: Install Hunyuan3D Dependencies
Now that everything is set up, install the dependencies.
Inside the virtual environment, run the installation for required libraries.
If there are missing packages, install them manually.
Once completed, the system will be ready to run Hunyuan3D-2 inside ComfyUI.
🔹 Step 6: Start ComfyUI in the Virtual Environment
Now that all components are installed:
Make sure the virtual environment is activated.
Navigate to the ComfyUI directory.
Run ComfyUI inside the virtual environment.
After opening ComfyUI, you will be able to load the Hunyuan3D-2 model, use the Hunyuan3D node, and generate 3D textures.
🔹 Step 7: Load the Hunyuan3D Node in ComfyUI
Open ComfyUI.
Search for the Hunyuan3D Node in the available node list.
Add the Hunyuan3D Node to your workflow.
Adjust settings and click Run to generate 3D textures.
⚠️ Troubleshooting
If you encounter issues, check the following:
ComfyUI does not start → Ensure you are inside the virtual environment before running it.
The Hunyuan3D node does not appear → Restart ComfyUI and reload.
Missing dependencies → Install any missing libraries manually inside the virtual environment.
@ncreature Thank you!
No matter what I do, or redo the whole thing, I keep getting the error where Nodes wont show up. Its so weird, I followed the instructions here but still nothing.
@rikardo2041145 Same here. I'm using both stand alone windows ComfyUI and in Stability Matrix and it's not working. I've updated every single version of all of the nodes in workflow and can't get the get/set nodes to work
- Correction/update - I found this reddit post which got me past getnode/setnode: https://www.reddit.com/r/comfyui/comments/1adhmcs/setnode_getnode_missing/
Even though this showed has having two conflicting nodes and NEVER showed as being missing, this resolved this error, and let me continue. As a workflow author, please stop using bad nodes that conflict with other nodes. Instead, encourage node authors to use best practices with programming and to discourage duplication of effort.
Then I got errors about missing the hunyuan 3d node, even though it was installed via the ComfyManager. I attempted to reinstall it. This left the Trimesh objects on the hunyuan3dwrapper objects without any form of connection to them, with a red circle. This is extremely weird, because there is a trimesh connection from the previous object connected to a mesh object, instead of a trimesh object, but it's falling from the RenderTextures group not having the trimesh.
I updated all of the nodes to switch from mesh to trimesh, but then I got a new error that I needed the pynanoinstantmeshes. For me, for example, fixed with my windows install StabilityMatrix\Data\Packages\ComfyUI\venv\Scripts>.\python -m pip install pynanoinstantmeshes
This got me where I needed to go. This may not help other folks get through where they need it to, but this did fix the issues for me.
had to bypass the mesh remesh node, gave error no mesh found.
same here
pynanoinstantmeshes not found. Please install it using 'pip install pynanoinstantmeshes'Which folder should I install it under?
One more question:No module named 'custom_rasterizer'
Same issue, which folder do you pip install pynanoinstantmeshes in standalone build?
@Lukey3333 Please read the description of the workflow. The last line tells you exactly where to run the command.
@ncreature The standalone version of Comfy doesn't have a python_embeded directory
I pip installed pynanoinstantmeshes in venv in Comfy folder and it seened to work but now get this error at the Instant-Meshes Remesh node: "AttributeError: 'Trimesh' object has no attribute 'geometry'. Did you mean: 'symmetry'?"
@Lukey3333 You can bypass that node if you need to by selecting the node and hitting Ctrl+B or just remove the node. It's only remeshing the output mesh. I will investigate if the node was updated.
You can also go into the node author's repo and report an issue or ask for help installing the optional node.
I have the non standalone version of Comfy and get the same pyanoinstantmeshes error
@ncreature Still no information about how to install pynanoinstantmeshes without python_embedded. I installed it because I have it but still got error: "pynanoinstantmeshes not found. Please install it using 'pip install pynanoinstantmeshes" so I assume I have to install it somehow without using python_embedded.
@DariuszClock If you are running comfyui in a venv you need to activate that venv and install the module there. Just running pip install pynanoinstantmeshes without activating your venv will install the module to your local installation of python.
I am not sure why, but the .glb output is nowhere to be found... Also, the preview3D node is never showing the 3d model.
I needed to create the 3D folder in the output for it to save to it, curiously.
I also can't for the life of me figure out how to make the instant remesh node work. It always says that there is no geometry attribute in the trimesh.
The Preview 3D node is part of ComfyUI and it was probably updated. Right click it and recreate the node or remove it and add it again. If there is a red outline around it that means it did not process properly.
@Zeroshin That node needs dependencies install as stated in the description. If it's not working you can also bypass it or remove it. All it does is give you a cleaner mesh, something you can do in Blender or your 3D package of choice.
where do I find the delight model and paint model
Very cool, thank you!
ComfyUI-3D-Pack
import failed for me, tried to install manually in custom nodes and via comfyui (updated everything today)
Maybe saomeone has a solution, have not found one yet.
Traceback (most recent call last):
File "C:\ComfyUI_windows_portable\ComfyUI\nodes.py", line 2141, in load_custom_node
module_spec.loader.exec_module(module)
File "<frozen importlib._bootstrap_external>", line 999, in exec_module
File "<frozen importlib._bootstrap>", line 488, in callwith_frames_removed
File "C:\ComfyUI_windows_portable\ComfyUI\custom_nodes\comfyui-3d-pack\__init__.py", line 53, in <module>
module = importlib.import_module(f".{nodes_filename}", package=__name__)
^^^^^^^^^^^^^^^^^^^^^^^^^^^^^^^^^^^^^^^^^^^^^^^^^^^^^^^^^^^^^^^
File "importlib\__init__.py", line 90, in import_module
File "<frozen importlib._bootstrap>", line 1387, in gcdimport
File "<frozen importlib._bootstrap>", line 1360, in findand_load
File "<frozen importlib._bootstrap>", line 1331, in findand_load_unlocked
File "<frozen importlib._bootstrap>", line 935, in loadunlocked
File "<frozen importlib._bootstrap_external>", line 999, in exec_module
File "<frozen importlib._bootstrap>", line 488, in callwith_frames_removed
File "C:\ComfyUI_windows_portable\ComfyUI\custom_nodes\comfyui-3d-pack\nodes.py", line 39, in <module>
from .mesh_processer.mesh import Mesh
File "C:\ComfyUI_windows_portable\ComfyUI\custom_nodes\comfyui-3d-pack\mesh_processer\mesh.py", line 8, in <module>
from kiui.op import safe_normalize, dot
ModuleNotFoundError: No module named 'kiui'
Has anyone else been struggling with the installation of the custom rasterizer? I can generate the mesh without issue. Even with extensive help from gpt and claude, I have not been able to install proper custom rasterizer. I did a fresh install with the only goal of getting the Hy3d RenderMultiview node to function so I can extract textures. Claude and I have installed many different wheels to no success.
init specs:
pytorch version: 2.6.0+cu126
Set vram state to: NORMAL_VRAM
Device: cuda:0 NVIDIA GeForce RTX 3090 : cudaMallocAsync
Using pytorch attention
ComfyUI version: 0.3.27
ComfyUI frontend version: 1.14.5
Death of the procecss: "E:\ComfyUI_windows_portable_nvidia\ComfyUI_windows_portable\python_embeded\Lib\site-packages\custom_rasterizer\render.py", line 25, in <module>
import custom_rasterizer_kernel
ImportError: DLL load failed while importing custom_rasterizer_kernel: The specified procedure could not be found.
same here, did you fix it?
Defaulting to user installation because normal site-packages is not writeable
Processing e:\comfyui\custom_nodes\comfyui-hunyan3dwrapper\wheels\custom_rasterizer-0.1-cp312-cp312-win_amd64.whl
Installing collected packages: custom-rasterizer
Attempting uninstall: custom-rasterizer
Found existing installation: custom_rasterizer 0.1
Uninstalling custom_rasterizer-0.1:
Successfully uninstalled custom_rasterizer-0.1
Successfully installed custom-rasterizer-0.1
Does not install in the venv directory.
activated venv
checked permissions
any suggestions would be much appreciated
you usually have to build rasteriser not using the wheel, i assume you built rasteriser using the wheel that came with the hunyuan3d custom node. I did the same and spent a passionate night with chatgpt trying to figure it out. turns out you should:
open the venv that your comfyui runs on
uninstall rasteriser, if you dont know what its called type pip list -v I think and it'll show you all installed packages
find out your cuda and pytorch version
build rasteriser using those versions
i hope this helps, honestly for issues like this just work with chatgpt
I keep getting this error, how can i fix it?
"Hy3DRenderMultiView
CUDA error: no kernel image is available for execution on the device CUDA kernel errors might be asynchronously reported at some other API call, so the stacktrace below might be incorrect. For debugging consider passing CUDA_LAUNCH_BLOCKING=1 Compile with TORCH_USE_CUDA_DSA to enable device-side assertions.
"
尝试安装nvidia-cuda(适合自己设备的)
Doesn't work
Outdated
I'm getting an issue with trimesh in Render Textures and Render Multiview on the input side want to be connected to something.
did u find a solution for this?
Also having problems with the trimesh in render textures render multi view node.
I struggled for a few days with ComfyUI on embedded Python and the ComfyUI desktop. Then I just installed a clean copy manually from GitHub, used it with a Python environment instead, built a wheel for my version of PyTorch, and finally got it working.
I first ran into the missing trimesh node error. After that, I switched the set_mesh_gen node to a set_trimesh_gen node. Once I did that, I was able to connect it to trimesh, and it worked—even on just 8GB of VRAM.
are you able to upload a fixed one or an image workflow? I have this issue but I don't fully understand the fix here - appreciate any help
Simply locate the set_mesh_gen node (right after Hy3D Instant-Meshes Remesh). It’s the last node in the Generate Mesh group. Change set_mesh_gen to set_trimesh_gen, click OK, and then you’ll be able to connect to the missing trimesh. Not sure how to add a screenshot in the comment, otherwise I’d show it. Good luck!
@katana88 Ah well now I understand why I did not see it. I did not realize you were talking about the V2.1 workflow. The one I'm having the issue with is the V2.2 Remesh, which isn't set up with that (from what I can see) Appreciate you taking the time to explain it anyways!
I was having the missing trimesh node error and I got it to work.
First I went into ComfyUI Manager > Custom Nodes Manager, searched for Hunyuan3DWrapper and updated it. Restarted the server.
Then, in the green Generate Mesh section, connect Hy3D VAE Decode's trimesh output to Hy3D Postprocess Mesh's trimesh input. The output there should go to the Set_mesh_gen node.
Then, in Render Textures, Get_mesh_gen is connected to Hy3D Mesh UV Wrap's trimesh input.
After all that, I kept getting errors but it was fairly obvious where to connect from. For all the missing pipelines, connect it to the Get_model nodes above. I can't remember exactly what I did lol.
If it helps, here's an image: https://i.imgur.com/9Mx9sfy.png
And my modified workflow json: https://pastebin.com/xBzpauPm
I'm just getting back a processed 2D image when I run the workflow?
Any guess as to why this happens?
You need to change the node connections from trimesh to mesh to trimesh to trimesh instead.
For anyone trying to run this on the latest version, as of now, 2.2 with remesh, you need to change the node connections. For some reason, the trimesh output are connected to mesh inputs. Reconnect them to the trimesh inputs instead.
Good luck!
thanks a lot