
V6.9 bug fixes, removed more incompatible nodes. Its very hard to keep up with frequent comfyui and custom node updates. Hope this works for you.
V6.7 I2V bug fixes, added extend video with combination, added Triton Acceleration for those who have it running on their system. Hopefully this is bug free for a while. Its been really tough staying on top of all of the comfyui, model and custom node changes. Still think Wan is better for I2V at the moment. Make sure you update to the latest comfyui and custom nodes to run this workflow.
** 5090/5080/5070 50xx series Nvidia GPU fixes in troubleshooting section below.
V6.6 I2V running Native, removed skyreels, added helper lora's to randomized stack. GGUF low vram support. System Ram as VRAM, Significant Interface Update. Perfect for Beginners and Flexible for Advanced Users. ComfyUI keeps updating and breaking things, changing node sizes etc. its tough to keep up. Please update to latest version of comfyui and latest custom nodes.
NEW in V6! Major overhaul. Significant interface changes. Dual Randomized Lora stacks with lora helpers, Triggers/Prompts and Wildcards. Amp up your over-night generation runs! Prompt Save/Load and more. Face Restore. Audio generation has been improved, Stand-alone Audio Generation, T2V, I2V via SkyReels, GGUF support, use system ram as VRAM.
** Wan 2.1 beta is here: https://civarchive.com/models/1306165
Read full instructions below for more info.
Workflow highlights:
Audio Generation - via MMaudio - Render Audio with your videos, Stand-alone plug-in available for audio only post processing.
FAST preview generation with optional pausing
Preview your videos in seconds before proceeding with the full length render
Lora Randomizer - 2 stacks of 12 Loras, can be randomized and mixed and matched. Includes wildcards, triggers or prompts. Imagine random characters + random motion/styles, then add in Wildcards and you have the perfect over-night generation system.
Prompt Save/Load/History
Multiple Resolutions
Quickly Select from 5 common resolutions using a selector. Use up to 5 of your own custom resolutions.
Multiple Upscale Methods -
Standard Upscale
Interpolation (double frame-rate)
V2V method
Multiple Lora Options
Traditional Lora using standard weights
Double-Block (works better for multiple combined loras without worrying about weights)
Prompting with Wildcard Capabilities
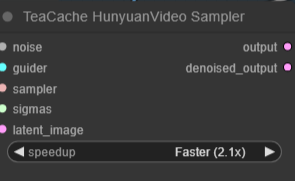
Teacache accelerated (1.6 - 2.1X the speed)
All Options are toggles and switches no need to manually connect any nodes
Detailed Notes on how to set things up.
Face Restore
Text 2 Video, Video 2 Video, Image 2 Video
Fully tested on 3090 with 24GB VRAM
This workflow has a focus on being easy to use for beginner but flexible for advanced users.
This is my first workflow. I personally wanted options for video creations so here is my humble attempt.
Additional Details:
I am new to AI and comfy, this is my first workflow I loved the "Hunyuan 2step t2v and upscale" workflow - https://civarchive.com/models/1092466/hunyuan-2step-t2v-and-upscale and it was highly used as the base. So should work on the same set-ups as the original.
** Troubleshooting nodes, or comfyui manager can be found at the bottom of this document.
Quick Start Guide:
By Default- everything has been tuned for a functional workflow, according to the Hunyuan 2step t2v and upscale workflow.
This is the workflow..
Step 0. Setup your models, in the Load Models section, Select your resolution in resolution selector.
Step 1. Render a preview low res model, check to see your loras/motion prompt is working
Step 2. Pause and decide based on the preview if you want to continue to the full render
Step 3. It uses the low quality render as an input to guide a better mid quality render. This will double the resolution that has been selected.
Step 4. uses a frame by frame upscaler that doubles the resolution again.
Step 5. Doubles the frame rate from 24 fps to 48 fps for more smoother motion.
(Optional Step) Enable MMaudio Generation - it will create audio to go along with your video, using both your text prompt and video to determine what sounds to add. Describe the sounds in the scene in your text prompt for better generation. This uses more VRAM so has been disabled by default. You can always add audio generation at the end using the Standalone MMaudio Plugin.
From here you can start to adjust things like # of steps, video length, and resolutions to find the best balance of what your available VRAM can handle.
All toggles and switches:
 Make sure you only choose 1 Method in Step 1.
* These are the default settings.
You should never need to rewire anything in this workflow. Detailed instructions and comments right inside the workflow.
V2V - Video to Video:
Enable it on the Control Panel:
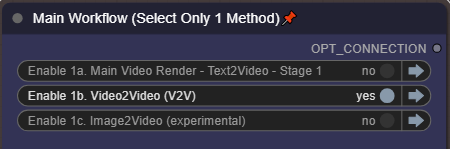
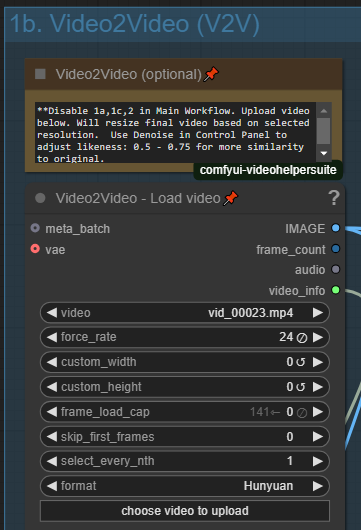 You can use video as an input or guide for your video. Enable this option in Control Panel and click to upload your source input video. Please note that this will use your selected resolution for output.
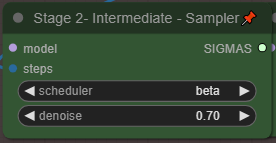 To adjust the similarity to your input video, adjust the Denoise in the main Control Panel. Lower (0.5 - 0.75) will provide closer similarity to your input video, where a higher number will get more creative.
I2V - Image to Video (Native)
This method uses Native Hunyuan for I2V
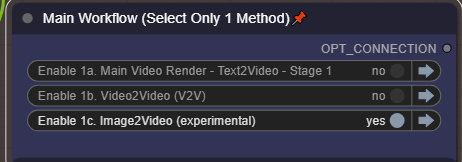
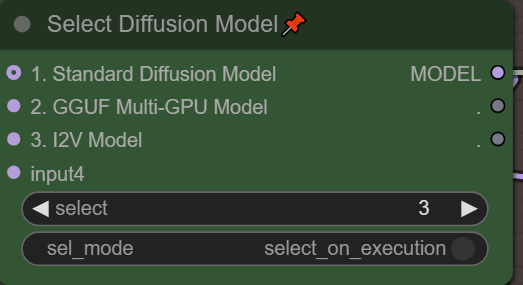
Enable it in the Main Control Panel, Then Setup the Models Here:
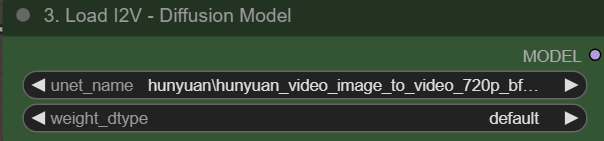 Also Make sure you Select Option #3 before doing I2V
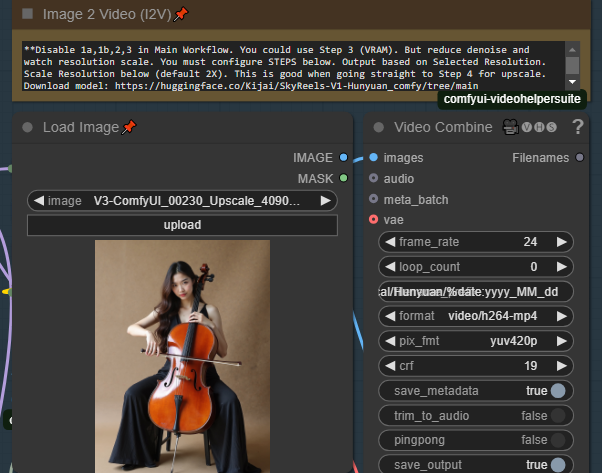 Used Load image to load your source image. The image will be appropriately scaled as to not break this plug-in. The output resolution will use your Selected Resolution from the Resolution Selector. I2V is very picky about resolution otherwise you get flashing or artifacts.
You have 2 options for Resolution, if you want to use the source resolution simply set use Orig IMG Resolution slider to 1. However this only maintains the aspect ratio without cropping. The next option is the Base Scale (default 384) due to limitations of video engine you will quickly run out of memory trying to render very high resolution photos at native resolution. This will scale the size of your render based on the Base Scale. Start with 384-500 to start and see if your VRAM can handle it. especially if your source image is very high resolution. If you start with a low resolution photo you can increase the slider quite a bit.

I2V Method 1: One-Pass to upscale/interpolation/audio
The primary way to use this method, is to Disable 1a,1b,3 in the Main workflow, it will take your image as input, Then render the video at your selected resolution, then send it to step 4/5 for upscale and interpolation. We still need some community help to find the best supported I2V resolutions, try a few out.
Video Extention:
Choose an I2V compatible Resolution (if anyone has a list for hunyuan please share it in the comments). As it uses I2V for first frame.
Enable 1d, 2,4,5 in the control panel (skipping 3)
Its very important to use a low or mid-resolution input source at this point, or you will run out of memory. *Same rules as I2V
Use an intermediate render from the T2V 2-stage or manually set a low to medium resolution for your video - you can set this manually. Alternatively you can choose to use the original video resolution. If you are using an intermediate source or the intermediate render from the T2V 2-stage method, this will work perfectly.. its designed for this.
Select if you want to just render out the extended part or the full combined video.. Select True if you want the full combined video. ie. The original video+extended video. This will also pass the entire fully combined video to the next step the upscaler. This is why its important to use an intermediate level video, as it will upscale and interpolate again.
1) Stage 1 - It will do a 1-pass full render at your selected steps and selected resolution
2) It will pause and let you decide if you want to continue to the upscaler, or cancel and try again
3) Upscaling - It will now take your Intermediate render and double the resolution.
4) Interpolation - It will double your framerate
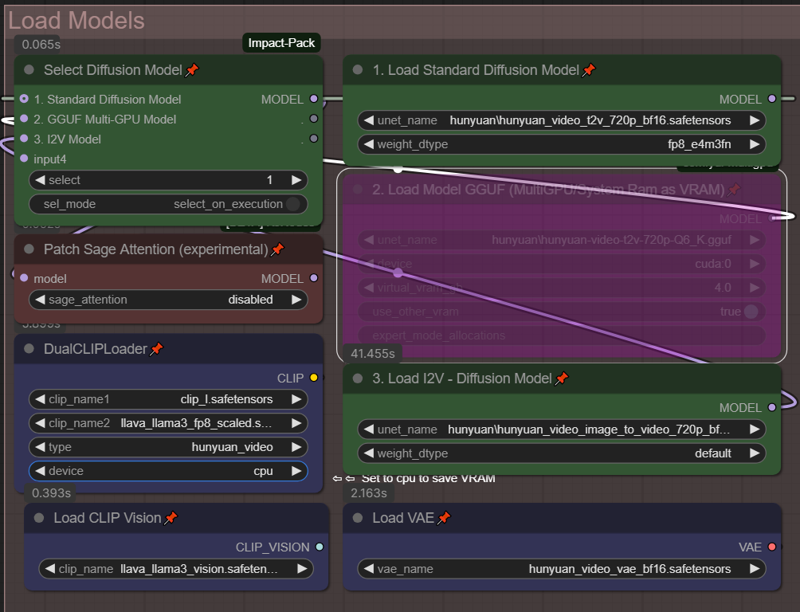
Selecting your Model (LOW VRAM options):
Although I have been testing on a 24GB VRAM setup, I've had a lot of users request help with Lower VRAM. I have not tested, so I'm hoping some of these features will help them out.
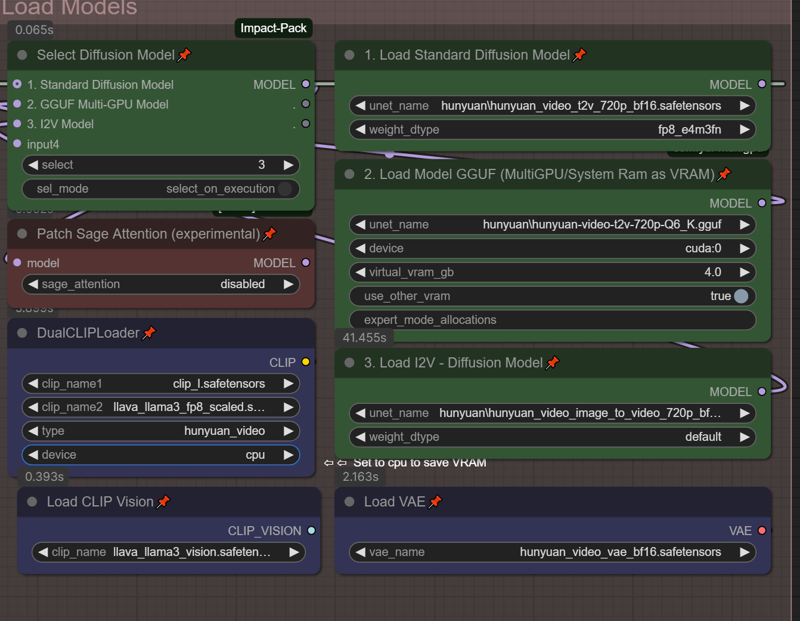 Load your standard BF16/FP8 or FP8 Models into "1. Load Standard Diffusion Model"
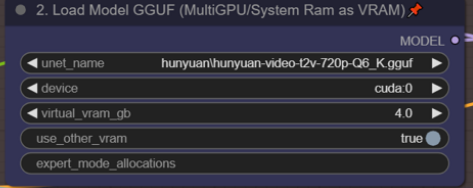
Load your GGUF models into "2. Load Model GGUF (MultiGPU/System Ram as VRAM)"
From what i understand the GGUF models can take a bit longer but really save on VRAM based on the model chosen.
Use the Green Selector box to choose the model you wish to use in your workflow.
For VRAM savings, set "device" to CPU in the DualCLIP Loader - if you don't see the option, right click on it, choose "Show Advanced" and it should show up.
If using the GGUF model, can you set "use_other_vram" to "true" this will allow you to use system ram as VRAM and hopefully prevent some of the OOM errors. You can set the amount of virtual VRAM to use above. Please note anytime you are using system ram, the render time will be much slower, but at least your production won't stop.
** I also noticed that there is a 24GB sized GGUF model - does anyone know if this is as good as the BF16 model? I don't want to sacrifice quality, but would love to use the virtual VRAM feature. if anyone knows, please let me know in the comments.
Lora Options:
Traditional Loras and Double Block can be used, Double-Block is default.
Double-block seems to do better with multiple lora's without having to worry about adjusting weights as often.
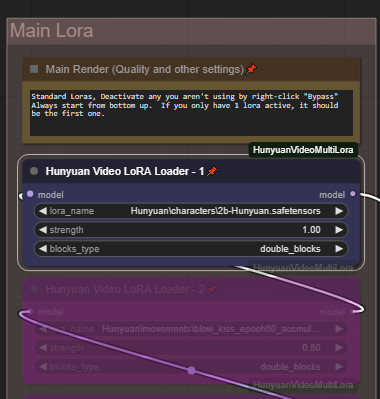 The Main Lora Stack is a standard additive Lora tree. Add or combine up to 5 different Loras, set your all, single_blocks,double_blocks according to the loras you are using. You can run these loras in addition to the random loras. Add a styles in the main lora section, then add randomized character loras, with randomized character animations.
Enable/Disable your lora's by right-clicking and choose "Bypass"
Resolution Options:
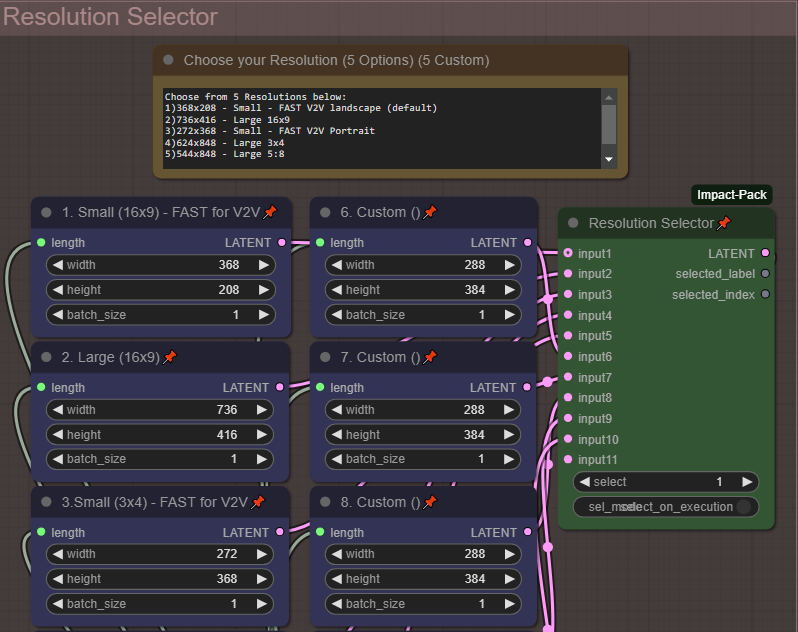 Select from 5 common resolutions - or edit an additional 5 custom resolutions to make them your own. Change resolution with the "Resolution Selector" By Default the fastest smallest resolution is selected intended to go to the next V2V portion of the workflow. As you increase to the larger resolutions your render times will take much longer.
Pause after Preview - (On by default)
Video generation takes too long, experimenting with multiple loras or getting your prompt right takes so long when video render-times are slow. Use this to quickly preview your videos before going through the additional time to upscale process. By Default this is Enabled. After your start the workflow, it will quickly render the fast preview, then you will hear a chime. Make sure you scroll to the middle section beside the video preview for next steps.
Upscale the previews you like, or cancel and try again!
1) Continue the full render/workflow - Select ANY image (It doesn't matter which one) and click "Progress Selected Image"
2) Cancel - click "Cancel current run" then queue for another preview.
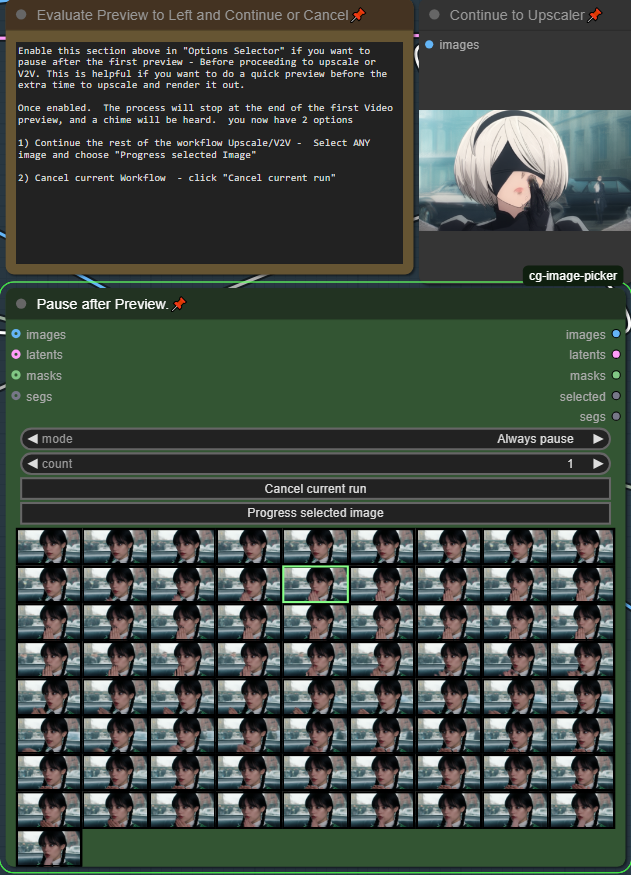 To disable this feature, toggle it off under "Options Selector"

MMaudio - Add audio automatically to your video
By Default it will only add audio to upscaled videos. However there is a switch to enable it for all parts of the render process. Be sure to add any audio details to your prompt for better generation.
** Note MMaudio takes additional VRAM, you may need to balance video length quality when using MMaudio. A Stand-alone plugin is available in v5.2 and you can add your audio after you have finalized your video in the main workflow. This lets you maximize the quality and video length according to your vram, then simply add audio as an additonal step in post-processing. Using Standalone offers additional flexibility for you to generate multple times to get the perfect audio for your video.
Interpolation after Upscaling
This option lets you double the frame-rate of your rendered video, by default "enabled"
you an disable it from the "Options Selector". This can slow down your render if you don't need it.

I feel the need, the need for Speed
Things running too slowly? you can increase the Teacache Speed up to 2.1X at the sacrifice of minimal quality. Default is Fast (1.6X). Please note there are 2 Teacache Sampler nodes.
T2V - Text to Video - Prompting and Wildcards
Please enter your prompt int he Green "Enter Prompt" Node. *** Please ensure your prompt doesn't have any linefeeds or new lines or it will change the way the system processes the workflow.
Using Wildcards is a feature that can allow you to automatically change your prompt or do overnight generation with variances. To create wildcards. you will need to create a .txt file in the folder /custom_nodes/ComfyUI-Easy-Use/wildcards. Create a wildcard on each line. Pressing enter to separate each wildcard. You can use since words, or phrases. As long as they are separated by a "enter" Do not double space. Here are 2 example wildcard files.
color.txt
red
blue
green
locations.txt
a beautiful green forest, the sunlight shines through the trees, diffusing the lighting creating minor godrays, you can hear the sound of tree's rustle in the background
a nightime cityscape, it is raining out, you can hear the sound of rain pitter patter off of the nearby roofs
a clearing in the forest, there is a small but beautiful waterfall at the edge of a rockycliff, there is a small pond and green trees, the sound of the waterfall can be heard in the distance, birds are chirping in the background
To use these in a prompt you can click the "select to add wildcard" and add them at the appropriate spot in the prompt.

ellapurn3ll is wearing a __color__ jacket ,she is in __locations__.
Full details on this custom node can be found here: https://github.com/ltdrdata/ComfyUI-extension-tutorials/blob/Main/ComfyUI-Impact-Pack/tutorial/ImpactWildcard.md
Randomized Lora and Triggers
Turn up your overnight generations by using both wildcards and Randomized Loras.
Choose up to 12 Random Loras to mix and match. Please note by default only the first 5 are enabled. Change the Maximum in the appropriate setting to set the number of loras you have configured. It will always count from top to bottom. So if you only want to randomize between 3 loras, set the "maximum" to 3. And fill in the information for the top 3 Loras.
** Very important. In order for the trigger words to populate, you must include the text:
(LORA-TRIGGER) or (LORA-TRIGGER2) in your prompt field. It will then automatically fill in the value when generating with random loras. This is case sensitive so please becareful.
Please note you can put full prompts, single triggers, or trigger phrases, and it will be filled in automatically for you.
To add wildcards to this use {} bracets and | separator. for example. She is wearing a {red|green|blue} hat. Or you can do full prompts {she is standing in time square blowing a kiss|she is sitting in a park blowing a kiss}
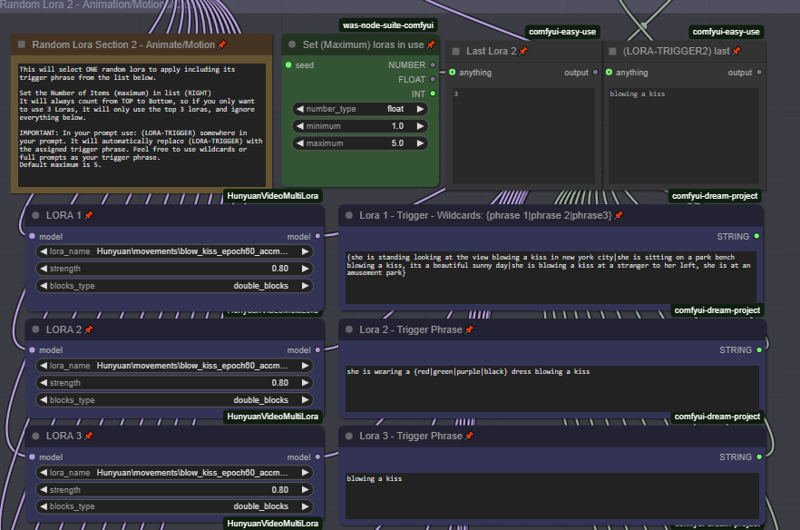 Helper Loras on Random Lora Stack 2 Only.
Helper lora's are now available. Often Some lora's work better with the addition of a motion or style lora. Enabling a helper lora will only take effect on the 2nd random stack, and only if that Lora # was selected in the randomization.. For example if Lora 1 works better with the addition of a motion or style lora. Enable Lora 1 Helper, and IF lora 1 is selected in the randomization process, it will apply both lora's (primary and the helper).
 This is mostly an advanced feature but some may find it useful.
Load and Save your favorite prompts with "Prompt Saver"
 As you run your workflow. it will automatically populate your Prompt Saver with the latest prompt. You can then Save it for later use. Please note to Load and use a prompt.. select your previously saved prompt, and click "Load Saved". But its important you must toggle "Use Input" to say "Use Prompt" in order to use your loaded prompt. Don't forget to switch it back to "Use Input" for normal prompt use.

**Default is "Use Input" This means your prompt will be generated by the normal input wildcard prompt field, and simply show the prompt data in Prompt Saver.
One Seed to Rule them All:
One single seed handles all lora randomization, wildcards and generation. simply copy and reused your favorite seeds with the same sets using random loras and wildcards without a worry.
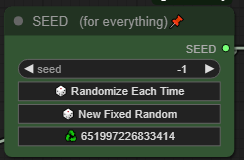 * Tip clip the recycle button to re-use your last seed. Did you want to fine-tune or tweak a video you just recreated? did you get an OOM in the 2nd stage, Use the last seed, adjust and try again!
Standalone MM-Audio:
To maximize your quality and video length you may want to disable MM-audio in the main workflow, then add the audio in later on in post-processing. This plug-in is meant to run as a stand-alone to add audio later.
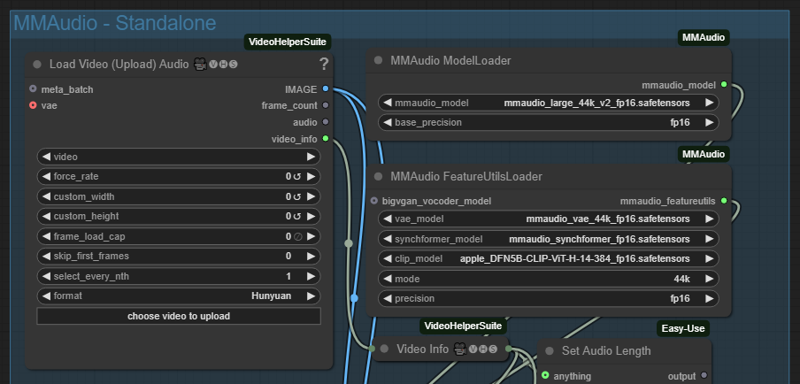 Enable MMAudio - Standalone and disable all other parts of the workflow.
Simply upload the video you want to add audio to. All calulations are done for you. Its recommended to use a blank/empty prompt. But i've included the prompt saver if you want to load your previously saved prompt
(Optionally) you can can enhance your prompt focusing on describing the sounds or the scene as it relates to sound.
Generate as many times as you want until you get the sound just right!
Standalone Upscaler and Interpolation:
Want to just upscale or interpolate your existing video files? Just upload them, Disable all other parts of the workflow except upscaler and interpolation.
The upload box needs to be enabled in the appropriate place.
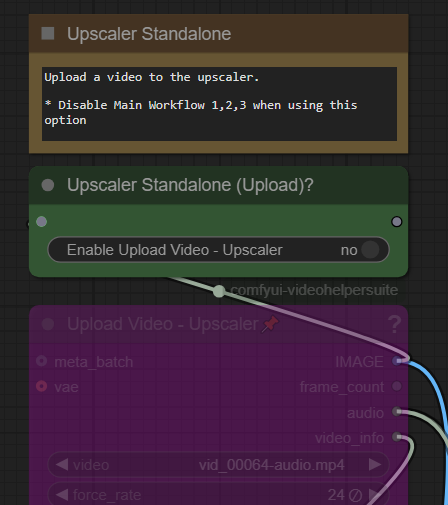 Click on Enable to "Yes" to use this feature. Don't forget to turn this off when using the regular workflows. By default these should both be disabled.
Tips for how to use the workflow
Fast, V2V method, Lora (Default) - this follows the original work flow.
Quick Preview using a fast low res video: Use
(Resolution 1 - 368x208) for landscape video
(Resolution 3 - 320x416) for portrait video
Pause to decide if you want to do the full render
Full render includes audio, upscaling and interpolation
T2V straight to upscale method
Render at medium or high res, then use the upscaler, audio
Use Resolution 2, 4, 5 options for higher res - slower render. I personally use resolution 4 for most generations
Will Upscale and add audio
Setup
Disable "Intermediate V2V" from Options menu
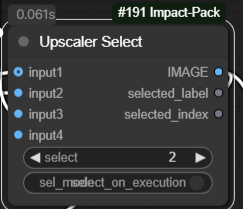
 Select input 2 on Upscaler Select
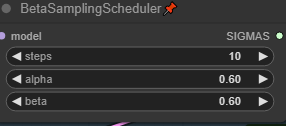
 Increase "steps" to 25 or higher in BetaSamplingScheduler in the Main Window.
Increase the Quality of your Generations
Increase the number of steps:
For the default V2V Method. In the Control Panel (Settles). Increase your steps from 24 to 35 or higher (up to 50). Each step takes more time and memory so find that balance between resolution and steps.
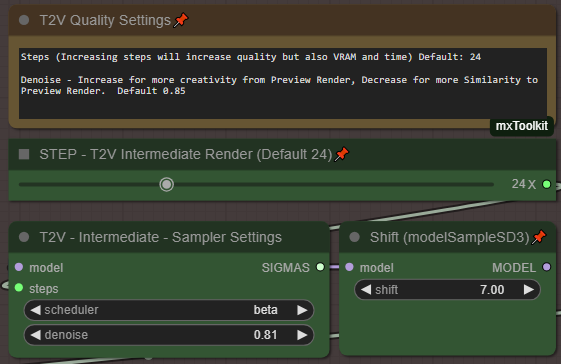
For the Main Render Video preview, or bypassing intermediate. Increase your steps from 12 to something much higher. ie. 30/35
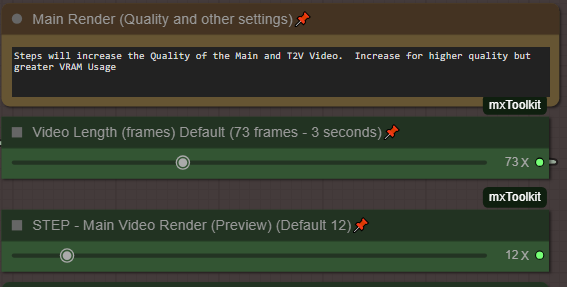
For the best quality run 35 steps or higher, and reduce both teacache nodes (main/intemediate) to "Original 1X" instead of "Fast 1.6"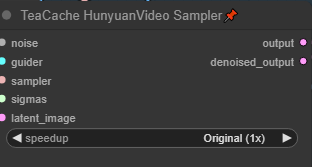
Try higher resolutions:
Change my resolution to one of the Large higher res. ie Resolution 2 or 4. Then Queue. For the most part, I get the same video only in a higher res. Please note that by default the Large resolutions are double the res of the small counterpart this helps maintain consistency when using this method. Please always use the same aspect ratios ie. 1--> 2, 3--> 4
Balance your video length and quality for that perfect video
Here are a few settings i've used which strike a balance for video length and quality. Tested on 3090 24 GB Vram.
Longest video length (16x9):
Use Resolution 1, video length to 201 frames, Set I2V Intermedia steps to "23" or "24" in basic scheduler, set scheduler to "beta". Disable MM-audio, use upscalers and interpolation.
For longer videos setting the Main Video Render to 15 steps is recommended for better guidance.
** Protip 201 frames is the max hunyuan video size, and will often create a perfect loop at this length.
High quality (16x9) (3x4)
Use Resolution 1 or 3, video length to 97 frames, Set MainVideo Render BetaSamplingScheduler steps to "15", Set I2V intermedia steps to "35" in basic scheduler, set scheduler to "beta". Disable MM-audio, use upscalers and interpolation.
Balanced with Audio (16x9, 3x4)
Use Resolution 1 or 3, video length 73 or 97 frames, Set I2V intermediate steps to "28" in basic scheduler, set scheudler to "beta". Enable MM-audio, use upscalers and interpolation.
Troubleshooting:
5090/5080/5070 50xx series Nvidia GPU fixes
50xx Nvidia GPU's are still being developed. Here are a few pointers to get things going with the Standard ComfyUI portable that comes bundled with python 3.12.X
Did you just update your GPU to an Nvidia 50xx and find nothing works!?!
Here are a few settings i've used which strike a balance for video length and quality. Tested on 3090 24 GB Vram.
Download the Standard Comfyui Portable. Or use your existing folder.
Install Cuda 12.8
(Install Torch 2.7 dev)
Go to the python_embedded folder
python.exe -s -m pip install --force-reinstall torch==2.7.0.dev20250307+cu128 torchvision==0.22.0.dev20250308+cu128 torchaudio==2.6.0.dev20250308+cu128 --index-url https://download.pytorch.org/whl/nightly/cu128 --extra-index-url https://download.pytorch.org/whl/nightly/cu128
(Triton 3.3 prerelease)
python.exe -m pip install -U --pre triton-windows
python.exe -m pip install sageattention==1.0.6
(Sage Attention)
SET CUDA_HOME=C:\Program Files\NVIDIA GPU Computing Toolkit\CUDA\v12.8
cd sageattention
..\python.exe setup.py install
If this doesn't work for you. Go to this article, and replace your setup.py with the code from here. https://github.com/thu-ml/SageAttention/issues/107
You should now be able run things as normal. Some previously working nodes stop working for some reason, not sure why. I will be updating both workflows shortly to include fixes for 5090 5080 5070 series cards.
** please note I'm not an expert at this, i can not help you troubleshoot.. This is how I managed to get it running on my system.
Model Loading or missing problems:
The workflow assumes you hae download one of each of the green and purple models. and has that setup and allocated. For T2V, V2V you will chose either #1 or #2 GGUF for lower VRAM. For I2V you should chose #3. Make sure all of these models are defined. If you are not using GGUF for example you can right click on the 2. box and choose bypass so the workflow doesn't complain about missing models.
Nodes missing:
MMaudio - If your audio nodes aren't loading. Please go to ComfyUI Manager, and do an "install via Git URL" with this address: https://github.com/kijai/ComfyUI-MMAudio
then restart.
If you get a security error, you will need to go to: ComfyUI/user/default/ComfyUI-Manager and look config.ini open that with notepad and look for "security_level = normal" change this to say "security_level = weak". Then try the install. Once you have installed, you can set the setting back to normal. any additional MMaudio information can be found on their github page.
UnetLoaderGGUFDisTorchMultiGPU missing.. Search in comfyui manager for "ComfyUI-MultiGPU"
You must also have "ComfyUI-GGUF" installed in your comfy UI. Please make sure these are both searched and loaded using comfyui Manager.
If this doesn't work you can try to go to comfyui Manager, "install via Git URL" with : https://github.com/pollockjj/ComfyUI-MultiGPU
If you get a security error, you will need to go to: ComfyUI/user/default/ComfyUI-Manager and look config.ini open that with notepad and look for "security_level = normal" change this to say "security_level = weak". Then try the install from comfyui manager.
As a last resort if you want to completely disable MultiGPU (not recommended).. Go to the "Load Model section. make sure your green selector switch "Diffusion Model" is set to 1.. Then simply delete the node called "2. Load Model GGUF(multiGPU/System Ram as VRAM), Everything will run fine, you will just lose the option to use GGUF and its VRAM optimizations.
 Delete this node.
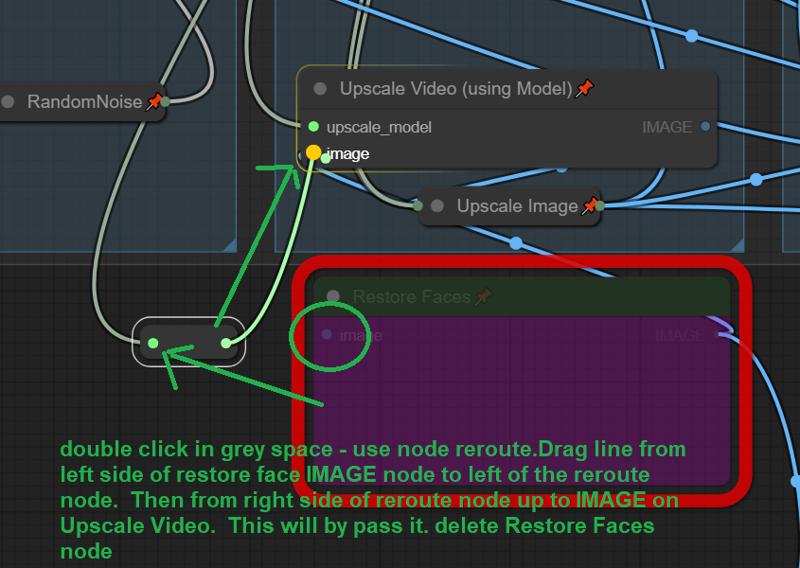
ReActor or Face Enhanced Nodes Missing:
if you are having trouble with the Re-Actor node. You can easily remove it. In theory the workflow should work without it since its bypassed by default.
1) got to the RED Restore Faces box.. and double click anywhere in the grey space. search reroute and add the node.
2) Drag the input line from the left side of Restore Faces to the left side of the new node.
3) drag a new noodle from right ride side of the reroute node to the Image input of "Upscale Video" then you can just delete the restore faces node completely.
That's all folks. all credits to all of the original authors of all of this.
Hope you enjoy. Great to be part of such an open and sharing community!
Feel free to share your creations, settings with this workfow.
Description
Use V4.3 it has more bugfixes
V4.1 Minor bugfixes, unhid Basic Scheduler in V2V Group - use denoise to adjust similarity/creativity. Changed Default to 0.75 instead of 0.85
Added an extra lora slot.
Updated Documentation - Please read as there are many tips and tricks and a full explaination of each part of the workflow.
FAQ
Comments (40)
hitting OOM with large res on 24G 3090, are you running this in the cloud?
no this is all local. I would assume it might be your video length? I believe i tested the large resolutions at 73 frames. You could reduce the resolution of the large models. Or just use upscaler. I most often, use resolution 4 and go straight to the upscaler bypassing Intermediate v2v
did not alter video lenght, but it looks to me like you need to clear vram in some places; at least that's what i am seeing in some other workflows that don't OOM
During vae decode i get oom too, not quite 24gb but 16, meanwhile i see people running bf16 on 12gb, i tried lowering the lenght without success, i can get a video only on low res and i cant even upscale...
@FrankGM I added some vram clearing nodes, i don't know if this will help.. I don't have a lower VRAM card to test, unfortunately i was going for features that fit within my own environment, so its hard for me to test against lower VRAM, you could try changing the base hunyuan model to a fast-fp8 or a GGUF model, that would probably be the best memory savings. Let me know how you make out.
Nice! Working great. How do we decrease the denoise for the V2V? Is it high for a reason on most workflows? It changes the video pretty drastically.
I just realized the "Basic Scheduler" accidentally got hidden under the video combine window. I'll fix it in the next version.to reduce the denoise (default 0.85) however dont' reduce too much due to the low resolution of the preview video. There will be some changes when using this method in the V2V. I have personally be using resolution 4, bypassing the Intermediate V2V and only using the Upscaler. This way the final product looks the same, but previews take 5 mins vs 1 min using the FAST resolutions. Hope that makes sense.
** I uploaded a new file that fixes that bug.
@thejsn Got it thanks. I did a few tests and I seem to be surprisingly getting better results with option 4 with the intermediate V2V rather than option 5 with the one shot high resolution. Hence my new comment asking for an expanded V2V feature lol.
Thank you so much, do you have any idea how we could create a sort of preview, let’s say 24 frames, from a generation of 100 frames?
Off the top of my head I don't think that its possible right now. I think the fastest way is to run the default V2V workflow, with resolution 1 or 3, to get a pretty close idea. the only thing is the V2V is not a perfect translation, as its using that preview as the input, for a better render.. its pretty good.. What i do is i run the standard workflow with Res 3 - preview a bunch of times to make sure my prompt and loras are working.. Then I turn off V2V, switch the Res 4 and just do the upscale/audio, then cross my fingers :)
For the previews do need to select one or multiple? Im little confused
When it pauses at the preview. select ANY image and click "Process image" Its a bit of a hack. your choice doesn't matter. All it does is allows the workflow to pause at that point your selected image goes nowhere.
@thejsn when i look at the pause there different images. Like each couple images it looks like its a different run or lora
Figure it out. it has to do with the prompt. It count each line as it own run. I need put together as one line.
don't worry about any of the images. Don't even look at them. If you are happy with the preview video to the left and want it to complete the process by going V2V or upscaling. just click on any random picture, then click "Process image" this was only a hack to allow it to pause. There is no relevance to those pictures OR which one you select. It was the only way I was able to get it to pause by using easily available nodes.
@ASray yes another user discovered you don't want to have line breaks in your prompt. I'll update the documentation.
@thejsn flim_net_fp32 where do I put this file for the flim VFI?
@ASray it should have downloaded automatically, but its located at ComfyUI\custom_nodes\ComfyUI-Frame-Interpolation\ckpts\film
Still the best workflow!
Your vid2vid from the low res works great. Can you enable a feature where we can upload a vid to do the same vid2vid on?
It might justify making a separate workflow for only vid2vid since that doesn't exist on civitai. It seems really powerful and I can't get anything to work other than your built in method.
I know you have an upload section but that doesn't seem to go to the same v2v section.
A "batch" run would be OP as we could run a ton of low res vids, then run the good ones through V2V at a selected denoise overnight.
Thanks! Yes the vid2vid upload currently only uses the traditional upscaler and interpolator. its an interesting idea for batch running the low res previews. For overnight generation, i just turn pause off, but it does use the full process. I'll take a look, I'm not sure the end result would be the same being done after the fact, since the workflow currently passes the same seed through each stage including the prompt for the audio. would need some testing.
I was thinking about how to overnight low res a bunch and then easily upscale the ones you like. So batch the low ones. Make sure save metadata is on. Then drag and drop your favorites to comfy. The workflow will be there turn on the upscalers and fix the seed. Then generate it will be the same as if you followed the workflow. Every way I tried altered the video too much different seeds and no original prompt when working on the raw video. Try it and see if it works
For some reason I'm always getting some Indian style background songs for my videos. Any tips for prompting MMAudio?
For example "Sounds of the beach in the background." Results in Indian style song.
This is the mmaudio engine, maybe try you to look up prompting tips for the engine itself. Try being more descriptive rather than saying "sounds of the beach" in the prompt. Try being much more descriptive. Say you can hear the sounds of light wind the waves crashing along the shore, seagulls and birds chirping in the background etc. Mmaudio doesn't do well with music but it's great at looking at videos and adding the right sound effects to match. But it's not really a music score engine.
Bad prompt = bad output
Great workflow, however I get a lot of weird random images in my pause after preview images node and temp folder. Stuff like buildings, food, etc.. doesn't seem to affect the end process but wondering why this is happening.
The images don't really matter - just select any if you are happy with the preview video to the left. However, some users have discovered if they're prompt has mutiple lines (which can be seen in the informational box before the prompt field) that they get wierd results similar to what you are describing, perhaps that is it? Ultimately though if the video preview is good, dont' worry about the images shown at the pause screen - they don't matter, nor does your selection of an image.. it just makes the process move forward thats all.
that was it, thank you!
UPDATE, the issue was this, others may need to do this too:
Error. No naistyles.csv found when connect comfyui web : r/comfyui
look in the documentation provided in the description, and try to install mm-audio manually. Or follow instructions on their github.. you can always disable audio in the settings as well. But it should work.
@thejsn Thanks, I'd already followed everything several times before asking here.
I ended up wiping my Comfy installation and starting again, that fixed, so maybe a conflict between other stuff.
I have got it working but my video quality is crap :(
That error is is because of a ComfyUI-Universal-Styler custom node which is installed by default has a coding error in it. it does not affect your output as you wont be using the node with this workflow . It's not worth trying to fix but if you want to the info is here: https://github.com/comfyanonymous/ComfyUI/issues/3463#issuecomment-2267394860
Hello, I keep running into an error: module 'torch.nn' has no attribute 'Buffer'. Any ideas on how to solve this? Thanks!
Is this using the default settings?
@thejsn yep, I just ran it as is to test, didn't change anything. Everything is installed as it should supposedly, It's happening in the mmaudio node
@auroch22934 let me look into this.
can you try again with V4.3 and let me know if you get the same error.
@thejsn Just did, same error :/
hmm, I'm not sure.. do you happen to know what version of torch you are running? I'm running torch 2.5 cuda 1.24
@thejsn Damn, not sure... I need to learn a bit more about this stuff. Will find out and get back to you. Maybe I can revert to the versions you are using and fix the problem
@auroch22934 I had this same issue, resolved by doing the following
Navigate to the python embeded folder
D:\ComfyUI_windows_portable\python_embeded (open cmd from the top bar)
Copy and paste the following
import torch
Press return (enter key)
print(torch.version.cuda) # Displays the CUDA version supported by PyTorch
Press return (enter key)
mine was showing 12.1
Close that CMD down, reopen cmd in the same location
Paste the below in
python.exe -m pip install --upgrade torch torchvision torchaudio --index-url https://download.pytorch.org/whl/cu121
(the last number depends on your cuda number so mine was 12.1 so 121 if you are on 12.3 it would be 123 etc)
Details
Files
hunyuanYAW67YetAnotherWorkflowT2VI2VV2V_v41.zip
Mirrors
hunyuanYAW64YetAnotherWorkflowEasyT2VI2V_v41.zip
hunyuanYAW65YetAnotherWorkflowT2VI2VNative_v41.zip
hunyuanYAW66YetAnotherWorkflowT2VI2VNative_v41.zip
hunyuanYAWYetAnotherWorkflowEasyT2VI2V_v41.zip
hunyuanYAWYetAnotherWorkflowFastT2VI2V_v41.zip
hunyuanYAWYetAnotherWorkflowFastT2v_v41.zip
hunyuanYAWYetAnotherWorkflowFastT2v_v41.zip
hunyuanYAWYetAnotherWorkflowFast_v41.zip
hunyuanYAWYetAnotherWorkflowFast_v41.zip
hunyuanYAW67YetAnotherWorkflowT2VI2VV2V_v41.zip