


Hey this is my first ComfyUI workflow hope you enjoy it!
I've never shared a flow before so if it has problems please let me know.
Both of my images have the flow embedded in the image so you can simply drag and drop the image into ComfyUI and it should open up the flow but I've also included the json in a zip file. (The zip file is the purpose of this post)
If you use the metadata from my images you'll get my entire workflow which has nice settings to save CivitAI-compatible metadata -- This flow is a little messy but its not the purpose of this post so have mercy if you look at it lol
Install Requirements
1. UltralyticsDetectorProvider and FaceDeaitler - https://github.com/ltdrdata/ComfyUI-Impact-Pack
2. Eyes detection (Adetailer) - https://civarchive.com/models/150925?modelVersionId=168820
3. ADetailer (After Detailer) Lips Model - https://civarchive.com/models/142240/adetailer-after-detailer-lips-model
4 Put these Adetailer models in to the bbox folder. Mine was located at ...\ComfyUI_windows_portable\ComfyUI\models\ultralytics\bbox
How to use
Note: Feel free to bypass (CTRL+B is the hotkey for bypass) if you don't want to use one the detailers. For example, the Lips detailer is a little bit too much so I often turn it off.
Step 1
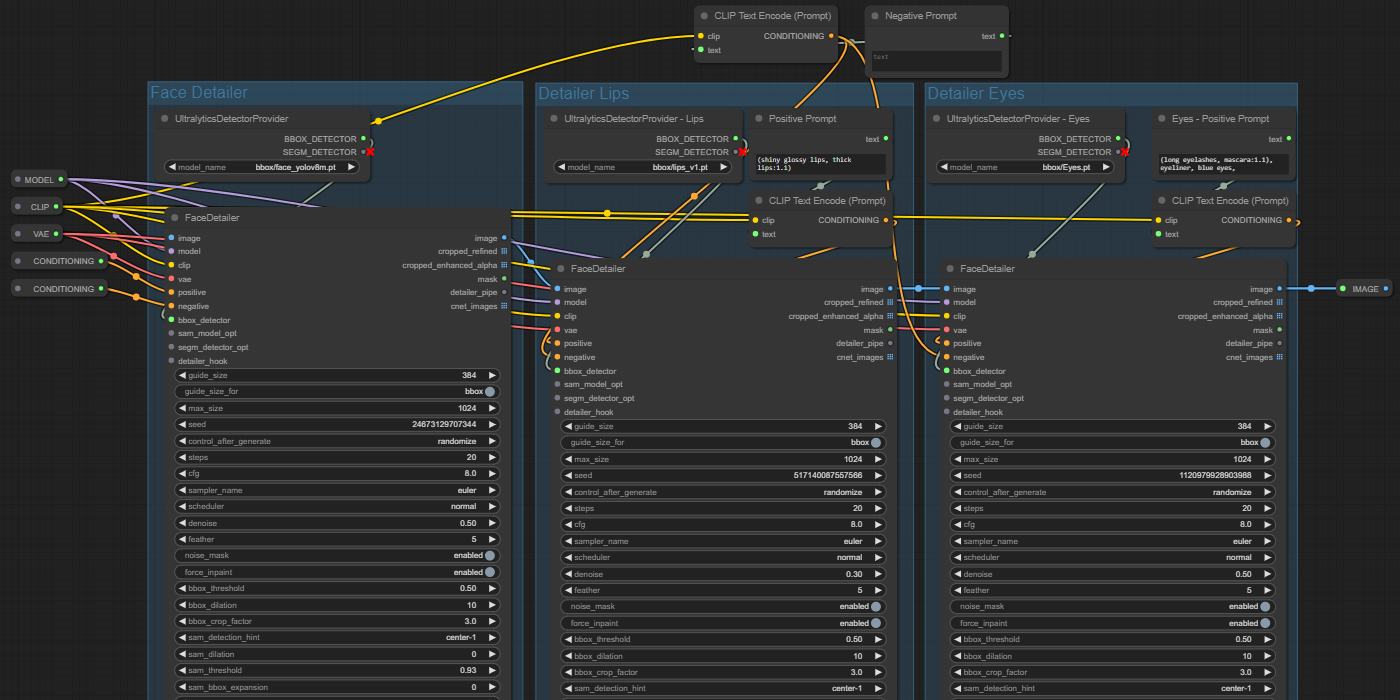
1. Please begin by connecting your existing flow to all the reroute nodes on the left
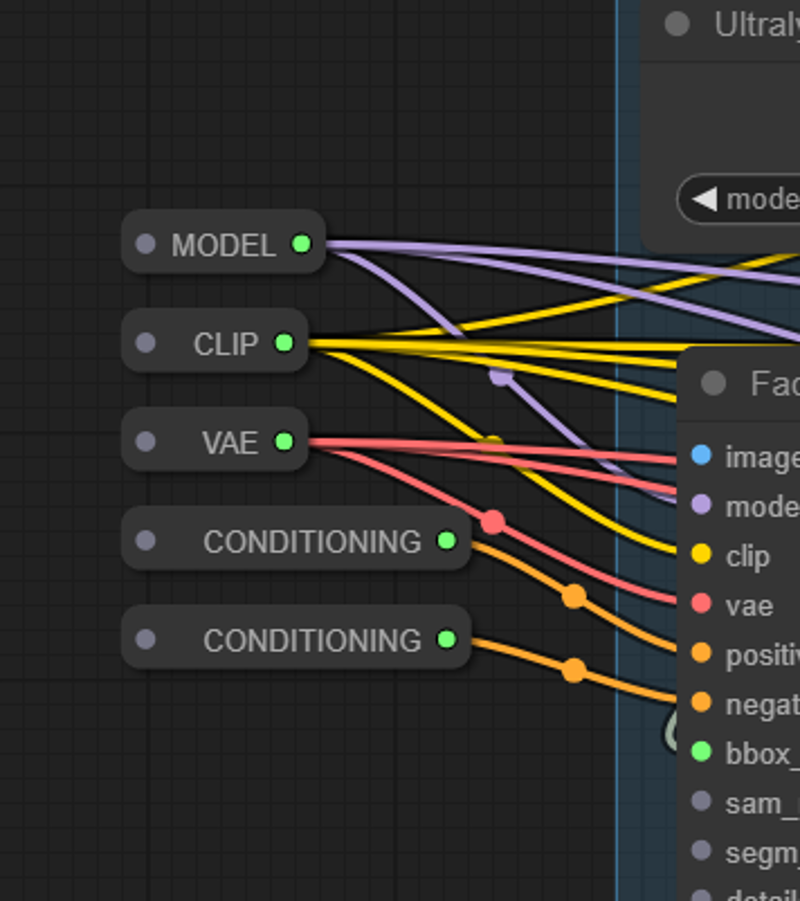
These are already setup to pass the model, clip, and vae to each of the Detailer nodes. I typically use the base image's Positive and Negative prompts for the Face detailer but you could use other prompts if you want to.
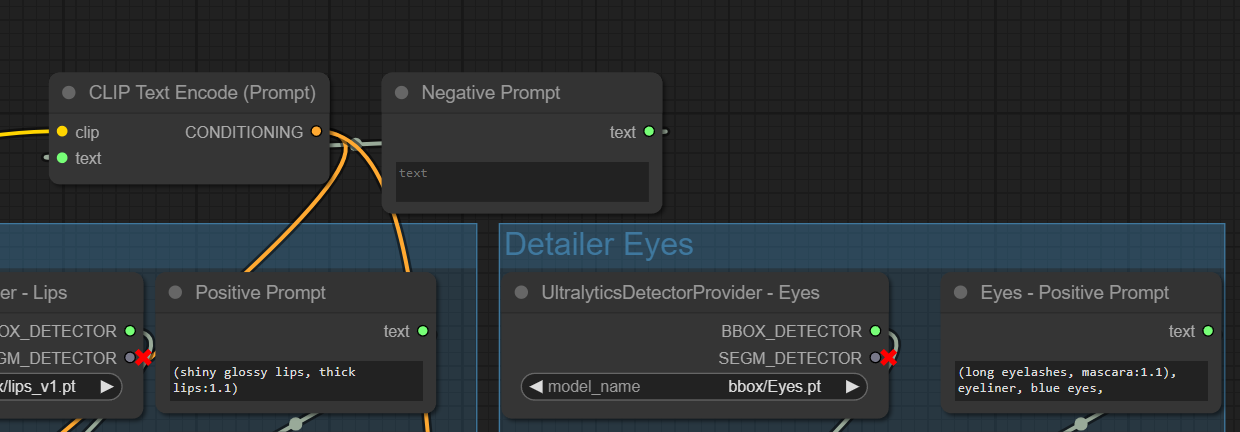
Step 2
2. Populate the Positive prompts for the Lips and Eyes. I left the Negative blank but you could populate it if you want. Right now the "blank" negative is applied to both Lips and Eyes because I don't use it. 
Step 3
3. Connect the final output to the rest of your flow. There is an "Image" reroute node at the end. This is simply to make it obvious where the final image comes out. You don't need to use it. I only included it for accessibility.

Description
FAQ
Comments (25)
This looks awesome but very challenging to setup for a beginner. I would love a json for the workflow!
EDIT: nvm, found them in the \ComfyUI-Impact-Pack-Main\test folder. Thank you!
Update: nevermind, I found them under the ComfyUI-Impact-Pack-Main\test
Thank you!
@aisorcerer1337
The json is the downloadable file.
Glad you found it! I can help if you have specific questions. Just let me know :D
This workflow is amazing. Very very very well done thank you for this! Has taken my gens to the next level
Awesome! Glad to hear it worked well for you!
ComfyUI is so powerful once you unlock its secrets and yet there are always new things to learn.
Today I learned a couple new workflows based on this page: https://promptingpixels.com/comfyui-workflows/
thanks for the workflow it really helped me a lot.
Glad you like it! Thanks for the feedback :)
I've tried adding a 4th one for feet, and now it just skips lips. I don't know what's causing this.
can you share your workflow with feet
@vihangasa14 Don't worry, I got it fixed. I just needed to change bbox_threshold.
@ZappaTrappa_AI Sorry I didnt reply before I must have lost it in my notifications.
Glad you got a fix! For Adetailer in general, you should adjust the threshold in case something goes wrong. I'd be curious if you needed to adjust the threshold for all generations or just some specific ones.
I'm getting an error when loading your workflow, here is the error
Works like charm, thank you very much!
Is there a way to combine the individual eyes, so its not working on them separately?
This workflow uses the BBox_Eyes pt to detect the region for the eyes so if you could find a replacement that detects both eyes at once then that would work.
I havent tested it but you could use something like this which detects both eyes together instead of individually https://civitai.com/models/330727/full-eyes-detection-adetailer
Again Disclaimer: I did a quick search and gave you the best looking result I haven't actually tested it.
I actually have tested it, I created hundred of pics.
Eyeful | Robust eye detection for Adetailer / ComfyUI - v2 - Paired | Other Detection | Civitai
Eyeful_v2-Paired.pt is the goat imo.
Thank you so much for this. Really helpful!
Glad it helps!
Hi! Maybe it's a stupid question, but I couldn't find a solution: sometimes (very often), the Detailer generates eyes quite well, but each eye per generation is different from the other in the pair. Has anyone managed to generate two almost identical eyes?
1. Try turning the denoise down. My workflow has it set to 0.3 which means it wont change the original too much.
2. If you want to change the original a lot you could try putting a Lora in to the prompt for the eyes so that the Lora controls the generation for both eyes to get a consistent style/look.
3. I’ll give you the info I gave the last person that asked this question. This info is complex so it may be too hard to use?
This workflow uses the BBox_Eyes pt to detect the region for the eyes so if you could find a replacement that detects both eyes at once then that would work.
I havent tested it but you could use something like this which detects both eyes together instead of individually https://civitai.com/models/330727/full-eyes-detection-adetailer
Again Disclaimer: I did a quick search and gave you the best looking result I haven't actually tested it.
@CitronLegacy Thank you for sharing! I just tested that the FULL EYE model works better. It rarely corrects problems with only one eye, and the consistency between the two eyes is better.
Although lowering the denoise down is also effective, it will result in insufficient correction and the details will not be as good.
My brain is extremely smooth so I have been pulling my hair trying to figure out how to setup multiple detailer nodes. Most of the other guides/workflows I've found are too complex for true newbies like me. This is an absolute godsend, thank you so much for sharing!
Thanks for sharing, i used your workflow to easily expand upon it, very simple and clear. Thank you!
clean and simple. ty
Excellent, exactly what I needed, I use it in ZIT