Hey everyone, I wanted to share a workflow I've been using to get incredibly precise results with Flux-Kontext LoRA training. This method is a game-changer for anyone struggling with dataset preparation.
The Core Idea: Work Backwards and Automate Everything
The standard approach to Flux-Kontext is to find a "before" image and then somehow create the "after" image (e.g., add an object, remove clothing). This is often the hardest part, especially if the AI is inconsistent in generating the specific change you want. Then you have to manually write all the sidecar text files.
My method is to reverse the process and automate the entire pipeline.
The Step-by-Step Workflow
Let's say you want to train a LoRA to remove a specific type of hat.
Create Your "After" Folder (The Dataset): First, gather or create a set of images where the subject is wearing the hat you want to target. This is your starting point and will become your Dataset folder.
Generate Your "Before" Folder (The Control Set) AND the Prompts: Now, take all the images from your Dataset folder and run them through a Flux-Kontext batch process. Your goal here is to undo the change. You would prompt it to "remove the hat," "give the person a clean hairstyle," etc. The clean, hatless images that come out are your Control images. The best part? The workflow automatically creates the necessary sidecar text file for every image pair as it goes.
The Benefit of "Cleaning": A huge advantage of this method is that you're training the model to go from a potentially flawed "after" image to a perfect "before" image. This often teaches the LoRA to remove AI artifacts and imperfections, resulting in a much cleaner final output.
Finalize and Train: You now have a perfectly paired set of Control and Dataset images, with all the sidecar text files written for you. Just add a few sample images, and you're ready to start training. The resulting LoRA will be highly specialized in performing that one specific task.
Making This Workflow Easier
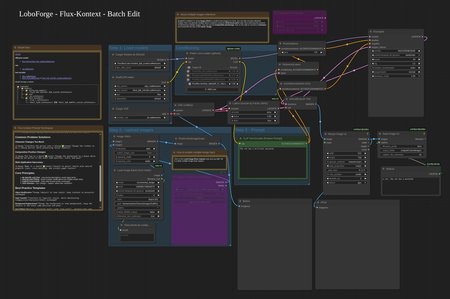
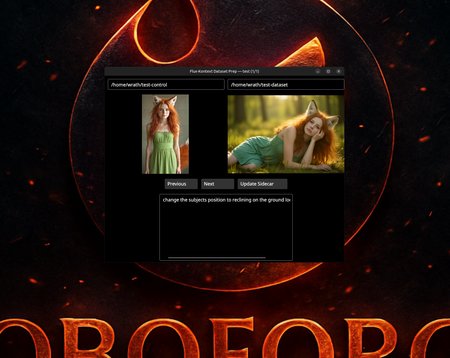
Managing the Control images, Dataset images, and their corresponding text files can be a headache. You have to constantly click back and forth to make sure image_a.jpg matches with image_b.jpg and prompt_a.txt.
To solve this, I developed a custom desktop application that lets you see all three at once in a single window. It’s a huge time-saver and completely removes the risk of mismatched files ruining a training run.
If you're interested in streamlining this workflow, this tool and my more in-depth tutorials are available for my supporters on Patreon. You can check it out at Patreon.com/LoboForge.
Here is the video demo: https://vimeo.com/manage/videos/1134804036?fl=pl&fe=vl
Also, if you would like the "Takeitoff" LoRA to remove clothing its also available on my patreon.
Give this workflow a try and let me know what kind of creative LoRAs you build with it
Description
Hey everyone, I wanted to share a workflow I've been using to get incredibly precise results with Flux-Kontext LoRA training. This method is a game-changer for anyone struggling with dataset preparation.
The Core Idea: Work Backwards and Automate Everything
The standard approach to Flux-Kontext is to find a "before" image and then somehow create the "after" image (e.g., add an object, remove clothing). This is often the hardest part, especially if the AI is inconsistent in generating the specific change you want. Then you have to manually write all the sidecar text files.
My method is to reverse the process and automate the entire pipeline.
The Step-by-Step Workflow
Let's say you want to train a LoRA to remove a specific type of hat.
Create Your "After" Folder (The Dataset): First, gather or create a set of images where the subject is wearing the hat you want to target. This is your starting point and will become your Dataset folder.
Generate Your "Before" Folder (The Control Set) AND the Prompts: Now, take all the images from your Dataset folder and run them through a Flux-Kontext batch process. Your goal here is to undo the change. You would prompt it to "remove the hat," "give the person a clean hairstyle," etc. The clean, hatless images that come out are your Control images. The best part? The workflow automatically creates the necessary sidecar text file for every image pair as it goes.
The Benefit of "Cleaning": A huge advantage of this method is that you're training the model to go from a potentially flawed "after" image to a perfect "before" image. This often teaches the LoRA to remove AI artifacts and imperfections, resulting in a much cleaner final output.
Finalize and Train: You now have a perfectly paired set of Control and Dataset images, with all the sidecar text files written for you. Just add a few sample images, and you're ready to start training. The resulting LoRA will be highly specialized in performing that one specific task.
Making This Workflow Easier
Managing the Control images, Dataset images, and their corresponding text files can be a headache. You have to constantly click back and forth to make sure image_a.jpg matches with image_b.jpg and prompt_a.txt.
To solve this, I developed a custom desktop application that lets you see all three at once in a single window. It’s a huge time-saver and completely removes the risk of mismatched files ruining a training run.
If you're interested in streamlining this workflow, this tool and the helper tool are available for my supporters on Patreon. You can check it out at Patreon.com/LoboForge.
Give this workflow a try and let me know what kind of creative LoRAs you build with it